Wednesday, December 31, 2014

End of the Year - How did I do?

Winda says: Bye 2014 - Can we go play now?
Wow - I can't believe it's the last day of 2014!!  Of course this means I have to decide how successful I was at my 2014 New Year's Resolutions...yikes! 

Here is a recap of what they were:
My 2014 Resolutions:

1. Start Blogging! - It's been far too long that we have been talking about doing this blog - we are doing it!

2. Get in Shape! - This is the year. I have to start working out and eating better. I am not expecting miracles, I would just really like to lose some weight and create a better eating habit.

3. Finish Projects! - We have so many things going on all the time, but this year we agreed we would finish all of our outstanding projects before starting any new ones.

I think I can say we were pretty successful with the first resolution - we have 243 posts published (well, 245 after tomorrows post lol) and over 8,500 pageviews in 2014!!  That seems pretty amazing to me - who knew we could follow through so well!  We are looking forward to adding new resolutions to this beginning, but we will cover those tomorrow.

The second resolution is a little harder for me to decide if I was successful or not.  I did (finally) find a workout that works for me (after trying a few different types/combos) and while I have managed to workout more often than not this year (I managed to workout unless I was sick, hurting too much or on vacation) - I still feel let down.  I have not lost a single pound - at all!  I did lose some inches, and the fatty areas seem to be moving around and thinning, but still - that stupid scale is my enemy!!  I get the whole fat to muscles, muscles weigh more blah blah blah...but I want the scale to say I weigh less!!  (Yes - I am pretty much a toddler throwing a fit about it.)  Lots of people have told me I am looking slimmer so at least that is a plus :)  I have been a little less successful finding a better eating habit - that's something I am working on for next year.

The final resolution is mostly a success.  We haven't started any more large projects this year - but we also didn't finish as much as I was hoping to.  We did have one project that we had to do - replacing our hot water heater - but it was finished in one weekend.  We have finished Eric's office and are continuing to work on the kitchen.  The kitchen is such a large project, but I am hopeful we are making good progress on it.  I just recently realised I never did an actual post on the finished office so I will see what I can do about getting some pictures together for that.  I thought the hot water would be neat too - but Eric says he can't see why it would interest anyone else.  We did some kind of cool upgrades so I may still convince him to share :)

So there you go, I feel like I did a pretty good job with my resolutions this year.  I definitely did better than I ever have before!  Comment and share your success or failure with your resolutions - we would love to hear them!

Have a great day!
Beth

Tuesday, December 30, 2014

Cheesecake for Christmas


I really enjoyed making this cheesecake. Not because of the recipe but because my husband helped me. He is a great a sous-chef. In fact he was too good, I'm going to need to step up my game. He meticulously made the crust. My cheesecake came out perfect because of it.

Cheesecake, in my opinion, is so easy to make. It's usually really hard to remember to take the ingredients out to come to room temperature.

Recipe

32 chocolate wafer cookies about 1 1/2 cup crumbs
1/4 cup melted butter
2 Tablespoon sugar

4-8oz block of cream cheese at room temperature
1/4 cup sugar
1 can 14 oz sweetened condensed milk
1/3 cup heavy cream
2 Tablespoons flour
2 teaspoon vanilla
3 eggs at room temperature

3/4 cup heavy whipping cream
1 1/2 cup semi-sweet chocolate chips

Crushed peppermint candies

Preheat oven to 350 degrees Fahrenheit. Set aside a springform pan. Heat around 4 cups of water to boiling. Set aside a big baking pan like a roasting pan.

Let's first make the crust. Crush cookies in a large plastic zip bag. You can use something heavy like a rolling pin or a can of food. When the crumbs are all crushed fine mix with sugar and butter. Press mixture into the pan and up the sides a little. Bake for 10 minutes then reduce oven to 300 degrees Fahrenheit. Let the crust cool for 10 minutes. Wrap pan with foil make sure it is pressed in real well so that water doesn't get inside from the water bath

In a large bowl beat cream cheese and sugar until fluffy. Slowly add sweetened condensed milk until just combined then add the heavy whipping cream, flour and vanilla. Add eggs one at a time beating after each addition. Pour cream cheese mixture over cooked crust.

Place pan in the roasting pan and carefully pour boiling water into the pan, not getting any on the cheesecake. Place roasting pan into the oven and bake for 1 hour and 15 minutes. Turn oven off and open the door at least 4 inches and let sit in there for 30 minutes. Pull out and let rest for 30 minutes on counter. Remove foil and wrap the top with plastic wrap. Now it's ready to go into the refrigerator for 6 hours.

When you're ready to serve make the ganache. Heat heavy whipping cream in a microwave safe bowl for 1 minute add chocolate chips mix until smooth about a minute.

Release collar of pan and pour ganache over the top smooth with an offset spatula or butter knife. Last sprinkle with crushed peppermint candies.

Finally it's ready to eat. This is a great base recipe you can easily adapt from here. For instance you can top with fresh raspberries and also heat up some raspberry jam and then pour on the cheesecake before the ganache.

Have fun and I hope you enjoy this as my family did!

Monday, December 29, 2014

Sourdough Rolls

 
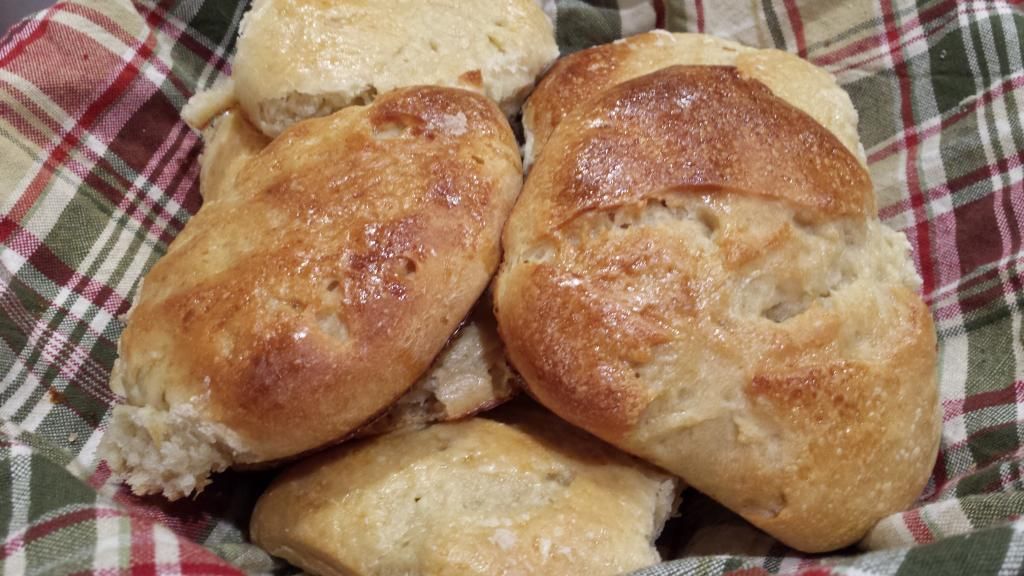
I was pretty excited to make these rolls - I even called my mom at midnight to tell her I was making them and how much I liked how the dough felt (if you make bread from scratch you know what I mean lol) and to thank her for giving me the sourdough starter.  I'm not sure where it all went wrong, or if it even did.  I made them for Christmas dinner and every one loved them - except me...What?!  I am hoping my tastebuds were just out of whack because they tasted like dirty socks to me, but everyone kept telling me they really liked them!!  Besides the taste - I was pretty disappointed with the texture - they were more like a dense bread instead of a fluffy inside with a crunchy shell.  This was mostly my fault - I knew they weren't going to turn out the way I wanted about halfway through the recipe but I didn't have time to find a new recipe and start over and I was fine with a more dense roll - but then I over-proofed them!  ( I thought I would use my bread proofing function on my oven, which made them rise a lot faster than I expected)  Erg...Well, I decided to share them anyways - maybe someone else will have better luck than me :)
 
Since I was home and I knew I wanted to make sourdough rolls, I pulled my starter out of the fridge 4 days beforehand.  I fed it around 1/2 cup each of flour and warm water every other day, and added just the 1/2 cup of flour the other days.  It seems like a lot, but I needed to double the recipe and needed to use 2 cups of starter.
 
Ingredients:
1 cup fresh sourdough starter
¼ cup brown sugar (I used white sugar)
¼ cup warm water
¼ cup melted butter
1¼ teaspoons sea salt
2-2½ cups all-purpose flour
1 egg
1-2 tablespoons water

In a mixing bowl combine starter, sugar, warm water, melted butter, and sea salt. Add flour slowly, mixed with a fork or spoon until it is thick and then switching to using your hand.  Knead the dough for around 10 min - until it is smooth and elastic.  (Every recipe will tell you to knead the dough on a floured surface - I actually use an extra large bowl to mix the dough and knead it right in the bowl - it seems to cut down on the amount of extra flour that is needed and it is not as messy).  Oil a bowl and place the kneaded dough into it, turning it to cover the dough.  Cover the bowl and place in a warm space to rise until doubled in size, 4-8 hours, or overnight.  
Divide the dough and roll into small balls.  Place into a buttered dish.  Cover and let rise until double, 4-8 hours (unless you use the bread proof function - then it's less than 2).  Preheat oven to 375ºF.  Make an egg wash by beating egg with water and brush the mixture evenly over the rolls.  Bake 20-25 minutes, or until golden brown.

Here is the link for the original recipe.
 
I hope you have better luck than I did - I will definitely be trying more sourdough recipes! :)
Beth

Wednesday, December 24, 2014

Christmas No-Bake Cookies


We were having a hard time deciding on what type of cookies we wanted to have for our cookie exchange this year - both of our favorite cookies have already been talked about!!  Then we came up with the idea to do No-Bake Cookies.  We have both been so busy, much like most people this time of year, and these are a great option if you are short on time!!  (You know - like if it's Christmas Eve and you have to make cookies for tomorrow and you just don't have the time ;)!!)


Felicia's No-Bake Chocolate Peppermint Cookies : 

1 stick (1/2 cup) butter
2 cups sugar
1/4 cup cocoa
1/2 cup milk
3 cups quick cook oats
1/2 - 3/4 cup crushed peppermint candies
1 teaspoon vanilla

In a large pan melt the butter, sugar, cocoa and milk over medium heat until it boils. Add oats, peppermint candies and vanilla - mix thoroughly.
It will look soupy but it will set after 20 minutes. Drop rounded spoonfuls on to a baking sheet lined with parchment or wax paper, I have non stick liners for my pans and that worked perfectly. 
I put in 3/4 cup of crushed peppermints, but I now think a 1/2 cup will work better - and I might put in a smidgen peppermint extract next time.

Beth's No-Bake Butterscotch Peanut Butter Cookies:

1/2 - 1 bag of butterscotch chips
1 cup peanut butter
6-7 cups corn flakes

Measure the corn flakes into a large bowl before starting.  In a double boiler (or in a bowl over a boiling pot of water), melt the butterscotch chips completely, stirring until it is smooth.  Add the peanut butter and continue to stir until the mixture is melted enough the pour off the spoon.  Carefully pour the hot mixture over the cornflakes and mix until they are evenly coated (I used 2 spatulas to toss the corn flakes).  Spoon the coated flakes onto parchment paper into cookie mounds - or spread it out and break it up after it has cooled.

We hope you enjoy these as much as we did!

Merry Christmas and Happy Holidays!!
Three Peas Create

Tuesday, December 23, 2014

Our Christmas Trees

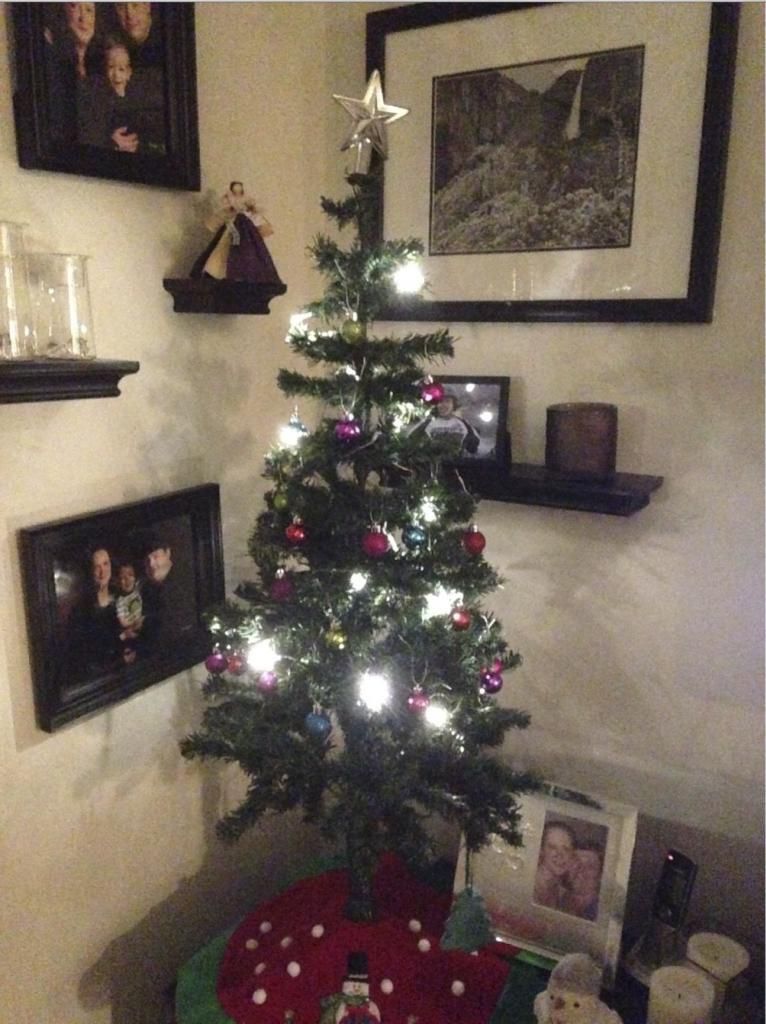
Here is a look at our Christmas Trees this year.  We had a lot of fun using new decorations!!

Beth's Tree:


I am so excited that I actually got to put my tree up this year!!  I wasn't able to get all of our ornaments out, but I did have fun making ornaments (even if they didn't turn out).  I wanted to keep it simple - and I think I did a pretty good job!  The angel doesn't really go with the rest of the tree, but I didn't want to buy a new one - I may own a few (like 3 or 4) and this was the best match.  I hope everyone had as much fun as I did getting their trees ready this year!

Felicia's Tree:


 This year we put up our little tree. Other than the skirt I had nothing to decorate it with. So I went to the store and found these cute battery operated low heat lights. I found a box of small ornaments in several colors and the other red and green. I let Xander pick which one. I let him decorate it too. Then I had to rearrange them, the cat has been playing with them and biting the strings until they break. Luckily they came with one whole extra string. So Hopefully I have them high enough or I will have to break out the twine if she gets them again. I have always like this little area, but now the tree has really made it my favorite spot!

Merry Christmas and Happy Holidays!
Three Peas Create


Monday, December 22, 2014

Making Our Own Ornaments

One of the best things about the holidays are all of the fun ornaments you can make!!  Here are the ornaments we made this year:

Felicia's Ornament:

I saw these on Pinterest and I had to make them! I shop at a local craft store in Redmond, and I've been there a lot recently! They have so many fun things to do right now. I wasn't sure if I could find the caps but luckily they had a bag of 50. I grabbed some paint, Mod Podge and brushes. I originally was going to cut out paper for the eyes, mouth and nose. I instead painted them with paint and nail polish. I also wanted them to sparkly so I found some chunky glitter. I'm so happy I got them! For the post I just used glue dots to stick them to the ribbon but when I mass produced them I want to use a hot glue gun. This one is going to be a gift for someone. The others will hopefully go on trees! 


Beth's Ornament(s):

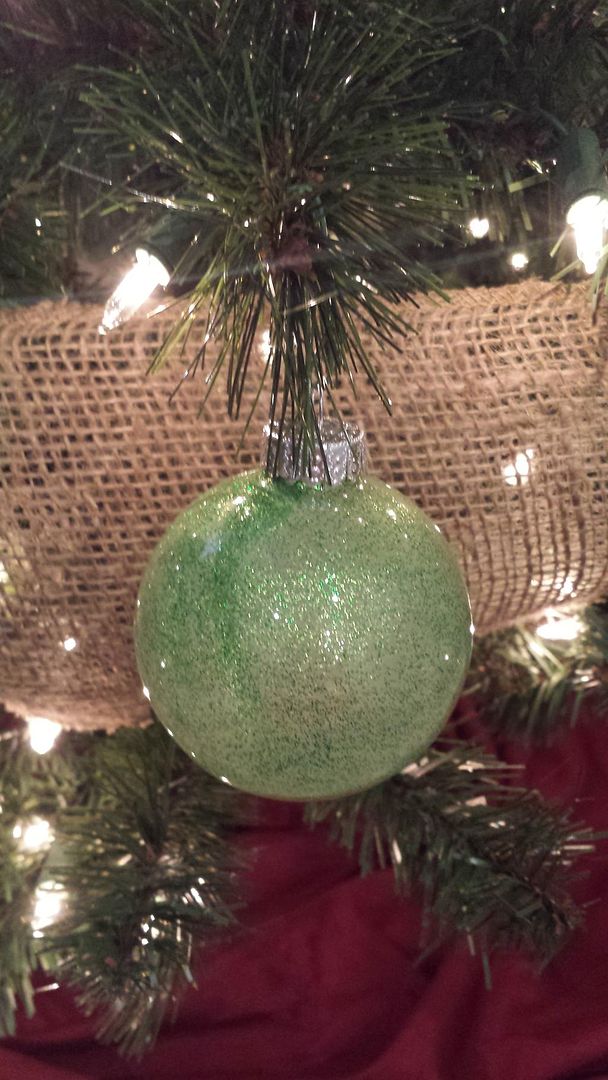
I actually made around 40 ornaments - but they were all made the same way.  I bought the clear ornaments from the craft store and used metallic and glitter paint to color them.  It was easy - just pour some paint inside the ornament and shake, smack and shimmy it around until the entire thing was coated (about 5 min each).  Then I left them to dry - I started them out right side up for a few hours, then flipped them over in cups for 24 hours.  Some still seemed wet so I left them right side up for an additional 24 hours.  They were really nice looking!!  I hung them all on the tree and I was really happy with them...anyone else hear the but coming?...I looked at them the next night and noticed a few were crackling.  I wasn't too worried about it - I just figured they must not have dried all the way.  Then I looked at them a week later...and most of the ornaments are either crackled or the paint just pooled on the bottom...almost a complete fail.  I was so bummed out!!  I don't know if it was because I used glitter paint and metallic paint, or if it is the temperature change since the tree is in the corner of outside walls, but I'm going to try it again with regular paint and see how it turns out.  Here is a small sample of what they ended up looking like:
 
 Not cool...not cool at all!
 
Has anyone else made ornaments this year?  Please comment and share your ideas!!
 
Merry Christmas and Happy Holidays!!
Three Peas Create
 

Thursday, December 18, 2014

Range Hood Decision

Range Hoods...not the most exciting topic today, but we are getting ready to work on our stove area and we are ordering the range hood tonight!  Yikes - I still have to decide between these two!!  I'm hoping someone has had experience with one of these brands and can tell me something about them.  If you have an opinion, leave a comment - I would love to hear what you think...


The one on the left is from GOLDEN-VANTAGE and the one on the right is from AKDY.  It was hard to find hoods that met the top two requirements - they needed to be convertible from ducted to ductless (just in case we can't run the ducting) and I wanted them to have LED lighting (so it would match the rest of our appliances).  I also didn't want to spend too much - I don't want to cheap out, but I don't want to sell a body part to afford it either.  They also both recieved decent reviews (I don't count the ones that give less stars because they couldn't figure out the directions - that is just lame). 

Both of these hoods fit my requirements - so now we just have to choose between them.  It was really hard to find straight front pictures of both - but the mock ups at least give us an idea of how they will look.

There you go - this what I've been working on inbetween getting ready for Christmas.  Are you ready?  I'm not!! (deep breathes)

Have a great day!
Beth 

Wednesday, December 17, 2014

Carrot Muffins

I finally made the recipe I talked about last week. I hope it works out. I'm not sure I will use Greek yogurt again. It was so thick, maybe I will put some honey in next time.

Recipe:

1 3/4 cup all purpose flour
1/2 cup sugar
1/2 teaspoon salt
3/4 teaspoon baking soda*
2 teaspoon baking powder
1 teaspoon cinnamon
1 cup plain Greek yogurt
4 Tablepoons melted butter, cooled.
1 large egg
2 cups of shredded carrots

Preheat oven to 375 degrees Fahrenheit. Grease or line a cup cake pan.

In a large bowl add flour, sugar, salt, baking powder and cinnamon, whisk to combine and make a well in the bottom. In a small bowl combine yogurt, butter and egg. Pour into well of flour mixture. Mix until just combined add carrots. Again mix until combined then scoop batter into cupcake wells. Bake for 30 minutes.


It did not work out! Plus they didn't brown, I'm thinking Baker's error! *I first forgot to add baking soda. Then I didn't see that the recipe called for banana which would have given it more body with the Greek yogurt. I added more yogurt but I'm thinking my honey idea will work. When I was mixing the batter it was like sand. So I added more yogurt and that resulted in over mixing which is a no-no in muffin batter. I hope that you have better luck than I did. Here's the Pin I used.

Tuesday, December 16, 2014

Panettone...I made it!!

Panettone is probably one of the top three items on my husbands favorite food list - he can eat an entire one himself and still ask me if I have more.  So every year I wait for it to be available and buy a few.  This year we were going to a Christmas Party and I offered to bring one for the party, but then I couldn't find them anywhere!!  So two days before the party I finally decided to see what it would take to make my own - I had no delusions that I would be able to make it taste as good as the real thing, but maybe it would still be tasty...

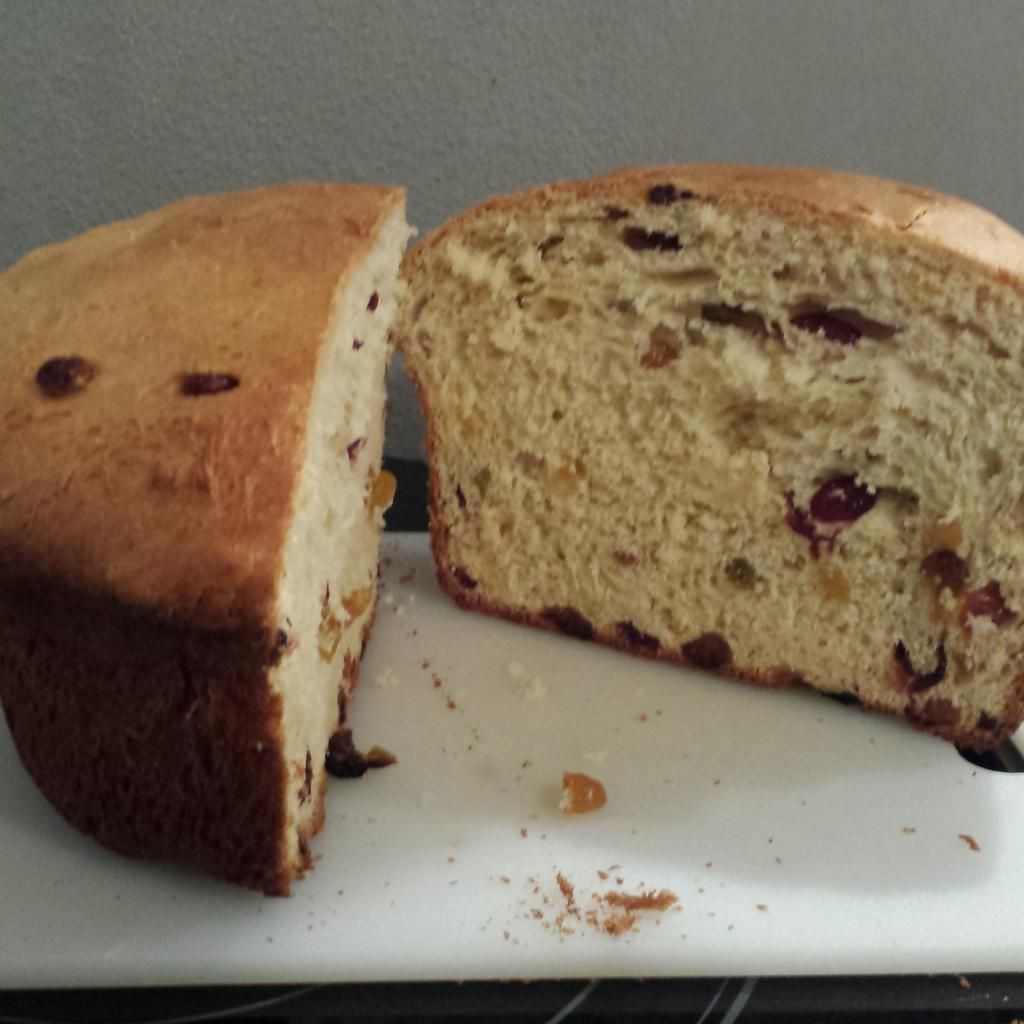
The first Panettone recipe I found seemed easy - a little too easy - but I thought why not?  So I threw it together the night before...it was beautiful, it looked good and had the fluffy flaky consistency I was hoping for...
 
...and it tasted like ham.  No joke - it really tasted like ham - what the ?!  Well - it was still warm, maybe that would make a difference - nope, it still tasted like ham several hours later.  I did add a bunch of different fruit instead of just the raisins (like the recipe called for) - maybe I made a bad combination?  I blamed it on the dried apricots, but it turned out it wasn't them (see below)...

Instead of giving up I decided to go ahead and make the second Panettone recipe, which called for a biga (where the yeast rises overnight - similar to a sourdough starter but not as developed).  I set the biga to rise overnight and then completed the recipe the next day.  This one was much better - it was close to the correct taste, but not as fluffy and flaky as the original Panettone would be.  I'm pretty sure that it was my fault because I forgot to add the additional yeast until the very end of the kneeding, so it didn't rise as well as I think it could have.  I will definitely be making it and continuing to tweak it until I get it right - especially since Eric knows I can make it any time of the year now!! 

I also made a second batch of the first recipe (you know - the one that tasted like ham...).  This time I just used the golden raisins the recipe called for and it still tasted like ham - I have no idea what the problem is!!

Luckily, I also finally found the store Panettone on Saturday morning and I bought three...One for the party and two for Eric.

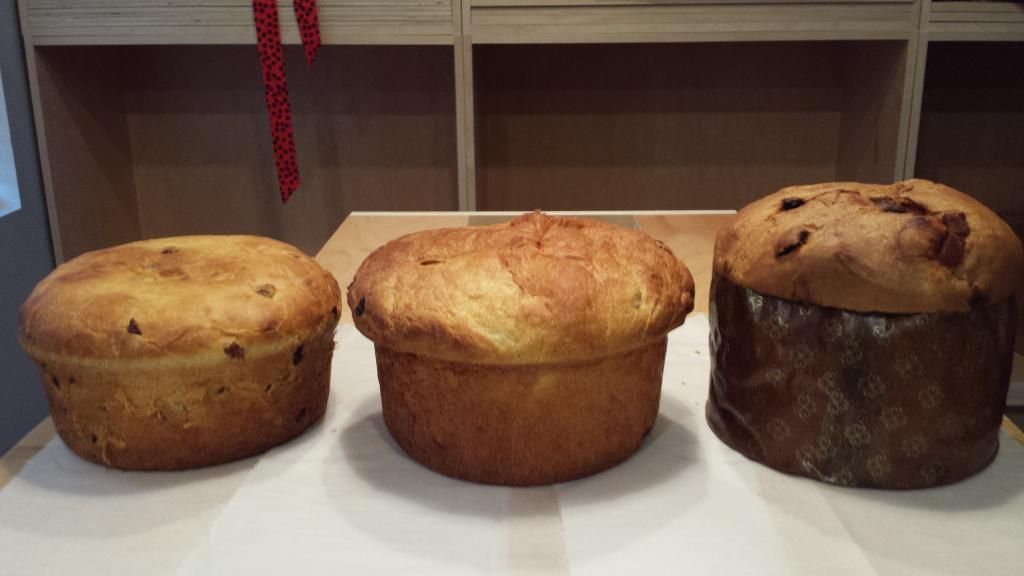
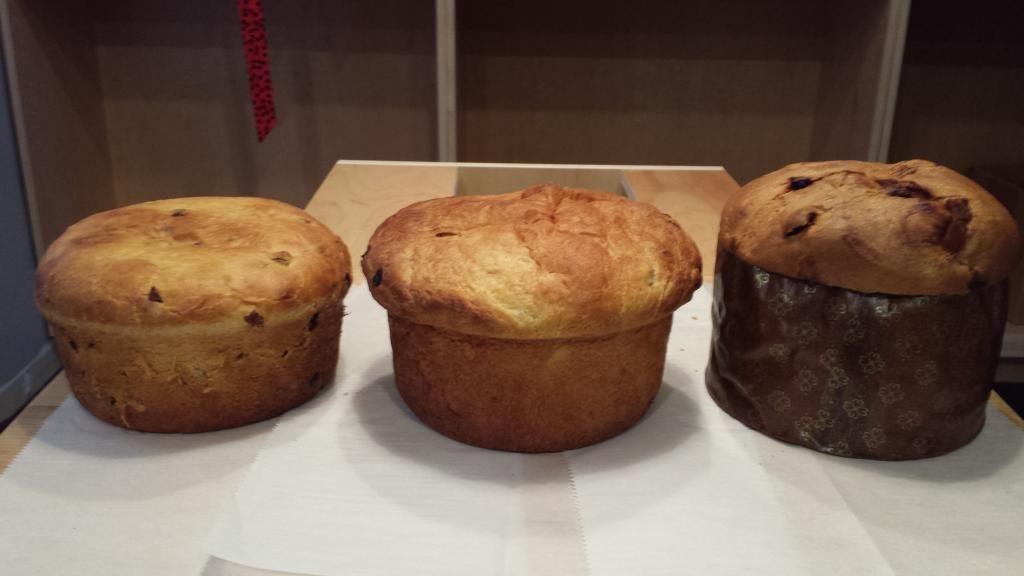
Here is a comparison:


The one on the left is the one that tasted more like the real thing, but see how much smaller it is.  The middle one is the one that tasted like ham, I give up on that one.  The one on the right is the store bought one.  I think I will try to find the wrappers to make itrise taller, my pans just aren't made to let it get that tall, so hopefully next time I can get the right consistency!

Here is my last thought on it: If you like to bake and experiment - definitely give this recipe a try!  There are so many variations, and it is easy - it just requires time to rise a few times.

Have a great day!
Beth

Monday, December 15, 2014

Veggie Macaroni and Cheese


Here's a quick stove top macaroni and cheese. I added peas and carrots too! I don't normally use recipes from Alton Brown. They always seem complicated. Now I can't say that any more. I found this Pin and decided to give it a try.

Recipe:

8 oz elbow macaroni
1 cup frozen peas and diced carrots
6 oz evoprated milk
Siracha sauce to your liking
3/4 teaspoon dry mustard
Pinch of salt
Pepper to your liking
10 oz cheddar cheese shredded

Bring a medium pot of water to a boil. Add macaroni cook as directed. My peas and carrots took 5 min so I added those in with the pasta and added a minute to the timer so that in can get back up to a boil. Mix milk, seasonings and hot sauce together set aside. Drain pasta and veggies. Turn heat down to low pour milk mixture and in little bunches add the cheese and stir until melted. Serve and enjoy!

I noticed I didn't add butter (I know I'm as shocked as you are) after draining but it worked with out it. If you want you can add 4 tablespoons of butter after you drain (per original recipe) the pasta and veggies.

Have a great Monday!

Thursday, December 11, 2014

What's my deal!


I don't know what my deal is lately! I have forgotten to post here a couple times now. I had an idea to make carrot breakfast muffins. I think I will leave that for next Monday. My day got away from me today. I have been dealing with some stuff that makes my mind wander. Head in the skies! We found out a wonderful lady that works at my son's therapist office is leaving for a new job. We would see her smiling face every time we came in. She shared a love of baking with me. Among other things I have started driving Xander to school and picking him up. Having him ride the bus gave me a big chunk of time during the day. I don't mind one bit, we get to talk and sing back and forth. Plus there's enough time for lunch now. I'm learning to make quick work of my time! It's definetly keeping me on my toes!

Tonight we are to have a crazy storm. I'm hoping it doesn't leave much damage (knock on wood.) I say this because we have an appointment in the morning for ABA therapy. We are having to say goodby, at least for a little bit, to Xander's BI (behavioral interventionist,) she is going on maternity leave to have a little boy of her own. We've grown attached to her. Tomorrow will be sad and fun. We are going to make sugar cookies and laugh and cry..a lot! She has been with us for almost a year now. My son has improved so much with her help. We'll miss you Ms V!

I'm hoping to update here with pictures of our decorated cookies!

I hope you have a wonderful weekend. 

Wednesday, December 10, 2014

It's Officially Christmas

I have been working on some fun things for Christmas - unfortunately I can't share any of them since I am using them for a few future posts with the other Peas - and there may be a few christmas presents mixed in too.  I don't want to ruin the surprise!! 

Since I have been focusing on those projects I don't have anything fun to share except this...

  
This probably isn't as exciting for you as it is for me - it is the first time since we bought our house that we have gotten our big tree out to decorate!!  I am so excited!!  One of the things I have been working on this week is making ornaments - we got the tree out of the black hole, but the decorations may be lost forever...
 
I can't wait to get it all decked out - maybe tonight?!
 
Have a great day!
Beth
 
p.s. The top is all smooshed so the angel will fit - it looks funny but it's temporary. :)
 

Tuesday, December 9, 2014

Chicken & Wild Rice Soup


Best soup ever!! I really like soup, I could eat it everyday! This morning I almost had some for breakfast! I ended up making eggs. Come lunch time I will have a bowl of soup. I Pinned it awhile ago, it kept popping in my head. Especially since the colder weather! Prep wasn't too bad either. I did do some short cuts and some upgrades.

Recipe

1 onion diced
2 medium Carrots diced
2 celery diced
2 tablespoons butter
1 clove garlic minced
Fresh thyme, a few stalks put in cheese cloth and tied or remove from stalks and thrown right in!
4 1/2 cups of chicken broth (I use better than bouillon)
1 pound chicken breast cut into cubes about 1 inch
1 box quick cook wild rice mix with seasonings
6 tablespoons butter
1/2 cup flour
1 cup milk
1/2 cup heavy cream

Prepare you rice mix as instructed. I went even easier and made mine in the microwave, I have a pretty good microwave cooker. It took about 8 minutes to finish.

In a large pot melt 2 tablespoons butter at medium heat. Add onion, carrots and celery cook for about 4 minutes. Add garlic and let cook for about 30 seconds add broth. Turn up the heat to med-high bring broth mixture to a small boil then cover and reduce back down to medium. Let cook for about 8-10 minutes until chicken is cooked. While that is cooking in a small pot melt 6 tablespoons butter over medium heat, add flour and contiue to whisk about a minute. Slowly add milk to the flour mixture continue whisking for about 5 minutes or until thickened. Add both rice and milk mixture to the soup. Last add heavy cream and serve with garlic French bread!


My husband doesn't usually like soup so when I find one he does I get really excited! Now this will not replace his favorites but I can definitely throw this in now and then! I hope enjoy this recipe let us know if you make it!


Monday, December 8, 2014

Sourdough Bread from a Bread Machine


I am so happy that my mom gave me some of her sourdough starter - I have already used it twice and will hopefully be making bread every weekend with it!!  At first, I thought I was crazy to think about using the starter in a bread machine, but I was pleasantly surprised with the results.  It isn't as strong of a sourdough taste as some people would like, but since it is mild it is slightly more versatile.  The other 'odd' thing is that you still add yeast so it will be able to rise in the time frame your bread machine uses - traditionally it can take up to 'all day' for handmade sourdough bread to rise using only the starter.  I actually have 2 recipes to share, the first one is the one I prefer (the picture above) and the second is Eric's favorite (as he reminded me several times when eating the one above lol).  Follow the links for the original site information.

Plain and Simple Sourdough Bread

3/4 cup warm water (110 degrees or so)
1 cup sourdough starter (already proofed - see below)
2 2/3 cup flour
1/2-1 tsp sugar (I added this to the recipe, it will feed your yeast and rise better but it isn't necessary)
1 1/2 tsp yeast (in center of flour mound)
1 1/2 tsp salt (sprinkled around the outer edge of the flour mound)

Crusty Sourdough Bread

1/2 cup warm water (110 degrees or so)
1 cup sourdough starter (already proofed - see below)
3 cup flour
2 Tbsp sugar (I added this to the recipe, it will feed your yeast and rise better but it isn't necessary)
1 tsp yeast (in center of flour mound)
1 1/2 tsp salt (sprinkled around the outer edge of the flour mound)

Add the ingredients in the order listed to your bread machine. Choose White, Light Crust, Rapid and Small Loaf as your settings. 

As a side note:  I wasn't sure I would be able to take care of my starter as well as it needed, so I opted to put mine in the fridge.  This allows me to feed it once a week instead of every day - I don't even feed myself every day!  So when I want to use it I have to proof it before hand -  this definitely takes time and requires planning.  When I know I want to make bread, I pull my container out of the fridge and add 1/2 cup each of warm water and flour.  Stir the starter until well combined (don't use a metal utensil).  Let sit in a warm area for 12 hours (yep - 12 hours), stir in an additional 1/4 cup of warm water and flour, and let it proof for at least another hour.  Once you see lots of happy bubbles you are good to go.  Remove the amount needed and put the container back into the fridge for another day.

Have a great day!
Beth


Wednesday, December 3, 2014

Chicken Parmesan


I'm So glad I tried this recipe. The family loved it. So it's going in my dinner rotation.  I don't have too many of those. My husband likes a handful of recipes so when I find something that works I get excited. This recipe is pretty quick. You can even prepare it the day before or the morning of. While it baked it gave me time to cook pasta and steam broccoli.

There's something to be said about simple recipes. That's probably why it taste so good. I used jarred pasta sauce, I would like to make my own next time.

Ingredients:

4 thin chicken breast
Panko bread crumbs
1 egg
2 Tablespoons milk
oil for frying pan
1 jar tomato sauce
Shredded cheese, mozzarella and Parmesan are standard but I used a Swiss blend.

Preheat oven to 375 degree Fahrenheit. Set aside a 9 by 13 baking dish.

You will need two bowls or plates which ever you prefer. In one bowl pour the bread crumbs in the other break the egg and pour in the milk and mix it around. I like really thin so I laid out the chicken breast and put a piece of plastic wrap over them. Then I got a tenderizer and flattened them more. Now that everything is prepped, heat oil in a large pan. Back to the chicken, first put the chicken in the egg mixture then in the bread crumbs and last into the pan. I have a huge family pan I was able to cook three if you have a standard I would do two at a time. When all the chicken is browned on both sides then add them in the baking pan. Pour the tomato pasta sauce over the chicken spinkle cheese on top! Bake for 40 minutes, next time I'm going to check on it about 30 minutes. You want the cheese melted and the sauce bubbly. I served it with pasta and broccoli which I made while the chicken was baking.

I hope you enjoy this as we did!

Tuesday, December 2, 2014

Friendsgiving!

A note from Beth:  Well, I have to apologize.  I fully intended to post this on Wednesday - BEFORE Thanksgiving - but I had a hectic day and just never managed to get it finished.  Then I got sick, and the next thing I know it's Tuesday!  So, it's a little late - but at least it's finally here - our Thanksgiving Luncheon (otherwise known as Friendsgiving)...

We wanted to stick with traditional flavors, but make things more fingerfoodish.  We had a few things that were hits, and a few things we want to impove for next time - but overall it was a fun and yummy time!

The top two items are Turkey Meat Pies, which don't have a gravy like a Pot Pie.  We made some with pie crust and some with puff pastry - just to see the difference.  They were equally liked so you can choose your favorite!!  Inside they have turkey, mashed potatoes and sauteed onions, celery and carrots.  We layered the three ingredients one side then folded the other side over to make a pie.  We brushed them with an egg solution and baked them at 350 degrees.  Since everything inside was already cooked, we just cooked them until the outside looked golden.  The great thing about these is there is no set recipe for what you use inside - they are great for leftovers after the 'big' day.

The next tray has a combo of Yam Bites, Stuffing Bites and Cranberry Wontons. 

The Yam Bites were a huge hit - all the kids wanted more - and even a few adults said they tasted like candy!  We left some plain (with salt & pepper), but the ones with melted marshmallows went fast.  They were easy to make ahead.  Place uncooked yams in water on med-low for 20, then cool to the touch.  Slice to any size, brush with butter and sprinkle with either brown sugar or salt and pepper.  Bake for 20-25 min.  Once you are ready to serve, top the sweet ones with a mini marshmallow and bake until metled and browned.  Use a toothpick for easy eating. 

The Stuffing Bites are super easy too - make your favorite stuffing, scoop into balls and bake at 350 degrees until browned.  We cooked these a little too long, so they were a little dry, but still yummy. 

The Cranberry Wontons were an expirement - I was craving the yumminess we had when we made the Wonton Bats for Halloween.  These didn't turn out as well as I was hoping.  We mixed cranberry sauce and cream cheese, but it was a little too liquidy.  They tasted good, but most of the mixture oozed out when we cooked them.  I definitely want to try it again - I think if the cream cheese mixture was more solid it would be a lot better.

Finally, we have Mini Pumpkin Pies.  These were so good!  It's also the only thing that needs a recipe!!  They're a little more work than making one big pie - but soo worth it!

2 pie sheets store bought or homemade
1 cup pumpkin puree
1/3 cup evaporated milk
1/4 cup sugar
2 eggs
1 teaspoon cinnamon.

Preheat oven 375 degrees Fahrenheit.
Cut pie dough with 2 2/1 inch circle cutter. Place in the wells of a mini muffin pan. Use a shaper that helps push dough down, or you can use your fingers just be gentle to not tear the dough. In a small bowl mix the remaining ingredients and use a tablespoon to fill your dough with the pumpkin pie mixture. Bake for 20-25 minutes. Let cool before eating.
*I had remaining dough so I cut out mini leaves and baked them separately until browned. I placed them on top after the pies had cooled. Also the pies are delicious with whip cream!  (Felicia)    
There you go - our Thanksgiving Luncheon (Finally!)
We hope you had a great Thanksgiving with your families and friends - we did!!
The Three Peas

Monday, December 1, 2014

Croissant Breakfast Pudding


I bought some mini croissants so that I can make a breakfast casserole. Awhile ago I would make this wonderful sweet breakfast casserole it was so perfect. Of course I can't find the recipe and everyone I made it for doesn't have it either. I'm still searching for it! This one is pretty good in the mean time.

I didn't let it sit in the refrigerator like the recipe instructed and I think I prefer it this way. I know traditional bread puddings come out like one congealed piece hence the pudding name. I like having the bread be defined in each bite.

Pretty simple instructions and my favorite part is that it has a crumb topping!

Instructions
6 small or 3 large croissants
3/4 cup half and half
3 Tablespoons plain Greek yogurt
1/4 cup sugar
1 Tablespoon vanilla
3 eggs
Pinch of salt
3 Tablespoon of butter cold and cubed
1/4 cup dark brown sugar
1/2 teaspoon cinnamon (you can add more or less to your liking)
3 Tablespoon flour

Preheat oven to 350 degrees Fahrenheit

Grease a small baking pan with butter. Tear up croissant into small pieces in the pan. In a small bowl whisk half and half, yogurt, sugar, vanilla, eggs and salt. Pour over croissants and push down the floating pieces to help soak them in. In a small bowl mix sugar, cinnamon and flour, add cubed butter and work it in with your fingers into smallish crumbs. Bake for 30-40 minutes. I checked mine at 30 and added 6 minutes, I like my topping to be a bit crunchy!


Serve with fresh fruit if you like!

I hope you enjoy this!

Tuesday, November 25, 2014

Centerpiece for Fall


Only 2 more days to Thanksgiving!!  I am excited and a little sad it came up so fast :)  I had some big plans for my table decor this year, but we have had so many things going on this month that I didn't quite make them happen.  I did get the basic components I needed, but I haven't had time to add the extra touches.  I wanted to continue my 'Rustic Glamour' theme from Halloween - so there is some glitter and metallic paint just waiting to be used!  I am still hoping I'll get a big burst of energy and will get them done before the big day, but if not there's always next year!!  I did have a chance to put this centerpiece together - and I like the simplicity (but I miss the glamour).  The extra large jars are awesome.  I was originally planning to have the pillars in them - turns out the opening wasn't quite large enough (really - they were an 1/8" too small!!).  I used a mixture of acorns, cranberries, pumpkins and pinecones to bring in the 'rustic' - as well as the burlap and lace. 
 
Overall I am happy with how my centerpiece turned out. 
 
Tomorrow is our post about the food we made for our luncheon - I can't wait to share!
Have a great day!
Beth


Monday, November 24, 2014

Paper Turkeys


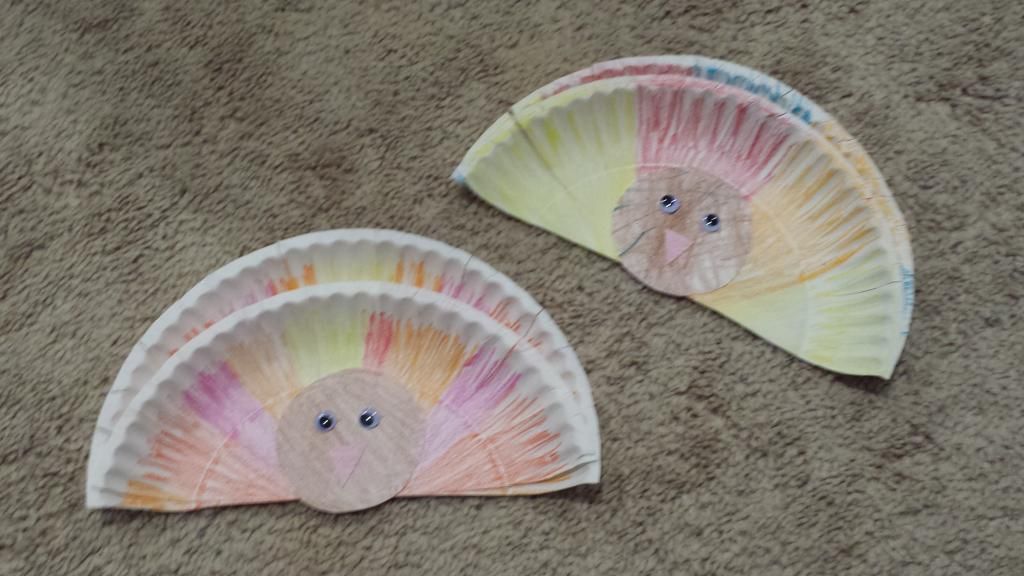
This weekend we had a Thanksgiving Luncheon at my house, which we will post about on Wednesday, and I wanted to have a fun craft for the 3 kids to do.  I loved how simple these paper turkeys were, and I think kids of any age can do them and have fun!  We were a little late eating so we didn't get to sit down with the kids for very long and do this (and when we tried Winda kept trying to give kisses and lay on the crayons), so these are mostly adult made, but they had fun picking colors and playing with them after they were done :)

To make them:
Color your uncoated paper plate with crayons, markers or anything else you would like (I think tissue squares would have been fun, but they went home before we made these).  Color one whole plate for the tail, and a circle or body shape for the face/body.  You can get as detailed as you want - add a body shape, arms/legs, or more face features.  Cut the body parts out and attach together with double-sided tape or glue.  Add googly eyes.  Cut the tail plate in half - but cut it off-centered so they will be different heights.  Attach all three pieces together (2 tail pieces and the body/head).  You can also make cuts to flair the ends (I did this but you can't really tell unless you move them).  Have fun!!

Whose excited for Thanksgiving?  This girl is!!
Have a great day!
Beth

Friday, November 21, 2014

We're Thankful!


I found this handy dandy pumpkin wire frame. I just love any thing chicken wire! I really enjoy the Thanksgiving tradition of saying what we are thankful for. I think it's good to do this through out the year. For now I'm going to start with this to help my son to remember to give thanks. What's great is that he picked it out in the store. So he is already into it!

I picked out everything else that went with it. Got it home and tried to use regular o'l chalk on the sign and it wasn't showing up at all. So today, when I should have been posting, I went back to the craft store and found a wet chalk pen and that worked great!

I'm sorry I'm posting so late. I have a list of things, don't we all, I want to do or start. Every time I would begin something I would figure out I don't have a key component. I really wanted to be sure this was up for a little while so that we add to it as we go.

Next week we will have something special to show you for Thanksgiving. So check back with us. Have a great weekend!

Thursday, November 20, 2014

Kitchen Inspiration

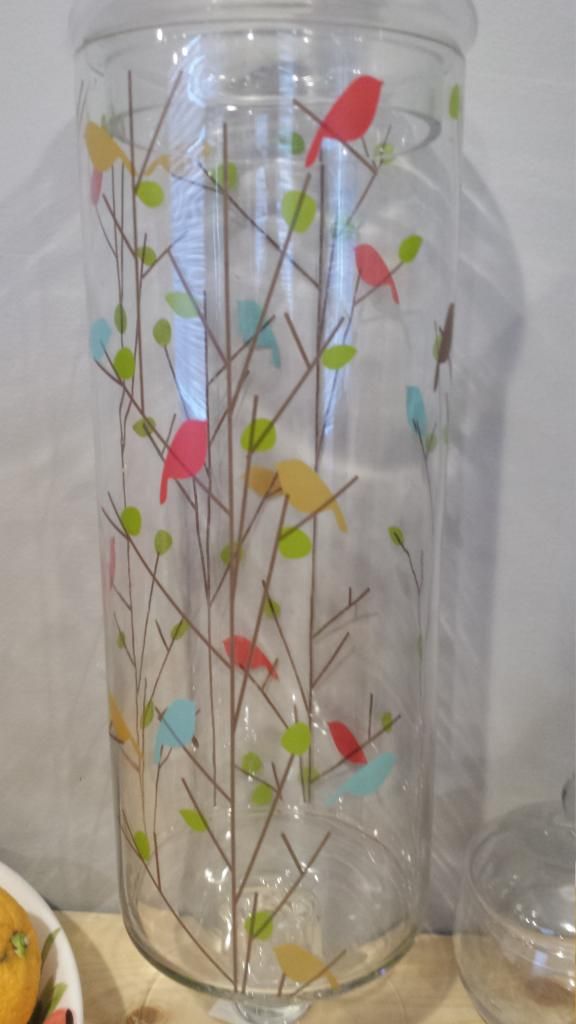
    I found this jar a few months ago and I loved it at first sight.  I almost didn't buy it since I was looking for a wedding shower gift at the time, but I couldn't leave it behind.  Luckily, it was only $15 (at my favorite, can't leave without something home store - HomeGoods) - so I took it out of my lunch money budget so I wouldn't feel guilty lol.  I am sure most of you know I have a "little" bird obsession, and I like how simple this design is.  I also really like the colors used, so I decided to use it as my kitchen inspiration.  I can use all the colors at once, or alternate them how ever I feel like.  I think they look nice with the gray walls behind the jar, and I don't think they will clash with anything I plan to do in the living room.  I still haven't decide if I'm going to incorpoate more birds into the kitchen decor or not, but I think if I do it will be in small doses.  I don't want to known as the bird lady!!  My current plan is to fill the jar with cupcake holders, but it will be a while before I can actually put it in the 'right' spot so that may change.  For now, I am happy with the little smile it brings me every time I see it in my kitchen, and I've already bought a few things to tie in the colors.  I can't wait to finally see a finished kitchen!!
 
Have a great day!
Beth   

Wednesday, November 19, 2014

Out of this world granola bars


I'm in trouble! These are so good! I want to double my batch next time, but I can't eat a double batch by myself...can I? No definitely not. 

My kiddo wanted granola bars. So I set out for a good recipe. I wanted a recipe with crispy rice cereal I finally found this. I'm so glad I found this recipe. I wanted a soft bar. I used dark brown sugar and I didn't have mini chocolate chips. I don't think it really needs it. So I'm going to add some other yummy things like ground flax seed, wheat germ, seeds or nuts. 

Here's my version of the recipe.

Ingredients
1/4 cup unsalted butter
1/4 cup honey (I used wildflower honey)
1/3 cup dark brown sugar
2 cups quick cook oats (I prefer the smaller cuts when it comes to bars)
1 cup crispy rice cereal
1/2 teaspoon vanilla
Handfuls of toppings such as mini chocolate chips or mini candy coated chocolate 

Grease a medium baking pan or sheet pan. In a medium bowl pour in oats and rice cereal. In a small pan over medium heat bring butter, honey and sugar until bubbles form. Then reduce to low and cook for 2 minutes. Add vanilla then pour butter mixture over oat mixture stir until all is combined. Press into prepared pan and let sit for 2 hours. I cheated towards the end and I put them in the refrigerator for a bit. Then I cut them into bars and ate a few!

This is so much better than any store bought bar you can buy. I hope you enjoy it as much as we do!

Monday, November 17, 2014

Saying Goodbye

This is a bit of a tear-jerker so if you are at work or somewhere you might not want to be crying - stop reading and come back later...I'll understand.
 
 
We said goodbye to Pinky, our cat, this weekend.  It is always hard to lose an animal, but he lived a good life and I find comfort in that.  He was a crazy, quirky, fierce cat - but he was also loyal, friendly, fearless and loving.  He could make you want to pull your hair out and laugh at the same time with the crazy antics he got up to.  For most of the first 5 years we had him, he was an outdoor cat.  He would be gone all day, but still come running when I called him.  I've seen him fight a deer and win (while tethered to a tree), I once caught him playing with an unknown paw (I like to assume he found it), and he would often walk on the top of the (3 story) house and look in the skylights.  After he was diagnosed with FIV 13 years ago, he became an indoor cat - and after a year of adjustment he settled into a semi-pampered life.  His was the only cat i knew who was leash trained - so at least he still got to go outside sometimes.  He loved sitting in the windows and yelling at the birds (to the window blinds' detriment), laying in the sunshine and eating (lots of eating).  He also loved trying to explore - he was always sure there was something we were hiding from him behind closed doors - we always had to double check where he was before leaving the house to make sure we hadn't locked him in a closet or room.  He once climbed a mountain of boxes and jumped 2 feet into a hole in our ceiling - I had to bribe him with food to get him to come out!  He was friendly to everyone, always wanting to get and give some petting.  He was tolerent of dogs and kids - and would even play with them if he felt like it.  He was everyone's best friend.  He was always happy to see you - even more happy if you had treats with you.  He would try to steal food off your plate using his paw to sneak around from the side, while trying to look innocent.  He loved soft blankets and pillows, but his favorite place to sleep was his pizza box.  He was frustrating and fun and he completed our family.  We are all sad that it was his time, but I am grateful that I was able to spend extra time with him and give him a peaceful send off.  He had a good life for 18 years and he will always be loved. 

Pinky will be missed, but we will carry him in our hearts and memories forever.

xo Beth

Pineapple casserole


I'm a huge fan of apple and cheese, so I'm sure I will love this as well. My son wanted to have pineapple upside down cake last night. Of course it was too late to make it, he said it right before going to bed, he's so funny! Well that got me thinking! I really wanted to make a pineapple recipe. I make Paula Deen's Pineapple gooey cake, oh boy is that delicious! Now I want to that too! Oh well, next time I will!

This is a southern dish, if you haven't guessed yet I love southern comfort food. I was thinking of having it with chicken. I was reading up on what is usually served with it. Ham is paired with it, which makes sense. So now I wished I had pork chops! I'm serving this with lunch so I'm glad I have chicken, I think it will be lighter.

Ingredients:

1/2 cup sugar
2 1/2 tablespoon flour
3/4 cup shredded cheese
1 20oz can crushed pineapple
3/4 cup crushed butter crackers
1 stick of melted butter

In a medium bowl mix sugar and flour. Add cheese and pineapple, mix well. Pour into a greased baking dish, I use a small 4 cup capacity stoneware dish. Next pour crushed butter crackers on, and last pour melted butter on top. Bake at 350 degrees Fahrenheit for 30 degrees.


Enjoy!

Friday, November 14, 2014

Freezing but no snow...yet


It has been so cold here lately! We have been in high 20's low 30's where we live in Washington. It has been clear and sunny, just very cold. Beth, Jamie and I have been debating whether it should snow or not. Jamie and I feel if it's this cold it should snow. Beth thinks it shouldn't because she still has to go to work and drive in it. I don't blame her! When it is this cold and if it snows I like to be at home safe and sound. Especially with a warm drink, like a mocha, and a blanket. I don't know about you, my favorite snow moment is just as it turns dark. You walk outside and look around and see the warm glow from homes and snow falling it is so quite!

What's your favorite winter or snow moment you look forward to?

We hope you all have a wonderful weekend!

Thursday, November 13, 2014

Turkey Craft with Kids


My son, Xander, has been asking to do a craft. I couldn't think of something. I have this handy dandy box of precut square tissue paper. They are perfect for little hands. Finally I thought a turkey would be fun and currant.

Their fathers sit pretty far back behind them so I thought flipping the plate would look neat, not to mention my plates are printed.

I drew a pin shape for his body, then his eyes, beak, wattle, and feet. Next I colored in his body. Then the fun part! I started with orange on the outside, I did two layers. Next was red, last was brown and I filled in as much as I could.

I can't wait until he gets home from school! I have a plan now so I need to get things set up for him before he gets home. I want to hang them in the window, when we are done.

Have a great day!

Wednesday, November 12, 2014

Pumpkin Muffincake


We're back! I'm sorry we haven't been posting this week. We all have those crazy weeks, we're having one now so bare with with us!

I set out to find muffin recipes yesterday. I found this muffin recipe which is actually cake with a muffin texture. 

This is delicious! Especially with the frosting! I think I might keep the frosting recipe for cinnamon rolls. I initially put a little cinnamon in the frosting. I'm going to add more, I love the specks of color and the taste, 

Ingredients

2 cups flour
2 cups sugar
2 teaspoons baking soda
1 teaspoon salt
1 teaspoon cinnamon
1 teaspoon baking powder
4 eggs
1 cup vegetable oil
2 cups pumpkin purée

Preheat oven to 350 degree Farhrenheit. Line 2 muffin tins with paper liners.

In a large bowl mix dry ingredients, then add the wet ingredients and mix until smooth. Fill each well 3/4 full. Bake for 25-30 minutes, the instuctions I had said a full 30 min and they got a little dark but still moist. Let cool and frost.

Frosting (I doubled the recipe. We like frosting in our house and it's nice to have left overs anyway)

1 1/2 sticks of butter at room temp
1 8oz block of cream cheese
1/2 teaspoon of vanilla
Powder sugar to your liking, I used about 1 1/2 cups
Cinnamon if desired

In a medium bowl beat cream cheese, add butter and vanilla. Slowly add powder sugar, checking for texture and taste. Last add a sprinkling of cinnamon if using.

Enjoy!

Friday, November 7, 2014

Deconstructed Carmel Apple on Cream Cheese


There really is no better way to explain carmel and apple. I tried though. This is pretty delicious and pretty simple. I love those recipes where you make, or pour, something tasty over a plain block of cream cheese and then serve with crackers or some kind of transportation to your mouth.

This is just the same. I was thinking of a treat I added to Xander's lunch once, slices of apple with peanut butter and mini chocolate chips. I wanted to make something similar but the crunch of toffee bits and luscious caramel sauce transformed it into an adult treat.

You can make your own caramel sauce. I recommend, the jarred version doesn't taste nearly as good as homemade. Not to mention you know what's in it.

Ingredients
1 8oz cream cheese
caramel sauce 1/4-1/2 cup or however much you like jarred or homemade
about 1/4 cup toffee bits
apple, pretzels or graham crackers

I pulled my cream cheese out of the refrigerator about 30 min before hand. That would give you plenty of time to make the caramel sauce.

Put the block of cream cheese on your serving dish.

I decided on an oval bowl to scoop out the goodness easier. Though a plate would look so pretty. Pour caramel sauce on top. I heated up for 35 seconds to help it pour. If you're making it from scratch you won't have to heat up unless you refrigerated it before hand.

Sprinkle with toffee bits and serve with desired dippers.

Enjoy!

I hope everyone has a great weekend!

Thursday, November 6, 2014

Mushroom Problems?

I have been wanting to post this for a few weeks - to see what suggestions you might come up with - and today seemed like a good time. 

We have a pretty big front yard, but it's mostly moss and clover - very little lush grass lol.  Every once in awhile we notice a mushroom will come up, but no big deal.  A few weeks ago, we noticed a huge mushroom was growing (the ones in the middle picture - they are at least 6" wide)...and then we saw that there were actually a bunch of different types of mushrooms growing in our yard!!  (Not all of the different types are here - I counted 5, but not all the pictures turned out)


I don't know whether I need to be concerned or if I should just leave them until we are ready to replace the whole yard.  Any suggestions?  If I need to get rid of them, I would love a non-labor intensive way to do it - I can't spend a lot of time digging them all out.

Have a great day!
Beth

Wednesday, November 5, 2014

Pumpkin Walnut Chocolate Chip Blondies


I'm so late sending this post out we are going to keep it simple and sweet, just like this treat! I love everything pumpkin and on my quest to find all the great pumpkin recipes I came across this one. I, of course, changed it - shocker right?! This recipe is simple to make, is very moist and oh so yummy.

Preheat the oven to 350

I used a greased 9x13 pan lined with parchment paper

Ingredients
2 sticks (1 cup) of softened butter (I used salted)
1 1/4 cups sugar
1 15oz can of pumpkin
1 egg
4 teaspoons real vanilla
2 cups flour
1 tablespoon baking soda
1/2 teaspoon of each cinnamon, nutmeg and allspice.
1/4 teaspoon ground cloves
1 1/2 cups chocolate chips
1 1/2 cups walnuts

Start by creaming the butter and sugar together in a mixer, blend in the pumpkin, the egg and then the vanilla. While that's mixing, combine the flour, baking soda and all of the spices in a separate bowl. Add the dry ingredients into the wet ingredients little at a time, mixing in between. Hand mix in the chocolate chips and walnuts. Pour into the pan and bake for 30-40 min. Let the Blondies sit for 15 min before eating.


Enjoy!
J


Tuesday, November 4, 2014

Oops, what can you do?

So I had a plan for my posts this week - I really did - but then my body laughed and said 'nope'...I have been feeling so much better lately that I got a little too excited and spent most of the weekend organizing my craft room (ok mostly just my books, but they are in my craft room so it counts).  I had plans for some projects I wanted to work on yesterday, but instead I ended up spending the day in bed.  Turns out spending hours bending, lifting and sitting on the floor does not go well for me - which I know but choose to ignore when I'm really into doing something.  Sadly, this meant I didn't get any of my planned projects done :/...stupid body.  So I'm sorry, but I've got nothing for today except the cute picture of Winda hiding in the laundry...hopefully I'll be ready to do them soon!!

Have a great night!
Beth

Monday, November 3, 2014

What Fall things I look forward to...


I hope everyone had a great Halloween. It was a nice night. In our town the businesses have people outside giving out candy during a specific time every year. Last year Xander fell asleep so we couldn't go into town. This year I didn't let him take a nap. He had so much fun. He wanted to be "Chase" from a TV show which is a police officer pup. I pinned a make up tutorial for a deer, that was so fun. I think that will be my thing for Halloween every year. What I ever I am I will have make-up as the main event. I thought I had taken pictures, but I can't find them now.

I'm super excited for the upcoming holidays. The day after Halloween I saw Starbucks had out their Holiday cups. They brought a smile to my face. I got married in the fall, but oddly did it Florida they had 70 degree weather, it didn't feel like fall. During our summer I was thinking how nice it was to have warm weather. I didn't want it to leave. But of course we have changes for a reason. Now I'm glad Fall is here. To me it means soups, blankets, warm drinks and watching the leaves change then fall.

I really like slow cooker meals too. I plan on making a couple this week. Look for Wednesday's post on a slow cooker meal.

Tell us what your favorite fall things to look forward to.

Friday, October 31, 2014

Spooky Food...with Recipes!


It's the end of our week long Halloween Pinterest Challenge!! It seemed to go by so quickly!!  We wouldn't be us if we didn't have a food post - and we have some great recipes to share. 


Let's start with dinner - we wanted simple food, that would be fun to make for a party.


Mummy Calzone: 
1 can crescent rolls
4 Tbsp Pizza sauce
1 cup Shredded cheese
1 cup of Toppings (We used salami, red peppers and green onions - but you can use anything you want.  Just chop them into smallish pieces.)
**The amount of toppings, cheese and sauce are estimated - use as much or little as you want.**

Lay the crescent rolls flat, with the large sections touching.  Press them together to form a solid bottom about halfway up.  Mix all your toppings together with the cheese.  Spread pizza sauce along the crust and spread the toppings out.  Tuck the bottom up and crisscross the ends over and then under the next piece.  We used a little of the extra thick sections for the head, and sliced salami for the eyes.  Bake at 350 degrees until golden brown - about 15 min.

Beth:  I love how well this turned out.  The original recipe called for making your own crust, which I didn't have time for.  The crescent rolls were perfect for a fast, easy alternative.  They are ready to eat in about 30 min and are fun for kids of all ages!!

Veggie Graveyard:
Any crust, Baked and Cooled - You can get or make any crust you want to.  We used crescent rolls, pressed together and rolled at the edges.
Ranch dressing
Chopped veggies
Chopped lettuce (We grabbed a chopped salad bag from the store - it had lettuce already cut into small pieces - but you can do it yourself)
Crackers shaped like headstones (We used Annie's Saltines)
Black 'ink' - You can dye ranch dressing, or use gel frosting if they aren't going to be eaten.

Cover the bottom of your baked and cooled crust with ranch dressing.  Spread the chopped lettuce out and top with chopped veggies.  Use the blank ink to write RIP on a few crackers, and place them in the veggies. Ta-Da Done!

Beth:  I'm sure you noticed there aren't any measurements - that's because you can make this in any size, with any amount of veggies.  It's fast, easy and even kids will want to eat their veggies on a 'pizza'.

Jack O'Lantern Cheeseball:
2 - 8oz room temp cream cheese
3 thinly sliced green onions, reserve about an inch of one the tops thick and thin.
1 - 8oz fine shredded cheddar cheese, divided 
1/4 cup small diced red bell pepper
2 slices of pepperoni for face

Mix the cream cheese, green onions, 1 1/4 cup cheddar cheese and bell pepper with a hand mixer.  Put mixture in refrigerator for 1 hour.  Roll the mixture into a ball, then press the remaining cheese onto the outside of the ball.  Take the 2 slices of pepperoni and cut into triangles for the faces, decorate how ever you like.  Use the reserved green onion tops to make a stem.  It's ready to eat! Serve with crackers - bread rounds and vegetables would be great with this too!

Felicia:  If you haven't figured it out yet I like pumpkins...a lot!  When I saw this on Pinterest it got pinned right away.  I actually also have a whole recipe book on cheese ball creations.  This was a perfect match!

Bat Wontons:
Wonton wrappers
Cream cheese - we used chive and onion cream cheese.
Oil for pan frying or deep frying

Scoop about a Tbsp of the cream cheese onto the middle of a wonton.  Wrap two kitty-cornered ends over the cream cheese.  Twist the remaining to corners and point upwards.  Pan-fry or deep-fry the wontons.  Once cooled slightly, dab some cream cheese and use peppercorns to make eyes. 

Beth:  I have to say these were so good!!  They were easy to make ahead of time and took just minutes to pan-fry.  Just be careful - you will want to eat all of the ones you make!!  I was pretty glad we only made 12 Lol...

And now for dessert:


Halloween Bark:
White Chocolate Chips (or really any form of white chocolate)
Orange Oreo Pieces
Candy Corn
Candy Pumpkins
Pretzel Sticks
Candy Eyeballs
Anything else you would like to add

Melt the white chocolate and spread into a thin layer on parchment paper or cookie sheet.  Mix all of the other ingredients together and spread over the chocolate.  Press down so they will stick.  Let it cool, then break it up onto any size. 

Beth:  Super easy and so fun to pick what you want to include.  The eyes were just creepy enough and because they were soft and jelly-ish they were a surprise when you bit into them! 

Witch Hat Cupcakes:
Waffle Cones
Black Food Dye + 2 additional colors
Chocolate Wafer Cookies or similar cookie type
White chocolate chips
Chocolate cupcakes - baked and cooled completely
Frosting

We made the cupcakes and frosting ahead of time.  You can use your favorite recipes.  We recommend these if you don't have a favorite yet - for the chocolate cake and for the frosting.

To dye the cones black you will need something to hang dry the cones.  I used orange peel sticks, but skewers or anything like that would work.  Then I turned a BBQ pan that had round holes over and stuck the sticks through the holes.  It worked great, but you can use anything you have or just set them flat on a piece of parchment paper.  Once you have this figured out, add a small amount of black dye to water in the bottom of a flat dish (I used my 9x9 casserole) - you only want a thin layer of liquid so it doesn't end up inside the cone.  Using the stick, I rolled the cones around in the water until they were the desired darkness.  I then let them dry overnight - the outside gets really soggy so I wouldn't recommend doing this the same day you want to use them.

Dye part of your frosting green and use it to attach the cookie to the bottom of the cone, then add a band around the seem.  Place a white chocolate chip tip end in for the buckle.

Dye the rest of the frosting purple.  Frost the cupcakes and place a hat on top.

Beth and Felicia:  We knew we wanted to make cupcakes and fell in love with the witch hats.  We divided the work up so it wouldn't be too much work for either of us.  Next time we hope we can find larger chocolate wafer cookies, but we are really happy with how they turned out!!

Candy Corn Meringues:
4 egg whites
1/4 teaspoon salt
1/4 teaspoon cream of tartar
1 1/3 cup of sugar

food coloring, orange and yellow
piping bag or plastic bag like ziplock
large round tip

Preheat your oven to 350 degrees Fahrenheit.  Prepare 2 half sheets with silplats or parchment paper.  In a large bowl, beat egg whites until foamy then add salt and cream of tartar.  Continue beating until soft peaks form.  Start your timer for 7 minutes, during that time add sugar slowly. 

Divide into three amounts - large, medium and small.  Tint the largest amount yellow and the medium orange.  These don't expand so you can make them close but not touching.  Pipe the yellow first, then pipe the orange on top of the yellow and repeat with the plain meringue.  They should look like candy corn.  Bake for 2 to 2.5 hours.  I ate mine right away but usually you wait for a day. 
Felicia:  So I rushed this recipe.  If you follow these directions you shouldn't have a problem.  This needs a day to rest as well, if you can wait.  Even though today is Halloween, you can change the shape and colors for upcoming holidays!!
We voted the Wonton Bats as the Tastiest Thing We Made, and the Pumpkin Cheese Ball and Witch Hat Cupcakes tied for Best Looking!! :)
There you have it - the end of our Halloween Week!  We had a lot of fun and are glad we could share it with every one!!
Have a safe and fun Halloween!!
The Three Peas


Related Posts Plugin for WordPress, Blogger...