Friday, January 30, 2015

Progress coming to our home soon.


I have been saying I need to clean and organize my house for awhile now. My son is 5 so that gives you an idea to how long. Oh my! I have been selling some of my son Xander's bigger toys and furniture to make room in our living room. So far it's been going well. I have more to do, but it's starting to look like when we first bought our house. Granted we had a futon and a small coffee table, our living room looked huge. 

My gripe now has been that although we have a wonderful open living room, we don't have storage. Everything I had was pushed up against the walls. I made a box with our couch and love seat which made it look like a living room. I can't wait t get rid of the big couch. My dilemma was where would I seat people? I would like to have a recliner chair, plus we have our dinning room table. I then thought I would like to have a bench under our three windows facing out to the street.

This would be helpful in several ways. Everyone would be able to sit down and take their shoes off. There would be places for people to sit when we have parties. I want cubbies underneath the benches with matching bins to put our shoes. Which reminds me of another helpful reason, it would make room in our closets if our shoes where out in the living room.

I think in two weeks I will finally be ready to begin building. I'm also thinking of making the cushions. I have a particular color theme that of course is not super common so I think I will have better luck making it. 

It feels good to get rid of things. I've heard less is more and I'm starting to understand.

What big projects are you starting, we would love to hear them.

Stayed tune next week and I will share my Super Bowl recipes from this Sunday!

Have a great weekend. 


Thursday, January 29, 2015

Italian Chicken with Tomatoes

This got a thumbs up from Eric, and since I picked it for him that was great!!  The first time I made it, he ate it for dinner two nights and then for lunch the next two days after that!!  Then he requested that I make it for his lunches this week.  I am glad he liked it so much!  Sadly, I'm not in love with it.  Partly I think because it was sweet to me - Eric added salt and said he really liked it (but then it was just sweet and salty to me - I think I'm just not a tomato person unless it is on pizza lol) and there were like 10 Red Pepper Flakes (really - I only put a dash in instead of 1/4 tsp the original recipe used and it was still too spicy for me :/ ).  I am glad that I found something I can make and use for several meals - in the future I plan to seperate it into freezer meals that Eric can just put into the oven and reheat. 
Originally, this recipe is for a slow cooker but I just stuck it in the oven instead.  Also, I added the pasta after cooking it al dente because that is how Eric likes it, but you can serve it over the pasta instead if you prefer (it might have made a prettier picture lol)...

Ingredients:

2 boneless skinless chicken breasts
1 green bell pepper, chopped
1/2 yellow onion, chopped
2-3 garlic cloves, crushed
1 (28 oz.) can diced tomatoes, drain it if you want a thicker sauce
1/2 (15 oz.) can tomato sauce, add the whole can for a thicker sauce
2 Tbsp. tomato paste
3 Tbsp. red wine vinegar (I used balsamic vinegar the first time - so use what you like)
1 1/2 teaspoons Italian seasoning (or a mix of basil, rosemary, oregano, marjoram and thyme)
A pinch/dash of crushed red pepper flakes
1/2 teaspoon salt
1/4 teaspoon freshly cracked pepper
1 (13-15 oz.) box of pasta, cooked al dente and drained
1/2 cup shredded mozzarella cheese or small chunks of fresh mozzarella, optional
2 Tbsp. fresh parsley or basil, chopped, optional

Place chicken in casserole dish.  Combine remaining ingredients and seasonings - except the mozzarella, pasta and fresh herbs - and pour over the chicken.  Cover and cook on low for 45 min.  Remove chicken and shred.  Return to the dish and add the cooked pasta if desired and cook for an additional 15-20 min.  Remove from the oven and stir in the mozzarella and sprinkle with fresh parsley or basil, if desired.

I got this recipe from here - and can I just say I hope to someday make both my food and pictures look as good as they do on her blog!! Serious picture envy :)

Have a great day!
Beth

Wednesday, January 28, 2015

Gluten Free Peanut Butter Cookies with Chocolate Chips

I went to hang out with my sister, nieces and nephew on the horse ranch again.  I always love being there and being surrounded by family.

My sister has been GF for almost a year now, so a few nights ago while I was there my niece and I decided to make her cookies.  She loves peanut butter, so this seemed like a good choice.

They do not have any kind of flour in them at all but you really don't notice that. They are really pretty tasty for only having ingredients and are quick to make.
 
 
Ingredients:
1 cup of peanut butter
3 tablespoons of honey
1 large egg
Chocolate chips (optional)


Preheat the oven to 350 degrees.  Place a cookie sheet in the freezer.  Put all of the ingredients in a bowl except for the chocolate chips and mix until combined.  Place the batter into the refrigerator for about 10 mins. Roll into small balls and place on the frozen cookie sheet.  Squish down with a fork and add the chocolate chips on top, if you're adding them.  Bake for 8-9 mins and place on a wire rack to cool.

These are similar to the Flourless Peanut Butter Cookies Felicia posted about last summer - check those out too!!

Enjoy
J

Tuesday, January 27, 2015

Bean and Cheese Burritos


We don't really need a recipe but it's nice to know about how much you will need. What's great about this is you can make whatever you want. You can do a combo of leftover taco meat and refried beans, roasted veggies and cheese and so much more.

I happen to love bean and cheese. I also baked these instead of deep frying them. I was actually thinking about taquitos for the Super Bowl this weekend. I have a bunch of tortillas and canned fat free refried beans. So I wondered how many I could make with one can. I like having easy, prepped food in the freezer, so I will be making more. They sure do hit the spot!

Recipe

1 can refried beans ( I used fat free )
8 small flour tortillas
1 cup of shredded cheddar cheese
Oil for brushing


Preheat oven to 400 degree Fahrenheit. Pull out a medium size baking sheet, put a piece of foil if desired, oil the pan.

Lay out your tortillas, beans and cheese. Put about 1/4 cup beans on a tortilla, sprinkle with a small handful of cheese, roll up tucking ends in as you go. Place on pan, finish the rest. When all of your burritos are done brush tops with oil. Bake for 8 minutes flip and bake for 8 more minutes. You can increase to 10 minutes on each side if you like them more brown. I wrapped my leftovers and put them in the freezer. When I reheated them they got more brown so it all worked out.

I hope you enjoy as we did.

Monday, January 26, 2015

Shredded Chicken Pot Roast

Yes, technically, this is not really a 'Pot Roast', but I couldn't think of anything better to call it!
Due to some recent changes in our eating habits, I have been attempting to make meals without any butter or oil.  Yeah, it doesn't sound very yummy to me either - that's what makes it a challenge!!  While Eric would be happy with the same meal every night - I am not!  So to find a good cooking alternative to butter and oil, I have started using chicken and vegetable broth.  So far it has been working pretty well, a little in the pan helps release the food from sticking and it adds flavor without adding fat.  This is the first potato dish I have tried without oil or butter, so I was a little nervous.  Eric said he wasn't really sure about it but after trying it he changed his mind and said it was the best thing I've made recently!  (To be honest I'm not sure if that means it was awesome or the rest of what I've made was not so great) I kind of just made this up as I went, but I can think of lots of ways to change it...

Ingredients:
1 chicken breast
1/2 medium onion, chopped
4 carrots, chopped
4 medium Yukon Gold potatoes, chopped/cubed
3-4 cups of broth, chicken or vegetable (I used both)
Seasonings, to taste - I used powdered garlic, powdered onion, thyme and pepper (plus, the broth I use has a slight rosemary flavor)

Started by cutting the chicken breast into smaller pieces so it will cook a little faster, then coat the pieces with the seasonings of your choice.  Heat a large pan on the stove, add 1 cup of broth and the chicken.  Cook on medium high until the chicken is cooked through, adding stock if needed.  Pull the chicken out of the pan and add the veggies and additional seasonings.  Add enough stock to almost cover the veggies and stir well.  Shred the chicken and return to the pan, mixing it in.  Cook until the potatoes are tender and the stock is mostly gone.  Cover the pan if you want to cook it a little longer without losing moisture.  It takes about 30 minutes or so.  This feeds two people - depending on how much you eat and how hungry you are :)

This ended up being very tasty and filling.  I think I want to try adding some minced garlic, red wine or balsamic vinegar and maybe some different veggies in the future.  I also think it would be good if you had precooked chicken already made - it would eliminate some of the prep work and cooking time, which would be great for weekday meals.

Have a great day!
Beth


Friday, January 23, 2015

Honey Buttercream Frosting


Originally I was searching for a chocolate frosting recipe. I came across this and it sounded fun. I wanted sweet because I made a plain white cupcakes so I wanted the frosting to be the star.

Recipe

1/2 cup butter at room temperature
2 cups powdered sugar
1/4 cup honey
1/4 sour cream whole fat

In a large bowl beat butter for at least 3 minutes until light and fluffy. Mix in powdered sugar slowly until fully combined. Last add honey and sour cream, mix until combined. Spread or pipe onto cupcakes or cake.

We are celebrating a birthday today. Several times during the week we have Xander's Autism BI come to the house to work with him. We had to say goodbye to our long time BI over the Holidays and that was hard. I don't think anyone can replace her. We are in the home stretch for his ABA. We really like who we are working with now. It's her birthday so we are celebrating with her. I feel when we are closely working with therapist/BI/teachers/Aids they become like family in my opinion. So everyone gets a celebration. The trick with me is you have to give me time to make it happen. Luckily she did. If I have know you for awhile you usually don't have to ask  e it just starts to happen.

We hope hope you like this as we did
Enjoy!

Thursday, January 22, 2015

Flourless Brownies


This is just like flourless chocolate cake. It's so good! We had it after dinner with ice cream. I heated mine back up and it had that wonderful gooey center. I was searching for gluten-free treats for my friends son. She had found a treat to make so I didn't need to make it. Now I wished I had. Everyone would have loved it!

Recipe

6 Tablespoons butter
3/4 cup granulated sugar
8 oz mini chocolate chips, semi-sweet
2 eggs at room temperature
1 teaspoon vanilla
1 Tablespoon cocoa powder
3 Tablespoons corn starch
1/4 teaspoon salt

Preheat oven 350 degrees Fahrenheit. Butter or spray a 9 by 9 baking pan.

In a medium pan melt butter on low heat. Add sugar and mix until combined. Add chocolate chips, stir and turn off heat. Mix until chocolate is combined. Add eggs one at a time mixing and combining each. Sift cocoa powder and corn starch over butter mixture, add salt. Pour into pan and bake for 20-25 minutes. Let them sit for 45 minutes before you eat them.


Enjoy!

Wednesday, January 21, 2015

Crockpot Citrus Garlic BBQ Chicken


I'm all about easy, fast and yummy these days and this recipe fits all of that!  After just a few simple steps the crockpot does all the work and the whole thing is done in 4 hours.  The chicken comes out juicy, tender and has a nice tangy flavor.

Ingredients:
Whole chicken
1 orange
1 lemon
1 lime
1/2 cup of BBQ sauce
5 garlic cloves

Cut all of the citrus in half and juice both halves of each fruit into a bowl.  Add the BBQ sauce, mix and set aside.  Rub the chicken with one half of each and then place those halves into the cavity (I did this with the chicken in the crockpot).  Crush the garlic cloves, rub the chicken and then place them in the chicken with the citrus halves.  Pour the sauce mix over the chicken.  Place the lid on and cook for about 4 hours on High. Carefully remove chicken and let cool, the chicken will just fall off the bone. I served it the first night with couscous and veggies.  I also added it later to salads and a risotto with mushrooms and green beans, so it is great for more than one meal.

Enjoy
J

Tuesday, January 20, 2015

A Little More Organized

 
I have been wanting to organize and put away my purses (and shoes!) since we got the closet in place, but I was holding out and hoping that we would get the closet finished first.  I finally threw in that towel and decided to just put everything away - the pile was driving me crazy!!  The first thing I needed to figure out was how to help the purses keep their shape - for easier storage and so they don't get all out of shape.  I realized that in the store they use tissue paper (which I would have to buy), but after thinking about what I might have on hand - it dawned on me that I have tons of scrap fabric.  So now all my purses are stuffed with fabric!!  Apparently I have a thing for big slouchy bags because I used an entire bin of scraps :)
 
After laying them all out, I sort of organized them by size and managed to fit all of the bags on two shelves...
 
 
Crazy, right?!  I am so happy that I managed to get them all on there - but I'm not sure what I'm gonna do if I buy any more lol!  Also, you may have noticed the right side of the closet has shoes - right now it just has shoes that I dont wear very often, and I may keep it that way.  I have a ton more shoes but they aren't going to fit on there so I will have to store some downstairs, which will work for the ones I use regularly.  I can also move the ones I don't wear to the top of the closet and put the ones I wear on the shelves.  Decisions, decisions!
 
Anyone else have a moment of organization??  Every little bit helps :)
 
Have a great day!
Beth

Friday, January 16, 2015

Teriyaki Sauce


I've been making this for awhile now and I love this recipe. It's easy and doesn't have ginger. I can't have ginger so that limits my Asian cuisine. Not to mention it's cheaper and I can have as much as I want! Wait that's not good. I should have less! I think it's too good to have less, oh well!

I got the recipe from here.

I'm almost to the point of memorizing it. I still double check though, my track record isn't so good!

Recipe

1 1/2 cup water
3/4 cup brown sugar packed down
1/2 cup soy sauce
1 teaspoon garlic powder
3 Tablespoons corn starch
1 teaspoon sunflower seed oil or what ever light oil you have

In medium bowl mix water, brown sugar. Soy sauce, and garlic powder well. Add corn starch and stir until completely blended and the color has lightened. Last add oil and pour into a small pot and heat at medium heat. While stirring constantly bring to a boil and cook for one minute and thickened.

Pour over you desired protein and serve with rice.

Enjoy!

Thursday, January 15, 2015

Salmon Chowder

I'm back again and I brought another soup with me. I am still having a really hard time with my illnesses, but I miss the blog and all of you, so I am going to come back once a week.

We have been doing a 31 Day Zero Spending (besides a very short list) Challenge with some friends, so I have been trying to use items in my cupboards. This chowder really has an amazing flavor and my husband (the non-soup guy) says this is his favorite one yet. He keeps saying that with each new soup, so I might make a soup lover out of him yet.

Ingredients:
1 stick of butter cut in half
1/2 of a large onion finely chopped
3 carrot sticks finely chopped
4 celery stocks finely chopped
4 garlic cloves finely chopped
2 medium potatoes cut into small cubes
6 cups chicken stock (I made my own in the crock pot)
3 tablespoons or more of dried dill
2 teaspoons of ground fennel
1 teaspoon of ground Rosemary
1 teaspoon of sage
1 can cream corn
1 can corn (I rinsed mine)
1 can evaporated milk
2 14.5 cans of salmon, you will want to take the bones out and crumble it a little.
The liquid from 1 can of salmon
2 cups shredded cheese
Salt and pepper to feast

Optional:
Sourdough or french bread
Cheese to top

Directions:
In a big pot melt 1/2 the stick of butter, then add the onion, carrots, celery, garlic and saute for about 2 minutes.  (For the best results, use a chopper or Ninja to get the ingredients finely chopped) 

Add the chicken stock, potatoes, spices and bring to a boil.

Once it starts to boil place a lid on the pot, turn the stove to low and cook for about 30 minutes.

Pour in the evaporated milk, then add both corns, salmon, salmon liquid, the other 1/2 of the stick of butter and cheese stiring between each one.

Simmer for about 20 more minutes.

This recipe makes a lot of soup, we ate it for a few meals and froze a bag for later.  Unfortunately, the frozen soup was not very good after it was reheated so enjoy it fresh if you can.
 
Enjoy
J

Wednesday, January 14, 2015

Getting Ready for Starters!

 
It seems a little crazy to be talking about getting starter plants ready in the middle of January - but it's true!!  According to this workbook - I'm actually a little late in getting started!  Luckily not by much,  since most of the first few weeks are about looking at your stored supplies and planning your next year out.  I have been doing a little of that here and there, but now it is time to get serious lol...
 
As part of my planning, I have been reading a lot of information about growing a lot of food in small spaces - Square Foot gardening, Vertical gardening and Companion gardening - including the book above.  I haven't made it all the way through yet (I'm really looking forward to getting to the plot designs lol), but I came across an idea about starters that I hope will help me.  I have a horrible time keeping my starters alive - I skipped them last year and it worked but I didn't have any early crops.  This wont work for my plan to provide most of our veggies in a few years, so I have to find a process that works for me.  In this book the writer recommends planting your seeds in toilet paper rolls.  The rolls allow you to grow more for the space (four rolls fit into one of the containers I plan to use), the rolls are also taller than normal so the roots will have room to grow nice and deep.  The biggest plus is that you plant the rolls directly into the ground and they break apart and compost, so you don't have to disturb the roots when transplanting them...yes, please!  I am going to be trying this for my starters this year, so I will do a follow up post to see how it goes. 
 
 
Anyone else getting ready for Sping Planting?  It's coming up so fast!
 
Have a great day!
Beth 
 

Tuesday, January 13, 2015

Head Band Holder


I have been wanting to make one of these for quite some time now! I use to have them hanging on the hand towel rings and they would get smooshed.


I picked up a pretty candle holder and emptied out my oats big tube canister. I'm a scrapebooker I have tons of printed and solid paper. Purple is my favorite color so I flipped through what I had and found a perfect page!

Everything is laid out. Canister, paper, candle holder, glue and ribbon.


First cut the paper down to the right height.


I figured putting glue on the canister would work easier. I started off with one line of glue, put the paper on and line it up then I would add a line on then press it down and continue until it was all on.


I was a little skeptical of gluing the candle holder to the canister. I didn't think it would hold. I put glue on the rim and then flipped the canister over and placed the holder on and held it there for about 3 minutes. Nobody is swinging off this so it doesn't have to be perfect. It didn't work. The bottom isn't super secure, when I put my bands on it was so heavy it pushed right through. So I cut out a circle by tracing the canister on a piece of cardboard. I glued that down and then stuck a book on it to hopefully give it enough pressure to stick.

Last I pulled the top out of the lid and put in a cut out of the same pretty paper I put on the canister.


Monday, January 12, 2015

Kitchen Update...Cabinet Color


This weekend we made progress in the kitchen and I'm so excited to share some of it.  We worked on the bookshelf boxes for the pantry wall, and since they are open we had to finally select a cabinet color - yikes!  We have a bit of trouble with picking colors, but this time was slightly easier since I knew what I wanted (grey), I just had to find the right tone.  I have been looking at colors for the cabinets for at least six months and had finally narrowed it down to a few that lived in the kitchen for the last few weeks.  On Saturday I picked up the 2 finalists - both were very similar but with different undertones.  I think we will be really happy with the color we chose - Dovetail by Sherwin-Williams.  It has a taupe-y undertone, instead of a steel/blueish undertone, that I think works well with the grey we used for the walls and the stainless steel appliances.  It also works great with the dining room color that will be shown above the pantry cabinets (see the picture over to the right - the pantry cabinets will be the same height as the light grey wall, so the darker grey will extend around 12" above the cabinets).  The colors are very similar, but the cabinet color is maybe 30% lighter.  There will be a lot of grey in the kitchen, especially with a whole wall of pantry cabinets, but it will be offset with the white tile and white upper cabinets.  It will be a great way to show off pops of color in the kitchen, and it will be easy to change out the kitchen decor without having to change anything but the accessories. 

Here is a reminder of what my inspiration kitchen looks like:


Find it Here
  We really went back and forth (well, mostly me...for months!) about whether we wanted the pantry to be grey or white.  It's a lot cabinets (approx 10'x10') and it is the wall you face from the living room - so it is a focal wall - and I finally decided that the grey would be less of a focal point than the white would be.  Plus, they will be easier to keep clean!!  We are still pretty far from painting all the cabinet doors (way too cold!!), but it will be awesome to have all of the storage available in the pantry!!

Now I just have to paint and sand those bookshelf boxes this week...

Have a great day!
Beth   

Friday, January 9, 2015

Cabbage Rolls


It's funny how many times I have Pinned cabbage roll recipes. I finally made them! To my surprise my family liked them. My mom would make these for me. I need to get her recipe mine wasn't the same. Not to mention I thought I had a can of tomato sauce so I had to make do with a canned tomatoes mashed up.

I got the recipe from here. It said to peel the leaves and boil the leaves for a few minutes. I broke 4 leaves and gave up. I boiled the whole thing instead. So if you have skills (please share with us how to do it!) you can take the leaves off and if you're like me you can boil the whole thing for about 5-7 minutes.

Recipe

Rolls
1 cabbage
1 cup cooked rice
1 egg slightly beaten
Salt and pepper
1/2 Tablespoon onion flakes
1 pound ground beef
1/4 milk

Sauce
1 can fire roasted tomatoes
4 Tablespoon Dark Brown sugar
1 lemon juiced
1/2 teaspoon garlic powder.

In a large pot boil cabbage for 5-7 minutes with the lid on. Pull out your 9 by 13 baking pan. In a large bowl mix rice, egg, salt, pepper, onion flakes, beef and milk set aside. Set your cooked cabbage on a cutting board, when it's cool enough pull 12 leaves off. I cut a V at the stem to remove the fibrous part. Grab your meat mixture and you leaves and put them close to your baking pan. Grab a handful of meat and shape into your hand then put it on the top of leaf so that the "V"is on the right side. Then start the roll and tuck the sides in and put the seam side down on the pan. When you have finished rolling them, make the sauce. I smashed the tomatoes in sauce you can also put them in the processed. Mix all the ingredients and pour over the top. Bake at 350 degrees Fahrenheit for 75 minutes.

Enjoy!


Thursday, January 8, 2015

Potty Training Update


So Xander has been doing better! We finally got him to poop on the potty. Then he wanted to poop all day! Because I gave him hot wheels, it was such a big deal I wanted him to know that! Well then when we stopped giving them to him he stopped as well. We have recently been trying no toys or TV until he starts trying to go all the time. He gets so distracted by that stuff and I can't be standing over him all the time to make him go. We do have a potty timer that when he does earn his toys back I will set up for him. I want to encourage him to continue going. He will be 5 soon so next begining school year he will need to take care of him self. I feel this summer will be a good time to support him in this as well.

I know that gifting for everyday normal activities is not good but I was desperate. I wish there were potty parties. It's so much easier to learn with other kiddos as well as your own gender. When my husband showed him how he goes potty we had huge success. It's a little awkward to ask "hey can my son watch your son go potty?"

I would love to hear your ideas! Have a great Thursday!

Amazing Overnight Rolls


I always make rolls when we have holiday dinners (or lunches...or breakfasts...rolls make every meal better!!)  I usually make 
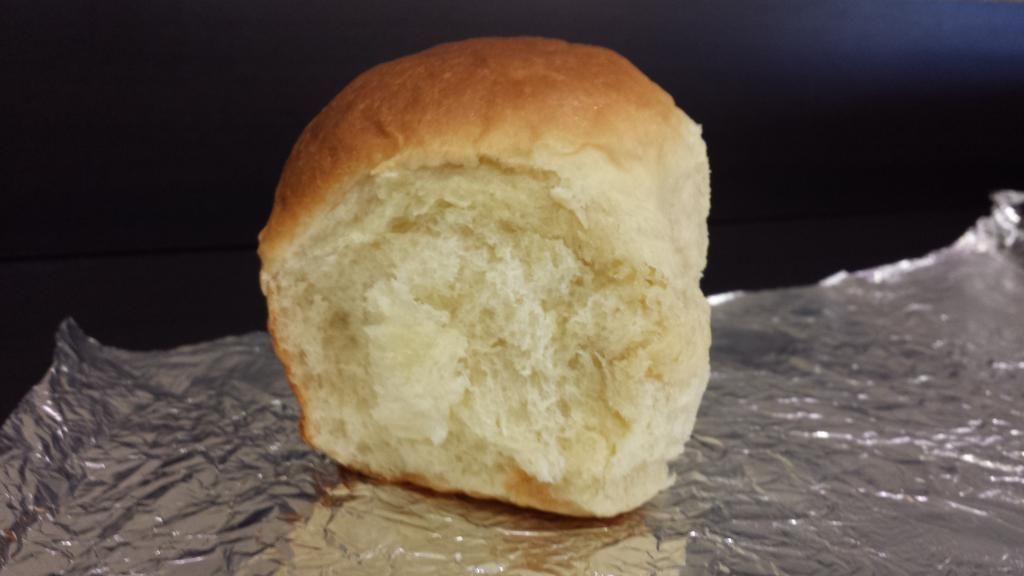
Parker House Rolls (which I thought I had posted about but turns out I haven't lol).  Every time I make them everyone tells me how much they love them - and they are delicious so no arguing from me.  This year I was hosting a small Christmas dinner at my house and I wanted to try something new so I decided to find an overnight roll recipe I could use my sourdough starter with.  You can see how they turned out here.  Since I wasn't too sure about them, I decided I needed a different overnight roll for the Christmas lunch I had with my family 3 days later.  We were leaving early (for us) and I wanted to let them do the second rise on the drive over.  I found a new recipe that was similar to the Parker House Rolls - follow the link for the original recipe for Blue Ribbon Overnight Rolls

The same ingredients are used for both recipes , but the measurements are different.  I never thought I would say this but I like these ones better than the Parker House ones - I think the extra rise time makes them taste amazing!!  Also they have less flour and less butter - so they are healthier right?! :)

Blue Ribbon Overnight Rolls

2 1/4 tsp yeast (1 package)
1 cup milk
1/2 cup sugar
2 eggs, beaten
1/2 cup butter, melted but not too hot
1 tsp salt
4 cups flour

Combine the milk and sugar in a small pot and heat until milk is warm and sugar is mostly dissolved, it should be hot but not burning hot or boiling at all (I think of it as 'yeast rising' tempurature lol).  Pour into a large bowl and add the yeast.  Let sit for 30 minutes.

Add the salt, butter and eggs to the yeast mixture and mix well.  Add 3 cups of flour and stir until well incorporated.  Add the last cup of flour and stir until it gets too thick to stir easily.  Use your hands to mix/knead the rest of the flour into the dough.  The dough should be soft, elastic and slightly sticky (but not too sticky).  It may take a few times of making them to get the correct dough consistency if you aren't familar with making bread dough by hand, but it will work itself out as it rises.  You can add additional flour if you think it is necessary, but I think the most I have ever added is 1/4 cup more flour.  Leave it in the bowl and cover with wax paper, parchment or saran wrap.  Store in a the oven overnight. 

The next morning, take out and gently knead the dough in the bowl.  Divide the dough into 24 rolls.  Place in a buttered 9x13" casserole dish.  Cover and let rise until double (about an hour).

Preheat oven to 375 degrees and bake for 15-20 min, covering them with foil if they start to brown too much. 

I actually made these 2 other ways as well:

One time I put it into the fridge to rise overnight, then took it out and let it come to room temperature to finish rising.  I was hoping it would rise faster than it did, but I stuck it in my oven with the bread proof setting and it had no trouble rising quickly.  If I wanted to let it rise at room temp, I think it will take about 8 hours.  I was working and then going to a friends house for dinner so if I had known it took so long out of the fridge I would have taken it out before I left and then formed the rolls when I got home.  It's untested but I'm pretty sure that would have worked. 

The second way was an accelerated time schedule - all in one day.  I used my bread proofing setting and raised the first and second risings quickly.  This turned out really well, but the yeast flavor was milder.  It still took around 5 hours to get them made, but Eric had rolls all week while he was home and I was at work (He asked me to make them at 6 on Sunday night lol).  They lasted for about 4 days wrapped up brfore they started to get stale.

If you have a favorite overnight roll recipe, I would love to hear it.  Comment and share!!  I really like being able to leave the dough overnight - it really cut down the prep time and made it feel less like a chore. That made it a little easier for me since I made all three batches in less than a week. :)
 
Enjoy!
Beth


Wednesday, January 7, 2015

Chicken Avocado and Lime Soup


I have been making a lot of soups lately because they are fast, easy and yummy as I have been having a really hard time with my legs because of my MS. My husband (like Beth) has never been a fan of soup, he says  it is a waste of space lol. I have slowly been winning him over by making soups with things he loves. This soup is a huge winner, he loves it and told me it is the best one yet. If you like cilantro, lime and avocados you will love it too!


Ingredients:
1tablespoon of olive oil
1 bunch (about a cup or so) of minced green onions, white and green parts
2 seeded and minced jalapeños
4 chopped cloves of garlic
64oz of of chicken broth (I used low-sodium)
3 diced Roma tomatoes
1 to 2 teaspoons of cumin (I used 1, but I will use 2 next time) About 2 cups of cooked shredded chicken (I made a small whole chicken in the crockpot)
1 cup of chopped cilantro
The juice of 2 limes
2 large avocados
Salt and pepper to taste
Optional:
Tortilla chips
Sour cream
Shredded cheese

Directions:
Heat the oil in a large pan over medium heat and add the onions and jalapeños for about 2 min, then add in the garlic and sauté for about a min more. Then throw in the broth, tomatoes, cumin, salt, pepper and chicken, bring to a boil over medium heat and then turn down to low. Stir in the cilantro and lime juice. Cube half of an avocado into each bowl and then ladle the soup over it. Top with any optional toppings and enjoy!

J

Tuesday, January 6, 2015

Disappearing Peanut Butter Rice Cereal Treats


I like this recipe! Last Sunday we went over to our friends house so that we can all spend time together, Dads, Moms and Kids. I wanted to make the crispy rice cereal treats with marshmallow. So I looked for ideas on good o'l Pinterest and I found this. I was running out of time so I didn't process the recipe in my head. It didn't have any marshmallows, too late I was almost done. It smelled wonderful as I think peanut butter always does! My son could hardly wait. I cut them into squares as instructed and packed some up. I had left overs so I decided to cut the squares in half to make triangles. Since I have a little one in the house his treats don't need to be so big. We did sneak a bite! It was the right thing to do, you have to try it before you serve it!

Recipe

1 cup corn syrup
1/2 cup sugar
1/2 cup dark brown sugar
1 1/2 cup creamy peanut butter
2 teaspoons vanilla
4 cups crispy rice cereal

In a large pot combine syrup and sugars, bring to just a boil, turn off heat. Add peanut butter mix until smooth and fully combined. Add vanilla and cereal. Pour into a 9 by 13 pan lined with parchment paper. Let cool about 45 min or so.

Of course I start thinking of how to improve this recipe. You can add mini chocolate chips after its cooled down. Just press them into the top so they stick. Of course mini candy coated candies would be great too. Of course my favorite, dip one side into ganache and let cool again.

Enjoy!

Monday, January 5, 2015

Plan for Healthy Eating

I am really focusing on eating in a sustainably healthy way this year.  I am all about reaching for the easiest snacks and usually that means sugar and carbs.  I am committed to changing my habits enough that I can eat relatively well without having to plan every meal - I don't want to have to keep track of what I eat for the rest of my life!


To help me with keeping track of what I am eating now I started using an app on my phone called fatsecret.  It sounds weird but it is one of the few apps that could be used on Apple, Windows and Android phones.  The app program is pretty basic but keeps track of food, exercise and weight - and you can log-on using a computer to have access to groups and recipes, plus a bunch of other community type stuff.  The two things I like about this program is that you can create a group and see what your friends are doing (which helps with keeping you on track), and I like that it breaks down not just the Calories - but the Fats, Carbs and Protein as well. 

The only thing missing is the ability to track how many servings you have had so you can keep on track.  I made a quick daily checklist I keep in my Kindle cover so I can keep it on hand.  So far (Halfway through the first day lol), it seems like this is a system I can use to get into the habit of eating all those different food groups! :)


The other thing I have worked on to help me get on track is to create a pretty structured meal plan for work.  My co-workers and I all agreed to follow the same plan for breakfast, snacks and lunch.  This will help since we all hold each other accountable.

Here's a breakdown of our plan:

Breakfast:  Fruit Smoothies - 3 servings of Fruit, 1/2 serving of Dairy
                  1/2 Whole Grain English Muffin - 1 serving of Whole Grain
                  1/2 Tbsp Cream Cheese - 1/4 serving of Dairy

Snack 1:  1/2 Whole Grain English Muffin - 1 serving of Whole Grain
                1/2 Tbsp Cream Cheese - 1/4 serving of Dairy

Lunch:  Salad - 1 1/2 servings of Vegetables, 1/2 serving of Fat
             One of the following options: Baked Potato w/ Bacon, Turkey Wrap or Grilled Cheese

Snack 2:  2 Celery Stalks with Peanut Butter - 1 serving of Vegetables, 1 serving of Protein

So as a whole we will be doing pretty good on all of our food groups by the time dinner rolls around (mmm...dinner rolls).  I am planning to stick to at least half my Grains being Whole Grains, but I'm not super great at that - at least I know I will have 2 out of 6 every day from breakfast and one snack.  I also will only be around 1000 calories by the time I make it home, so I will be able to have a decent sized dinner every night as well.

My next challenge is to figure out a plan for the weekend - that's a little trickier lol...

Have any suggestions?  I would love to hear them!

Have a great day!
Beth

Friday, January 2, 2015

Amazing Mexican Red Rice


One of my husbands favorite meals is fajitas. I change up what I serve with it, from rice and beans to guacamole and chips. I had been buying boxed flavored rice for awhile and was not impressed. I have made some recipes and they just didn't turn out like this one.

I know a fantastic step is to sauté the rice before you add the liquids. Did I do it? Nope! I was too excited and just started dumping my liquids in. It was still good. I didn't have any chicken broth so I used water, which is still delicious. I'm so curious to try out chicken broth though, I can't wait until next time.

Recipe

1 hothouse tomato (2 plum tomatoes were recommended but I had the other) chopped
2 Tablespoon oil
1 cup onion diced
2 garlic cloves minced
1 cup long grain white rice
1 3/4 cup of water, chicken broth or vegetable broth
1/4 cup tomato sauce*
1 teaspoon dried oregano
Salt and pepper to taste.

* This explains why it tasted a little bit like pasta sauce hahaha I added a whole can of tomato sauce and I just looked at the original recipe and it says 1/4 cup. Oh my that's funny!


In a 3 quart pot heat oil at medium heat. Add onion and let cook until translucent about 2-3 minutes. Add minced garlic and rice sauté for about 3 minutes until slightly toasted. Add tomatoes, tomato sauce and broth or which ever liquid you choose and seasonings. Bring to a boil and reduced heat to medium low or low, put a lid on and simmer for 15 minutes. Turn heat off and let sit covered for 8 minutes.

My kiddo loved this, it reminded him of spaghetti, now I know why! I will remake this with less sauce and with chicken broth. Also if you like cilantro you can add 1/2 cup fresh when you add the tomatoes in.

I hope you enjoy this as we did! Have a great weekend!

**Update
I remade this. This time I used a half can of fire roasted tomatoes, I didn't have fresh. I also am updating above in the directions. I didn't say when to put in the spices.

Here's what it should look like!


Thursday, January 1, 2015

2015 Resolutions


Woohoo!! It's 2015! We are so excited for the next year - there are lots of things we are looking forward to but today is all about our 2015 Resolutions!!

Felicia :

My New Years Resoulution is to complete my crafts that I have stored for years! I received an awesome handmade bag from my sister in law and I love it! She used vinyl iron-on for the inside fabric. I have been wanting this product, so luckily she gave me a piece to have a reference to take to the store. I didn't know what the product was called or even what it even was. I want to make make-up bags and snack bags too.

I also want to have friends over more. I really like to entertain. Now that our lives have settled down I'm starting to have the mind capacity for parties. I will also celebrating my 35th birthday this year I'm looking forward to it. I really enjoy being around my friends and family!

Of course, I also want to be healthier this year. My son got a balance bike for Christmas this year. He wasn't pedaling his trike so his PT recommend a balance bike. It doesn't have pedals or training wheels. So he just moves with his legs. We've taken him out while we walk and he stays on his bike the whole time. This is great because he gets worn out and exercises and we do too.

Beth:
 
My resolutions are all about building on the success from last years resolutions.  
 
My first resolution is to work on having a healthier eating habit.  I am awful at saying no to just about any junk food - and I like to eat veggies but I'm not great at making them with meals (I always forget until it's too late and everything else is made so then I just don't make any veggies at all).  My co-workers and I all want to eat better so we are planning to buy food and make breakfast and lunch at work every day.  This will definitely help since we are not always the best at eating things that are good for us.  I think we have a plan that we will be able to use for eating all of our fruits and veggies and cutting back on the carbs and sugars - now we just need to stick with it.  We are also planning to continue going to the gym at least 3 days a week - we joined Crunch last year and it's really made it easier to go as a group.  My workout buddy and I also plan to add yoga to our regular 30 min cardio workout - I have read a bunch of article that say doing yoga for chronic pain has helped a lot of people so we are excited to see if it really makes a difference.
 
My second resolution is to learn different ways to help promote our blog.  We have been doing pretty well writing posts, but not bringing in a lot of people to read or comment on them.  Hopefully, I will be able to figure out some useful things to help - we would love to grow the blog this year!!
 
Jamie:
 
I don't like to do resolutions - hardly anyone follows through on them.  However, I am planning to start a 31 day challenge which I will posting about in the near future!!
 
We hope you have a wonderful New Year and we look forward to sharing our new adventures with you!!
 
Happy New Year!
The Three Peas

Related Posts Plugin for WordPress, Blogger...