Friday, June 27, 2014

Summer Pops


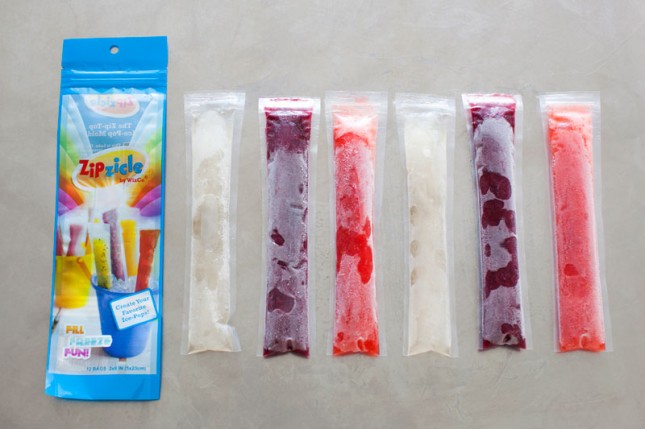
I found these awesome "make your own" small popsicles. I need to make a mental note to pick up more. I'm pretty sure I can reuse them, but in case I can't, I better get more. Their website has a lot of recipes and they are on Pinterest as well.  I can't wait to try some adult recipes as well. I made up a recipe and filled some of the tubes. I had some strawberry lemonade that I really like and some fresh strawberries. The lemonade is a little tart for my son so I threw in a banana and puréed it all together. I'm sure I will have a grand time making recipes for these. They are in the freezer right now so I will tell you how they taste soon. What's great about these is that you can put what ever you want in them. Like purée fruit with a simply syrup or fruit juice. Pear juice is wonderful for popsicle's it pair's well (see what I did there?) with other fruits and doesn't over power the taste.

I'm sorry for the small post. We are feeling a little under the weather today. I had fabulous plans to make cinnamon rolls. Hopefully tomorrow I will make them. Oh that's right I need flour. I have quite the list for the grocery store. I better go write them down before I forget.

I'm excited to have a late Father's day celebration with my Dad and family this weekend. Beth is getting me a recipe on Party Potatoes she said they were delicious, I can't wait to make them. I'm also bringing "frog eye salad" it's my son's favorite. My Mom made it for us when we came to stay with them and it's been in the back of my mind ever since. I love my Mom's cooking. I need a cookbook just on her!

I hope you all have a wonderful weekend!

Sometimes I just have to buy it instead of make it...for now

A few weeks ago I was all fired up about making my own bug spray.  I had my list and went to the store - and after seeing how much it was going to cost - I put it all back lol!  Seriously - it was like $40+ for all the things I needed.  I was wandering the store aimlessly and then I found this - on the bottom of the shelf and it was dusty and very easy to miss!  It was still a little expensive at $9, but way better than the price to make it on my own.  I definitely still plan to try making my own, but I need to collect the ingredients over time to help negate the cost.  At least I know it will work - the recipe I was using had the same ingredients - but of course this had a lot of additional ones as well.  We tried it out for a 2 hour walk in the woods and it worked great!  Usually I would have ended up with at least 10 mosquito bites (seriously - they love me!), but I only got one - and even then it was a pretty small bite compared to what I have ended up with in the past.  It also smells better than the sprays I have used in the past.  Overall I definitely think it is worth using - but (here is the downside) it looks like it might be discontinued.  I tried to look for the ingredients since I forgot to take a picture or write them down and I couldn't find it on the Kiss My Face website.  I may just have to go back and buy all of the dusty bottles off the shelf!!  
Active Ingredients: Octinoxate (7%), Octisalate (4.50%), Oxybenzone (4.50%)


Ingredients: Isopropyl Palmitate, Cyclopenta siloxane, VP/Eicosene Copolymer, Glycine Soja (Soybean Oil), Cymbopogon Nardus (Citronella) Oil, Pimenta Acris (Bay) Leaf Oil, Cedrus Atlantica (Cedar) Bark Oil, Lavandula Angustifolia (Lavender) Oil, Pogostemon Cablin (Patchouli) Oil, Juniperis Communis (Juniper) Fruit Oil, Vetiveria Zizanoides (Vetiver) Root Oil, Melaleuca Alternifolia (Tea Tree) Leaf Oil, Citrus Medica Limonium (Lemon), Peel Oil, Mentha Pulegium (Pennyroyal) Oil, Tanacetum Annum (Tansy) Oil, Hydrastis Canadensis (Goldenseal) Oil, Dimethicone.


Wednesday, June 25, 2014

Fresh Raspberry Pie


A friend, her two boys and I went raspberry picking yesterday. We went to two different farms and picked so many berries!!


Oliver playing in the fields
When I got home and looked at them all I was a little overwhelmed. I decide to try to make a dent in them by making a pie. I sent half the pie with a friend who stopped by last night. She sent me a message after they had some and her 4 year old daughter said  "This is SO nice!  This is so yum!  MMMM.... You better get over here Dad we are going to eat it all.... I am loving this".

Use whichever type of pie crust you would like.

Preheat oven to 375 degrees.

Ingredients:
5 cups fresh raspberries
3/4 cup sugar
1/3 cup flour
Mix sugar and flour together, then mix the raspberries in until everything is combined.


Pour into the prepared pie plate. I covered the pie crust and baked for 30 minutes, then uncover it and baked it for 20 more minutes. Let it cool for at least 10 minutes before serving. 

Enjoy
J

Oh Bananas!


I finally purchased a wire basket with a banana holder attached to it. I thought they were neat, but I only saw the holder no basket. It might be in my head but I think they do better hanging then sitting on the counter. My "on the counter food" was sitting in a serving bowl. Now I have freckled bananas hanging. Usually when I have very ripe bananas and they are sitting in a bowl and they are mushy. These where not bad, soft but not mushy. I thought about the things I could make, I was thinking of the first cake I made for my son. It was a banana snack cake. I found this recipe and put my own little twist on it.

Banana Chocolate Snack Cake

2 ripe bananas
1 1/4 cup flour
3/4 cup brown sugar
1/4 cup unsweetened cocoa powder
1/3 cup vegetable oil
1/3 cup water
1 teaspoon baking soda
1 teaspoon white vinegar
1/4 teaspoon salt
1/3 cup semisweet chocolate chips

Preheat oven to 350 degrees Fahrenheit. Prepare an 8 by 8 baking pan, grease or line with parchment paper.

In a medium bowl mash bananas, add all ingredients except chocolate chips. Pour into prepared pan and sprinkle chocolate chips on top. Bake for 35-37 minutes or when cake tester comes out clean. Let cool for 45 minutes.

I hope you enjoy!


I take my son to Autism therapy and their office has cake Wednesday's so I partake in it by eating or bringing, usually both. It's a wonderful thing!


Tuesday, June 24, 2014

Lemon Blueberry Cake


This cake was very moist, lemony and good! My nieces and I made it together for Father's Day, it was easy to make and a big hit. If you don't really care for lemons you are not going to like this cake, the lemon really is the star here.  I got the recipe from here

The recipe will make 3 round cakes, but Hailey wanted to make it square. 

Cake ingredients:
1 cup softened unsalted butter
4 large room temperature eggs
1 1/4 cups sugar
1/2 cup brown sugar
1 tablespoon vanilla extract
3 cups flour
1 tablespoon baking powder
1/2 teaspoon salt
1 cup buttermilk (use real buttermilk)
Zest and juice of 3 medium lemons (use less if you want it to be less intense)
1 1/2 cups fresh or frozen blueberries coated in 1 tablespoon of flour (we used frozen)

Frosting ingredients: 
8oz softened regular cream cheese
1 stick softened unsalted butter
3 1/2 cups powdered sugar
1 teaspoon vanilla
Pinch of salt
1 to 2 tablespoon heavy cream (we used one and I thought it was too runny. I would take this out all together) 

To make the cake:
Preheat the oven to 350 degrees and grease your pans.

With a mixer beat the butter, then add both sugars and beat on high until creamy. Scrape the bottom and sides of the bowl before adding in the 4 eggs and vanilla. Mix on high for 2-3 minutes or until everything is mixed together. 

In a separate bowl combine the flour, baking powder and salt. Add the dry ingredients to the wet ingredients in thirds - mixing a few times by hand in between. Stir in buttermilk, lemon zest and juice - be careful not to over mix. Fold in coated blueberries.


Pour the batter into the greased pans and bake for 20 to 30 minutes, depending on the size of pans you are using.


To make the frosting:
Cream together the cream cheese and butter until smooth, beat in powder sugar, then add in vanilla and salt. Once everything is mixed well - if you are adding cream mix in now. 
Once the cake is cool - frost and decorate how you would like. Hailey made our cake beautful! :)


Now have a bite and enjoy!
J

Friday, June 20, 2014

Cinnamon muffins


I wanted cinnamon rolls for breakfast but we slept in a bit. I will make them later. This is an ok recipe. I think I'm going to try some different things next time. I was reading about sifting, I was always thought it was extra work that didn't do anything. I'm beginning to think I should sift more.

I picked this recipe because of the picture. They looked perfect. I know lots of people who need pictures to make recipes. My take on it is that when I make something it usually never looks like the picture so I don't need the pictures. I have a ton, probably acurate assement, of cookbooks. I use them, not all, but quite a few. My dream is to go through each index and type in all of the recipes so that I can search my books instead of the internet. I have several recipes that I remember finding but I don't remember which book it was in.

I like this recipe it has whole wheat flour, uses sunflower seed oil and cinnamon and not too much sugar. I did not get 12 muffins like the recipe said, I will try some of my ideas to see if I can get a tender and bigger muffin.

1/3 cup sugar
1 3/4 cup whole wheat flour
2 1/2 teaspoons baking powder
2 teaspoons cinnamon
1 egg
1/2 cup whole milk
1/4 cup sunflower seed oil

Topping:
1 teaspoon cinnamon
1 teaspoon sugar

Preheat oven to 400 degrees Fahrenheit, line a muffin pan with liners or grease cups.

In a large bowl mix sugar, flour, baking powder and cinnamon. This is where I would sift all of the ingredients, this would also mix the ingredients. In a small bowl beat egg add in milk and oil. Fold wet ingredients into dry ingredients until just combined. Scoop batter into prepared pan. Mix toppings and sprinkle on top of the muffin batter. Bake for 17 minutes. I added butter, I couldn't help myself!

I hope you enjoy this recipe, I got it from here.

Thursday, June 19, 2014

Fried Rice without the Rice?!


One of my favorite dishes that I am sad to not eat for a while is Fried Rice - I love Thai Fried Rice especially, but most versions are good to me :)  When I was looking for recipes to make without grains, I came across this one which uses grated cauliflower instead of rice.  I was a little worried it wouldn't be the comfort food that I love, but I was pleasantly surprised that it was really good!!  It wasn't exactly the same as the regular version, but not in a bad way.  Grating the cauliflower was messy (but that might have just been me), and it is not a cheap option since organic cauliflower is not cheap at all - but overall I was really happy with it.  One head of cauliflower made just enough for us - and we would have definitely eaten more if we had it.

Cauliflower Fried Rice

Ingredients:
3 cups shredded cauliflower
1/2 cup frozen peas

1/2 cup carrots, thinly sliced (I used baby carrots I got at the Farmer's market - so good!)
3-4 garlic cloves, minced
1/2 cup onion, diced (I used green onions from my garden, but I will add regular onions as well next time)
1/2 tbsp oil (whichever kind you like, I use Sunflower Oil)
2 eggs, scrambled
3 tbsp soy sauce

Saute the onion and garlic in oil on medium/high heat until softened.  Add the carrots and peas, and saute until cooked through.  Add the eggs, soy sauce and grated cauliflower - stir frequently and cook for 5-7 min until cauliflower is softened and cooked (but not mushy).

It goes together really quickly so make sure everything is chopped, grated, scrambled before you start.  I only used the green onions I brought in from my garden - it was tasty but I think having regular onions as well will add more flavor.  The fried 'rice' was really good, but not as flavorful as it could be - so add anything you like and find the flavors you like best.  I think adding chicken (or any protein) will help it be a little more filling as well.

Did you catch that I used green onions from my garden?  I started regular onions at the end of March, and about 3 weeks ago I noticed that a few of them started getting flower stalks.  I looked it up and found out that the crazy weather had made them bolt - once they start flowering they wont grow any longer and the flower will actually make the onion bulb split.  Apparently they also wont store as well as full grown onions - so I decided to pull them and use them as green onions.  I took out all of the onions that had sent up a flower stalk and chopped them and put them in the freezer (green onions work great straight from the freezer).  Once I pulled them I realized how tall they actually were - since they tend to flop around when they are in the ground they didn't look that tall but some where almost 24" tall!  Not all of the onions were good enough to eat - most of the plants had 4/5 green (stalks, leaves??) and at least 2 on each were too damaged to eat - but I pulled around 8 onions and ended up with almost 2 cups of chopped green onions.  They are really flavorful!!  I am looking forward to using more things from my garden - maybe I should grow cauliflower next year :)


Wednesday, June 18, 2014

Meatloaf Cupcakes with Mashed Potato Frosting


My 11 year old niece Hailey and I were in charge of dinner the other night and this is what she picked. When I make meatloaf at home I always use muffin tins instead of a loaf pan. I like that they are portioned out that way, everyone can have there own and I freeze the rest. They freeze well and my husband likes them for a quick meal (he doesn't cook) when I'm gone.

These are easy to make and you can use whatever recipe you would like. This is what we did for 6 people (we had leftovers).
Ingredients:
2 lbs of extra lean ground beef
1 can of diced tomatoes, drained
1 small onion, chopped small
Garlic
Oatmeal
Ketchup
Worcestershire sauce
1 egg
Salt and pepper

We divided the meatloaf into muffin tins and then baked them for 35 to 40 min on 375 degrees. 


For the mashed potatoes Hailey peeled, cut up and boiled them. We whipped them and added milk, butter and fresh pressed garlic.


We used an ice cream scoop to frost them.  She was so proud of them!


Enjoy!
J


Flying and brownies


Sorry this post is so late. I dropped my husband off at the airport today. I made these brownies last night for dessert. They didn't look good, but they are! I'm hoping I know what happened, oh darn I will need to make more! My problem was I added too much butter. It doesn't taste like a problem though, in fact I think it needs a glaze or ganache. This is a good example why you shouldn't bake while tired or shop while hungry. I was shopping for a couple of things yesterday and I passed the baking aisle, I love that place! I saw a big batch recipe for brownies and it all started clicking into place.

Here's the recipe!

1 cup brown sugar
1 cup granulated sugar
1 1/2 cups flour
 3/4 cup of unsweetened cocoa
3 eggs
1 1/4 cups of butter really softened
2 1/2 teaspoons of vanilla
1 cup of Reese's peanut butter chips

Butter a 9 by 13 pan. Preheat oven to 350 degrees Fahrenheit.

Mix sugars, flour, and cocoa in a small bowl. Beat butter and eggs and hand stir into dry ingredients. Stir in vanilla and pour half of the batter into prepared pan and smooth out batter. Sprinkle peanut butter chips and pour and smooth out remaining batter.

Bake 30 min and let cool 20-30 minutes.

My husband had whip cream on top of his piece of brownie, I had a bite it was good!

I hope you enjoy!

Tuesday, June 17, 2014

Coconut Flour Banana Muffins

I was soo hopeful for this recipe - I mean it sounded so good! Banana bread with a coconut flavor...mmm.  This was the first recipe I made with my new grain-free plan in mind and it was so/so.  I was bummed - I really, really wanted to love it!  They looked nice, and they felt like they would have a pretty good texture...but after letting one cool for 15 min, and putting butter on it, I took a bite and it was mushy.  Not like "I can't eat another bite it's so gross" mushy - but definitely not a texture I am excited to eat.  It was also very coconut flavored - I used the coconut flour and the coconut oil (I think next time I will use butter instead).  I have had recipes before that got better after they cooled, so I waited an hour and it was better but still very blah.  Having said that - I ate 4 on Saturday because I was hungry all day, my stomach did not know what to do without bread to fill it up, and I ate all day! :)  I put the remaining muffins in an airtight container and refrigerated them, and on Sunday they were better but still nothing to be excited about.  I tried one this morning and it was a lot better - so if you follow the recipe make them at least one/two days ahead.  I am going to try replacing the coconut flour with almond or cashew flour - I think it will give the muffins a better texture and flavor.         


Coconut Flour Banana Muffins

Ingredients:

5 eggs
2 bananas
1/4 cup coconut oil or butter (softened)
1/2 cup coconut flour
1 tsp baking soda
1 tsp vanilla
small amount of milk to thin (may not need)

Preheat oven to 400 degrees.  Put all of the ingredients in a stand mixer (or use a hand mixer or immersion blender), mix until the batter is smooth and well incorporated. If the batter is too thick, add a little milk to thin, but don't let it get runny at all.  Grease muffin tins and evenly distribute the batter - I got 12 muffins using a 1/4 cup measuring cup.  Bake for 13-18 minutes until lightly browned and set in middle.


I got the recipe here - I definitely want to play around with it to see if I can make it a little tastier.  Anyone else have a good banana bread recipe that is grain-free??  I need something I can use as breakfast in the morning on my way out the door. 

Also, I have to say the most surprising thing about going grain free is how many eggs I have to use in recipes - this one has 5 eggs.  Since Saturday morning I have used 16 eggs - usually I go through 12-18 in 2 weeks!!

Monday, June 16, 2014

Colored Soap Foam Sensory Play


I'm at my sister's house on a horse ranch - I love it here. I want chickens, cows, horses and more...I need a farm! I want to live off the land. Oh the day - dreaming of how perfect it would be. :)

My nieces and I made a big tub of colored soap foam the other day. We had fun making it together and the kids had even more fun playing in it. It's pretty simple, with only 3 ingredients. It took us about 10 minutes to make 9 batches of it in 3 colors. 3 of the batches I doubled the recipe and 3 batches I did not. I didn't see a difference, so as long as your bowl is big enough you could do more then one batch at a time.

Ingredients:
1/4 cup of water
2 tablespoons of dish soap
Food coloring (we had a little light staining on hands, but it came off before the day was over)

Add all 3 ingredients into a bowl, and beat with a hand mixer for 2+ minutes until foam starts to get stiff.


Use a rubber spatula to spoon your foam into whatever tub or bowl you're using and repeat until you have the amount you want.

Let the fun begin!
 
We took it outside for less mess!


And just for fun I will leave you with some sweet baby pictures.


These 3 went on a walk with us...


Enjoy
J

Friday, June 13, 2014

Bologna Pâté


I was sitting here reminiscing about my mom's cooking. This recipe always cracked me up. This is what we called Bologna Pâté. It is the most simple recipe ever. The way my mom made it was the best. She had a meat grinder that attached it to the counter. She would hand grind the Bologna. I believe she would process the pickles in a food processor.

I just love this simple recipe!

1 package of Bologna
Bread and butter pickle chips and a little of its juice.
Mayo
Crackers, butter crackers are the best, I use mini multigrain here.

Of course there are not precise amounts.  I process the pickles first, then the Bologna, otherwise the Bologna sticks to the bowl. I put in about a cup of pickles and pulse until finely chopped, put into a small mixing bowl. Then process the Bologna, I usually use a half package, the same way and add to the pickles. I add a little bit of mayo, about a tablespoon, stir and add more if needed. Last I add a little bit of the pickle juice because I like the flavor. We always served with the famous butter crackers. I found these mini multigrain crackers at Trader Joes. Of course serve it in your fanciest bowl because it's a fancy appetizer.

Enjoy your weekend! Don't forget to wish Father's of all sorts out there a Happy Father's Day!

Thursday, June 12, 2014

Grain-free Menu Plan

Since I am planning to go grain-free starting Saturday, I figured I should get a new menu together - my last one didn't quite work anymore :)  I actually managed to keep most of our regular meals - I just removed the grain items and either left it or added potatoes.  I also removed the lunch section and added a baked goods section.  I figured that since I would not be able to have store bought breads and treats, and I like to bake anyways, that I should try to find some recipes to make.  I am really hoping to find a sandwich bread for my lunches on the weekdays, so I am going to try a few different ones over the next few weeks.  I found a great blog about how to make your own flour/meal from nuts like almonds, cashews and peanuts - hopefully this will help bring the costs down since specialty flours can be pricey.  You might also notice that there seem to be a large amount of sweet items - don't be fooled - I always have sweet treats.  Usually, I don't include them in my menu planning - I just make what I feel like at the time.  Since I am making such a huge shift in the way I eat, I thought it would help me to see what my treat options are :) Also, I am not removing sugar or carbs from my diet - just grains.

Now, I just need to go grocery shopping and throw out all of my 'not allowed' foods - luckily I'm pretty low on those at my house since this is my weekend to shop anyways. 

Wish me luck!

Wednesday, June 11, 2014

Italian Antipasto Pasta Salad


I know I have been gone for two weeks, but I'm back! Things have been crazy, but I have missed the blog!

It's June and the sun has been out more. It makes me want to eat summer food! I have been making this pasta salad for about 13 years and I still love it. An old friend and I made it up late one night when we were 19. We were wondering the store and couldn't decide what we wanted to eat. We decided on this........

Ingredients:
1 box pasta (I like the bow tie pasta the best, but I usually just use whatever I have)
Tomatoes (I used 4 big Roma tomatoes this time)
Spinach
Red onion
Cheese, cut into cubs
Dry Italian Salami
Green olives
Any kind of Italian dressing (sometimes I make my own and sometimes I use bottled)

While the pasta is boiling, I chop everything up and throw it into a big bowl. When the pasta is done, strain the water out and rinse it with cold water, stirring the pasta to cool it all down. Add pasta to the bowl and mix in dressing.


A simple summer dinner in less then 30 minutes. Yummm

Enjoy
J

Summer Time!


I'm so excited for the end of the school year! My son is all done with school after tomorrow. We are not completely free to do whatever we want - we have weekly sessions with Autism Therapy, OT and Speech -but our morning's are free for now. I do want to do a couple (or a few) fun trips this summer! I really need to start planning them out.

My everyday morning plan is to go to the gym, they have a play area for kids. I was also thinking of putting him in a swim class. We have not given him lessons yet and I think it would be really good for him. I got him a little pool and a wet slide that has sprinklers that run along the edge to keep it wet. Last summer I was sick most of the time, come to find out it was a combination of allergies and heartburn. This year I want to play outside as much as possible. I found a shade tent for me and him if he wants to take a break.

I'm also hoping he will be fully potty trained. I have not picked up any more pull ups. This is it - here we go. I'm also trying a new idea out. If he has an accident I want him to feel more, so I'm going to have him in underwear and pants. (Thank you Beth!) The thing with boys is some of them flat out don't care. Let me tell you we have a pile of toys that he gets when he does the big one. He just will not go, he's not there yet. That is Okay! I read somewhere that when they are four they get everything figured out if they haven't already.

I need to finish up my baking tonight as well. I have brownies for his bus drivers and I want to put cookies in the goodie boxes as well. I'm hoping to find gifts for his Teachers and TA's while I'm out today.

I hope you all have a great week, I will see you on Friday!

Tuesday, June 10, 2014

I have to try...

Add caption
I'm sure a few of you have figured out that I have been making a few changes in my lifestyle.  There are lots of reasons for doing this, but the main one is preperation for future babies :)  There aren't a lot of better motivations than that!  So I have started slowly eliminating chemicals from most of our daily life (I do still occasionally bleach my white linens, I use a stronger cleaner for my shower and stove than I should, and we still use Febreeze because my cat can stink up the whole house).  I have also been slowly eliminating most processed foods, high fructose corn syrup, and other unnecessary food additives - which means more organic, all natural and real foods in our diet (eating out doesn't count...right??).  Even with this shift in our eating I still eat way too many snacks, carbs, fats (not the good kinds), and generally unhealthy food on a regular basis.  This needs to stop - and being me it will have to be a drastic change - I have no willpower and very little self-control when it comes to food. 

One of the things I have repeatedly and loudly said is that I could never give up bread (or grains/carbs in general).  So now I have to eat my words...too bad it isn't a loaf of bread.  I have spent a lot of time reading about things that can make you healthier, feel better in general, and help with Fibromyalgia - and a lot of things I read say that cutting grains from your diet has an immense effect.  I have resisted this for a while, but I finally decided that I should at least try it and see how it goes.  Honestly, most of what I have read says grains and sugars - but that's not happening (at least not yet).  I may have to give up sourdough bread for lunches, but I am not giving up cookies!  I don't plan to go completely Paleo or anything, and even if I do stick to the grain-free menu it wont be forever (I have no intention of giving up all of my favorite foods forever), this is a way to "detox" from my addiction to grains.  My hope is that I will be able to cut grains from my main diet and use them as treats and on special occassions.  I also plan to try a few of the alternatives to wheat flour, so I am sure I will have some recipes to share.  I am taking a few days to use up what I have in my house, and make a new menu for the next 4 weeks.  I have to admit I'm a little scared!

Wish me luck!  

HAHA - I just realised the song on the radio...

"Well, I've been afraid of changin'

'Cause I built my life around you
But time makes you bolder"...

Perfect LOL
      

Monday, June 9, 2014

An Update, and an I Told You So...


A few weeks ago I talked about making my own dishwasher tablets.  They worked great - except when they didn't.  The first few washes turned out just as good as anything I have gotten at the store, but then I started getting cloudy dishes.  My tupperware seemed to be the worst, but silverware and glasses also took a small hit.  It's hard to see but the glass on the left is cloudy, and the one on the right isn't.  (I tried getting a better picture, but this was the best one.)  At first I thought it was just the one load, but then every load started having issues - not cool.  So I went online and found a ton of people who had the same issue.  There were a few different ways that people used to solve their problems, so I wanted to try them and see what worked best for me.  After trying a few things, I found that 1/2 cup of lemon juice in the basin works for me.  I tried vinegar, but I think the lemon juice worked better.  If I have a particularly dirty load, I will also add 3 drops of dish soap.  This seems a little like cheating, but I would rather have clean dishes than worry about it :).  I also do one other thing that I never thought I would do...

Now, time for a funny story (and the I Told You So) - So one night I am trying to figure out how I am going to make this homemade dishwasher tablet thing work - I'm pretty attached to it for some reason - and Eric wants me to switch to the store bought stuff again.  So I am thinking of what I can do and I start rinsing off my dishes, and I think "well, it's not too bad rinsing the dishes off - especially if it means they will come out clean"...and I am about halfway through filling the dishwasher when it dawns on me - my mom was right all along, damnit, and now I have to admit that she was right!  And I have to say it made me laugh because I have resisted rinsing the dishes before loading them for years and now I do it, because it makes the dishes cleaner!!

So, Mom, you were right all along...Lol, that kinda hurt :)
 

Friday, June 6, 2014

Not Stouffer's...maybe it's me?


I really like macaroni and cheese, and I really, really like Stouffer's Mac and Cheese - especially the crispy edges! I was excited to try this recipe out. Mine did not turn out like theirs - it was good but it did not taste or bake up like Stouffer's. If you want a good mac and cheese recipe this is a great dish. The cheddar cheese soup acts like a recipe starter, you don't have to make a roux, so this comes together quickly. The sauce was a little gritty so I researched a little bit on this and I will give a little more directions in the recipe to help this not happen to you.

Here we go...

2 cups elbow macaroni uncooked
1/2 stick of butter
1 can of cheddar cheese soup
Pinch of salt
1/2 teaspoon of mustard (I think I would leave this out next time, I think it takes away from the cheese flavor)
1/2 teaspoon of black pepper
2 cups of shredded cheddar cheese
1/2 cup of sour cream
1 cup of milk

Cook pasta as instructed on package. If you want to bake the macaroni preheat the oven to 350 degrees Fahrenheit.

Melt butter in a large saucepan, I would have it at med low or low if you have a gas stove. Add cheddar soup and seasonings, heat for 1 minute. I dumped all the cheese at once, which throws off the temperature. You need to add the cheese by small handfuls and mix until melted, then keep adding until all of the cheese is incorporated. Slowly add the sour cream little by little. Again, add the milk slowly. By spoonfuls add the cooked pasta until all is incorporated. At this point it is ready to eat or you can pour into an 8 by 8 pan and bake for 20-30 min.

I hope that you try this out and let us know if you are successful with these instructions.  I got the recipe here.


Thursday, June 5, 2014

Bug Free Zone...Please!!

Ever since I started walking and jogging after work I have been battling a problem - mosquitoes!  It is definitely not a new problem, but it is a bigger problem since I go out at night now.  Mosquitoes love me and it's easy to see!  I not only get the bite, but then a welt and a red area anywhere from the size of a dime to a quarter - they are itchy and hot for a week after!  Then, because I am awful about leaving them alone, I get scars for months afterwards (Eric once told me I looked like I had the plague after a particularly bad night with 10 new bites). No fun!

So, not only will I be applying sunscreen before every excursion (because, yes, I do burn when it is 7pm and overcast), but I will be applying bug spray as well.  I am not a big fan of the commercial bug spray's that use DEET, so I looked online and found this recipe for making your own.  There are ton of different mixes, but this one was simple and I can always add things if it doesn't quite do the trick.  I haven't tried it yet, but I will post an update after using it for awhile.

All Natural Bug Spray:

1/3 cup of Witch Hazel
1 ⁄2 teaspoon Lemongrass Oil
1 ⁄ 2 teaspoon Eucalyptus Oil
1 ⁄ 2 teaspoon Citronella Oil

Mix and use in a small spritzer/spray bottle.  Shake and apply as needed :)

Have a great day outside!

Wednesday, June 4, 2014

Cherry Cupcakes, yumm!


My birthday is coming up. It's a month out and I like to plan ahead as much as possible. I think I will be making these for myself. I have a favorite box cake mix, it's my one (ok, I may have more than one) indulgence that I enjoy. Especially when pared with the rainbow chip frosting. I just found out that I can buy the rainbow chips from Wilton. I'm super excited and I will be adding those to the frosting for my birthday. Another exciting thing that happened was I found natural maraschino cherries at Whole Foods. Thank goodness they are tastier than the originals. Of course they are not as pretty, but they are very delicious. I have to admit that I added red food coloring to the batter since I don't have the natural beet color. Next time I will use. I figured a little wouldn't hurt, since that little bit is all the red dye I put in.

So here's the recipe:

1 10 oz jar of maraschino cherries, liquid reserved and chopped.
2 egg whites beat to stiff peaks
2 cups of flour
1 Tablespoon of baking powder
1/4 teaspoon of salt
1/2 cup of unsalted butter
1 1/4 cups of sugar
1/2 maraschino juice
1/4 cup of milk
1-2 teaspoons of almond extract, I used 1 and that was plenty for me
red food coloring

Frosting:
3 cups of powdered sugar
1 cup of butter
1 teaspoon of vanilla or a little almond would be good too, I would start off small, almond flavor is strong.
reserved juice of maraschino cherries

Preheat oven to 350 degrees Fahrenheit, line muffin tin with paper liners.

In a medium pourable bowl add flour, baking powder and salt. In a small pourable bowl mix cherry juice, milk and almond flavor. In a large bowl beat butter, add sugar until combined. Starting with flour mixture, add to butter mixture, then liquid mixture and then ending with flour mixture. I did 3 flour additions and 2 liquid additions. Fold the beaten egg whites into the mixture. Lightly add the chopped cherries and scoop into the prepared pan. Bake for 20-25 minutes. Let cool

To make frosting:
Beat butter and slowly add the powdered sugar until fluffy. Add the cherry juice to your liking, I added all of it! Then hand mix in the vanilla flavor.

Frost your cupcakes to your liking. I just scooped a big amount onto the cupcake and then smoothed it out with my offset spatula.

You can top with a cherry with a stem on top, that would be sweet!

I hope you enjoy this recipe as much as I did!


Tuesday, June 3, 2014

Let's go for a hike!

I would love to show you a picture of how happy Winda was on our walk this weekend...but it wont be a surprise to anyone that I forgot to takes pictures...again!!  I can see it now... "I'm sorry honey, we don't have any pictures of you as a child, because mommy forgot" - seriously, our kids are doomed. Although I'm sure they will appreciate it when they start dating - yeah there are more than a few embarrasing pictures of me I would love to forget, LOL.  The flipside of forgetting to take pictures is knowing that I forgot because I was having fun, enjoying the moment, instead of worring about taking pictures.  Anyways, back to Winda - since I didn't have a picture from our hike in the woods - I thought I would share a few of her because she is just so darn cute.  (I'm gonna have to do a post about Pinky soon so he doesn't get jealous!)

One of the main reasons we took her with us was to see how she did on trails.  We have decided that this year we are going to do more than work on the house every weekend.  One of the things we would like to do is go on day hikes - we live in Western Washington and there are tons of awesome places to visit nearby that we have never been to!  However, because she is a smaller dog, we were concerned that she would get too tired or have trouble getting over/around things in the trails.  She did great - the only problem she had was when I stepped on a stick and it poked her in the face (oops, LOL).  Unlike most dogs (who I am assuming like to lead, based on what I have seen with other dogs we ran across) Winda likes to walk behind me when we are walking - she keeps up and isn't scared, she just doesn't want to be in front unless someone else is ahead of us - silly dog :)

Now that we know she is good with hiking, we are going to start planning a day hiking for early next month (We have a birthday, a wedding and a shower to go to this month so we don't have any extra days to go this month unfortunately).  One of the things I want to get is this book.  Dogs aren't allowed on trails in certain areas (including National Parks), but there are so many places to go where dogs are allowed - and I need some help with figuring out the best places to go :)  The second thing I want to get is this.  Yes, I know it is a little silly - but it is easier than being stuck 3 miles from the car and having to carry her back in my arms.  Plus, it will be easier to carry extra water, a bowl, baggies (new & used), snacks, etc...as well as the things I need for myself.  I figured if I got it and used it a few times this month, she will be a pro at it by the time I really need it.  


Monday, June 2, 2014

A great Expo...and a little incentive!

  
So excited to see the bees out!
This weekend was packed with fun things.  On Saturday, my mom and I went to the Mother Earth News Fair at the Puyallup Fair Grounds.  It's pretty rare that my mom and I get to spend time together without a million other things happening at the same time.  Usually, Eric and I have to cram a lot of visits into a single day - otherwise we lose an entire weekend of house time (plus the extra travel cost).  Hopefully we will be able to take more time in the near future, but it's already JUNE and we have so much to do still.

When my mom called me to see if I wanted to go to the expo with her, I jumped at the chance.  If you have never seen or heard about Mother Earth News (or even if you have), you have to visit their site!  They cover a broad range of subjects, but I think their tag line says it all "The original guide to living wisely."  Living Green, Organic Gardening, Homesteading...They have it all.  The fair was a 2 day event, but we were only able to go 1 day - next year I am going to go both days if I can.  There are so many presentations/speakers/ workshops that it is impossible to see everything and still see all of great vendors there as well.  Of course there is also the food...yumm fair scones!  Next year, I will take pictures!  I was having so much fun that I completely forgot to take pictures (oops).  I also have a little experiment I will be posting about, but it will probably be next week before it is ready.

Sunday, Eric and I had a lot of fun walking the trails with our neighbors.  We all wanted to see how it would go, so that we could maybe go on a few day hikes in our area.  We took Winda, and they brought their kids, and everyone did great!!  We went a little over 3 miles in 2 hours.  It is really cool that we have so many trails that we can reach just by walking from our house.   

Then, after I rested for a few hours, I decided I needed to get caught up on my weeding - the weather has been a weed heaven lately.  So I spent about 3 hours weeding all the beds in my front yard, and then I weeded the area around the apple tree and planted red and green scallions (just for the heck of it).  I am so excited about how well the front beds are filling in, I can't wait for everything to start blooming!!  My roses took a beating - well a cutting - poor things were covered in black spots so all the affected areas had to go - it wasn't pretty!  I also need to get out and stake my dahlias and peonies asap!! 

Here are a few pictures of my front beds after I finished weeding them.

    
I hope everyone had as much fun as I did this weekend!!

(psst - did anyone else catch the weed in the 3rd picture I didn't notice until after I took the pictures?  There's also a few weeds I left until I had confirmation of what they were - turns out they're Milkweed - good thing I didn't pull them out since they need to be dug out to actually get rid of them!)
Related Posts Plugin for WordPress, Blogger...