Friday, August 29, 2014

School's Back!


For most around my area, this is the last weekend before school is back on. My kiddo goes to the public elementary school, luckily he starts the following week to get the bigger kids settled. We will have a whole week to do activities practically by ourselves. I have already done his clothes shopping. I'm looking forward to spending one on one time with him. Our schedules, although filling up more, it will be less crazy. He will be going to school and getting his Autism, OT, and Speech therapy, his social skills has stopped for Fall and Winter. I'm glad that the only time we will need to go out will be for one day for his OT and Speech.

It's been staying warm here, except today it has been raining a little and it is cloudy. This is the first day I have felt like I'm ready for Fall. I have pinned a bunch of soups and warm dips. I have thought of pumpkin all day. Unfortunately I don't have enough ingredients to make any of the wonderful recipes that I want to make. My local bulk shopping store had 3 large cans of pumpkin I couldn't help it, I grabbed one. I'm also looking forward to apples, canning, baking and eating them. One of my favorite snacks is apple slices and cheese slices.

Let us know what your favorite fall recipes!

Have a great weekend!

Wednesday, August 27, 2014

Things are changing..


I have loved this summer here in Washington, it's been so nice. But things have to change eventually!

The fall Pins have showed up and school is beginning. My kiddo starts the 2nd week in September. He and I are so excited! I'm so blessed that he loves school just like I did.

I wasn't ready to make a pumpkin flavored dessert. I feel like school and cookies go hand and hand, so that's what I decided to make. I make a mean chocolate chip cookie. Just like our season's change sometimes I want to mix it up a bit too. I made a chocolate crinkle with white chocolate chips. I really like crinkle cookies.

I was a little nervous about melting chocolate in the microwave, it never fails I always turn it into concrete. What I have found out is that I have been cooking it too long. I was cooking it until it was smooth. That's were I went wrong! This is another reason I love trying new things, I usually learn something new! It went perfectly, I'm so glad!

Here's the recipe:

8oz semisweet chocolate chips
4 tablespoons unsalted butter
2/3 cup all purpose flour
1/2 teaspoon baking powder
1/4 teaspoon salt
2 eggs
3/4 cup light brown sugar
1 1/2 teaspoon of vanilla
12oz white chocolate chips.

Preheat oven to 350 degree Fahrenheit.  Grease 2 half sheet pans with butter or spray.

In a microwave bowl add chocolate chips and butter, microwave on high for 20 seconds then stir. Repeat this until the mixture is almost melted. Set aside.

In a small bowl, combine flour, baking powder and salt. Set aside.

In a large bowl add eggs, brown sugar and vanilla until lighter in color. Add melted chocolate mixture and until well blended. Add flour and mix until just combined. Hand mix the white chocolate chips in.

Scoop onto prepared baking pans and bake for 12-15 min. I usually under bake my cookies, so I pulled them out at 12 min. I also turned them half way through the baking time.

My baking notes are next time I would add dark brown sugar and I would put in a little bit of dark unsweetened chocolate chips. I like the flavor of dark better. I think it will complement the white chocolate.

Enjoy!

This is where I got the recipe from.


Monday, August 25, 2014

The tale of two projects...


It always amazes me how fast our plans can change.  When we found out our kitchen cabinets were coming in the middle of our closet project, we both agreed to finish the closet before starting to build them...that lasted about a day!!  Then we found out that Eric's dad was available to help him finish running the electrical outlets to the islands - in 2 weeks!  Yikes!  We need to have both islands ready to install before they do any of the electrical work, and while the cabinets are built there is still some work to be done to make  them into actual islands.    

Here is a quick rundown of our plans for the two islands:

The front island -
 
Each of the corners will get a 3"x12" cabinet box (the yellow squares above) - this seems small but they will hold spices, measuring spoons/cups and one will have access to an outlet.  Also, we need to buy/create 4" corner posts (the blue squares).
The back island -
 
For this cabinet we need to buy/create 2" corner posts and figure out how to support the countertop.  I plan to use a padded bench instead of two stools or chairs - it will save on space and be a little more roomy. 

We also need to build the bookcase shelf for the pantry (the top cabinets will be about 12" higher, with a shelf between the top and middles sections).  Luckily that doesn't have to be completed before we do the electrical, but it does need to be completed before we can finish installing the cabinets and can use them...

So, how does this affect our plans to finish the closet first?  Yeah - it's been semi-delayed.  We have a ton of small steps that need to be completed on the closet, so we plan to keep working away on those while we also work on the islands.  Then we will need to paint the closet - which will probably be done in a few weeks.  In the meantime, here is where we are...


So close, but oh so far!!  I am really happy with how it is turning out - and I can't wait to see it all completed!!!

Anyone else start more than one project at a time?  We somehow end up doing this all the time - even when we don't plan to - LOL!

Have a great day!
Beth

Pssst - We are also (finally) going to be replacing and moving the kitchen light in the kitchen - now I just have to find something we can both agree on...   

Friday, August 22, 2014

So nervous

Today I'm taking my son to the dentist. Anytime I come at him with floss he freaks out on me. I'm hoping it goes well, even though I don't think it will. He's 4 and this is his first time going, to think he won't have an cavities is a far stretch. We can't take him to get his hair cut, he freaks out on them because they use the razor and he doesn't care for the sound.

He has been watching tv shows about going to the doctor and dentist so he's super excited to go. I sure hope it goes well.

My experience with dentistry has not been well until adulthood. I stayed far away. My son is just like me and needs to know what's going on. That's really hard to do when your young you think everything is going to hurt. I was strapped down and didn't have my parents with me and it was traumatic. One time I was crying before the Dr. came in, he walked in peaked in my mouth said it will fall out on its on and he left. I scare more doctor's then they scare me.

When I finally started going back they gave me Valium to help calm my nerves. I also had gas, they had to turn it way down because I was sucking in too much, I couldn't feel my lungs. I have found these days they are a lot nicer and I hope that my kiddo won't be as scared as I was.

I'm taking him to our Children's hospital they have a dental clinic and if need be we can knock him out for a simple cleaning.

Being a mom has definitely helped me become more brave. I want my son to know that sometimes we have to do things that are a little uncomfortable and my hurt just for a bit, they are necessary to keep our bodies healthy.

Wish us luck today! I hope you all have a great weekend!

Thursday, August 21, 2014

Is it a Toy or Tool?

I'm sure most people have figured out by now that Eric and I build things - a lot!!  I would have to say at least 75% of the time we decide we can build something better than what we can buy.  Even after 3 years of almost constant projects - we have barely scratched the surface of the number of shelves, cabinets, closets, furniture and random wood projects we have planned. 

Which brings me to our current "should we?' moment.  During our closet project we went to Home Depot and had one of the associates cut the 1/4" backing for us.  We did this for 2 reasons - (1) we were too lazy to unbury the sheets of 1/4" plywood in the garage (which we very smartly buried at the back of a huge stack of random wood we have and then parked a car in front of and so on...it's about an hours worth of moving things to get to it and then we would have to put it all back), and (2) since we decided to buy new wood it wouldn't fit into my car in its original size.  Anyways - as we were standing there while she made 6 cuts in like 5 minutes I thought "Wouldn't it be awesome to have one of these panel saws, where you just slide the 4'x8' piece of plywood through and it cuts it like butter?!?", then I basically said the same thing to Eric and he agreed.  So after a stunned moment of "what?!?!"  We looked at each other and started talking about why it had never occurred to us (in 3 YEARS!!) that we could buy one of these saws...Seriously, this would have been a huge game changer if we had thought of it before we started Eric's office or the kitchen.  We have been struggling with making our too small table saw work, with a lot of brute strength/force and frustration.  So we decided to do a little research - I was still convinced we would look them up and it would be like $5000 and completely out of our reach.  It turns out that you can get them for a lot less than I thought.  You can actually build one if you want to and spend even less but we decided we wanted a metal one that we don't build ourselves - just in case - something about a DIY saw going crazy makes me uncomfortable lol.     
This is just an example of what we are looking at, but it gives you an idea of what it is.  It does both vertical and horizontal cuts, you can use a saw or a router with it, and it takes up less floor space (I know just the spot where we can keep it if we don't to mount it on the wall).

So now, we have to decide - is it really going to be a useful tool, or is it just a big toy we want to play with?  I think it would be awesome to have - it is NOT easy to wrestle those huge pieces of plywood and we have sooo many things left to build!!!  The one part of a project I dread is the cutting part - I don't think it will be a problem anymore with one of these.  But, of course, the cost is the sticking point - it may be cheaper than I thought but it is still not cheap.  If we had discovered this before we bought the kitchen cabinets - we would own one right now and we would have made them instead...but we didn't so now we have to choose whether it is worth the cost or not.

Decisions, decisions...

Have a great day!
Beth

Wednesday, August 20, 2014

Hazelnut spread with amazing ingredient


If you haven't guessed I have a huge passion for food. I was a Pampered Chef consultant, with Beth for awhile. I actually started it so I would have a business in place when I had children. Come to find out my child needed me more so I was happy to be there for him. Before I was a consultant I could cook instant ramen and Mac and cheese from a box. I have Dick and Sue (who are like my family) along with Pampered chef for my love of cooking/baking.

 It is also the reason why I have more kitchen products than food in my cupboards. I even have a rack in my laundry room full of tools and appliances. I'm hoping for a bigger kitchen some day.

On to this wonderful surprising recipe. I was watching "The Kitchen" on the food network and Katie Lee made a hazelnut spread, the other chefs had to guess the secret ingredient. They couldn't taste it, neither did I. It has chickpeas!

You can check out the nutritional benefits here. They have a great source of fiber among other things. The cocoa is so good in this. It also has coconut sugar, I have never used it before this recipe. It smells Devine I can't wait to use it again. It might replace my brown sugar obsession. If you don't have coconut sugar you can use granulated, or try brown sugar!

Here's the recipe

1 cup of Hazelnuts
1 can of chickpeas (Garbanzo beans), drained and rinsed
1/2 cup coconut sugar
1/3 cup cocoa powder
1/3 cup coconut oil
1 teaspoon vanilla


In a food processor pulse hazelnuts until a fine meal. Add chickpeas pulse until blended. Add, coconut sugar, cocoa powder, coconut oil and vanilla process until all blended. Eat right away. If you want it for later, store in refrigerator. When you're ready to serve, bring it out and let it sit for at least 15 minutes to soften.

Enjoy!

Tuesday, August 19, 2014

Small Closet Update


I don't have a big update today but I though I would share a sneak peak of my closet coming together.  We are building the last of the boxes today and tomorrow, then we have to paint and re-install them.  I'm hoping to have a completed closet to share next week!

On a side note - we should be getting the kitchen cabinets I ordered this week!! Soo excited to finally be doing some more work in the most used room in our house and having more cabinet space in the kitchen!!

Have a great day!
Beth

Monday, August 18, 2014

Cherry, Cherry Baby


I don't know if I have said this before but I love maraschino cherries. This recipe I made is a little different then the cake that I make. These are cherry cake bars. I was worried what it would look like baking in a 9 by 13. It didn't rise much and it turned out perfect! The recipe I found came with a frosting recipe that called for powdered sugar, I ran out. I found another recipe where you thicken milk with flour and heat. Then add that to beaten butter, sugar and vanilla. I have never made a frosting like that, I will make this again of course with out the cherry juice.

This recipe looks hard but it really isn't.

Cherry cake bars

1 10oz jar of maraschino cherries, drained save juice for frosting
1 cup flour
1 cup sugar
1/2 teaspoon salt
1/2 teaspoon baking powder
1/2 stick of butter
1/2 cup whipping cream
1 egg
1/4 cup sour cream
1/2 teaspoon almond extract
1/2 teaspoon vanilla extract

Bake at 350 degrees Fahrenheit, grease a 9 by 13 pan.

Cut cherries in half or more if you would like. I did half and it's nice to have big chunks of cherries to bite into. Set aside.

In a small bowl combine flour, sugar, salt, and baking powder. Set aside.

In a medium pan add butter and whipping cream, heat to med high, stirring until just about a boil, remove from heat. Add the extract flavors, then sour cream, whisk the egg just a little add a little of the warm mixture to the egg to help warm it up before adding to the whole pan. Fold in the chopped cherries.

Pour into pan and bake for 20-25 until a cake tester comes out clean. Let the bars cool.

Cherry frosting

2 tablespoon sugar
Reserved cherry juice
Milk
2 sticks of butter
1 cup sugar
1 teaspoon vanilla

In a small pan add 2 tablespoon of flour, measure cherry juice in a measuring cup, add milk to measure 1 cup. Heat until thickens and boils. Take off heat.

In a medium bowl beat butter, sugar and vanilla until light and fluffy. I also checked to see if I could feel the sugar grit, kept beating until it was smooth. Add cooled thicken milk mixture until blended well.

Frost the bars and cut into small squares.

I hope you enjoy this!

I got the cake bar here and the frosting here.


Friday, August 15, 2014

Honey BBQ sauce


This BBQ sauce was easy to make. Put all of the ingredients into one pan! I like to make my own sauces, I really like smooth sauces like the  processed kind. I figured I would just strain what ever sauce I make, it worked perfectly. I will try out some other recipes this way too.

1 1/2 cup dark brown sugar
1 1/4 cup ketchup
1 1/2 tablespoon molasses
3 tablespoon apple cider vinegar
1 tablespoon Worcestershire sauce
2 teaspoons ground mustard
1 teaspoon paprika
1 1/4 teaspoon salt
1 1/2 teaspoon ground black pepper
1/2 teaspoon garlic powder
1/2 teaspoon onion powder
1/8 teaspoon crushed red pepper flakes
1/4 cup honey

Combine all of these ingredients in a small pan over medium heat. Stir constantly until it boils, reduce to med-low to a simmer and cook for 2 minutes. I poured the sauce into a small bowl with a strainer. Use it right away or let cool in bowl then put into your refrigerator.

I used pepper which comes ground it tends to have a bigger grind, then hand ground. Straining caught all of the big pieces which is exactly what I wanted. I'm so excited to have homemade BBQ sauce.

I hope you all have a great weekend!

Thursday, August 14, 2014

Fall Harvest

I have to admit to equal parts excitement and trepidation - I have never tried to grow anything for a Fall Harvest.  Usually I run out of steam halfway through Summer (right about the time I have to water every day and I don't want to).  With my decision to eventually grow enough food to provide for most of our fruits and veggies, I decided I had better learn how to grow things after September!!

Here is my plan:
I hope I can actually find all of the seeds (I am secretly writing this post a week early so I can have the week off!  Fingers crossed I can find everything I want to plant.)

Hppy Planting!
Beth

Wednesday, August 13, 2014

Chocolate Caramel Cake


I was coming to this office when "Cake Wednesday" started at my sons Autism thearpy. I now have a reason to bring baked goods. I've been wanting to make this recipe for awhile. I have a love for Dark Brown Sugar! I feel brown sugar gives a caramel taste to baked goods, it's a nice deep flavor. This recipe didn't disappoint. I changed things up a bit from the original which called for toffee bits to mini chocolate chips. It had a beautiful caramel recipe, I bought a jar of salted caramel to pour over the top, I didn't have time to make it. I will someday!

Here's the recipe

1 1/2 cups (3 sticks) of butter
2 cups brown sugar
1 cup granulated sugar
5 large eggs
3 cups all purpose flour
1 teaspoon baking powder
1/2 teaspoon salt
1 cup milk
8 oz mini chocolate chips
Small jar of caramel sauce

Preheat oven to 350 degrees Fahrenheit

Grease a bundt pan.

Cream butter in a large bowl. Add sugars, when it's blended add eggs one at a time. Combine flour, baking powder and salt. Start adding 1 cup of flour, mixing completely then 1/2 cup of milk mix until completely incorporated. Continue with flour then milk until all of it is added. Fold in the chocolate chips. If you have a helper you can have them turn the pan while you slowly pour in the batter. Otherwise spoon in and turn pan until it's all in and even. Bake for 75-85 minutes. Let cool for 30 min in pan. Then turn out onto plate or platter, let cool completely. When it's cool, I heated the caramel sauce to help it be more pourable then I poured while I turned the cake so that it got over ever piece.


I hope you enjoy this as we did!

Tuesday, August 12, 2014

Isn't the guy supposed to say that?!

LOL - that could go so many ways, but let me explain...

Eric and I are celebrating our 12th Wedding Anniversary this week.  Originally, we were planning to go somewhere for the week for our anniversary, then we ordered the kitchen cabinets and decided we didn't want to spend even more money going on a big trip.  So we decided to just go away for the weekend, but we couldn't decide where we wanted to go - or even how far away we wanted to travel to even look!!  So, in an attempt to make sure we actually did something for our anniversary I sent Eric a text and this was our conversation:


Yeah - I'm a little crazy.  I gave up a relaxing weekend for a BBQ and lots of work building something. LOL.  The funniest part is I am completely happy with the exchange.  I don't mind giving up driving a few hours away and staying there for one or two nights and then driving back.  (It's not like I gave up a trip to Hawaii or something)  To me a BBQ is a much better use of our limited fun money.  We bought it the weekend we built the fire pit, and I have used it several times a week since then.  One friend actually told me I had 'given in' when I told her about it - I told her since it was my idea and I got two things I wanted out of it, I won more than I lost.  Since it wasn't a competition or a war (or even a battle) and we were both happy with the plan - really we both won.   Everyone has different priorities.

The BBQ we ended up buying was a Kitchenaid Gas Grill with a side burner.  We love it!  As for the project, we decided to complete the closet in our master bedroom.  Woot Woot!  Hopefully, I am working hard right now and will have pictures to show next week.

Have a great day!
Beth


Monday, August 11, 2014

One Pan Fettuccini Alfredo


I really like the One-Pot dishes. This was the first time I have seen this kind. I thought this would be great for lunch time. I try and make the heavier meals earlier in the day. This was a quick dish. I will probably make it for dinner sometime, while it's cooking you can prepare sides like green beans or broccoli. Of course some bread sticks would send this over the top!

8oz dry Fettuccini, I broke the noodles in half because I have a smaller pan.
1 cup of heavy cream
2 cups of water
4 Tablespoon of butter
1/2 teaspoon of salt
1 clove of garlic peeled
Pepper to taste
2 cups of shredded Parmesan

Combine cream, water, butter, salt, garlic and noodles. Bring to a boil while stirring, reduce to low and simmer for 15-20 minutes. While that cooked I grated my cheese. Taste a noodle at 15 min and if it's to your liking you can turn off the heat, I added 3 more min and it was perfect. Take off heat remove garlic. Add pepper to taste and add Parmesan cheese slowly, stirring well after each addition.


This was excellent, it will be helpful to make on those nights when I just don't have time to make anything else.

I hope you enjoy this recipe. I got it from Pinterest! Here's the site.

Friday, August 8, 2014

Cowboy dip my way


We went to our friends house last weekend and she served this, it makes a lot. I thought for sure we would eat it all. It's so delicious I could eat it for lunch, I may be doing that now! I ended up making this recipe in half. I thought I might eat it all if I made the whole recipe. I don't eat a lot of chiles or jalapeño's so I left those out. I made it my way, maybe a cowgirl dip.

8 oz finely shredded cheese, medium grate works too.
2-11 oz cans of sweet corn with sweet peppers, drained.
1/2 cup of mayonnaise
1/2 cup of sour cream
1/4 teaspoon of garlic powder
1/4 cup sliced green onions
Fritos (scoops work the best)

Mix all of the ingredients except the Fritos. Serve with the chips. You can make it the day before and let the favors develop.


Enjoy, have a wonderful weekend!

Thursday, August 7, 2014

How does your garden grow? Update :)

I can't believe summer is halfway through!  I have been scrambling just to keep up with work, the house and working out - so I haven't been able to spend as much time as I would have liked on my garden.  I ended up deciding to scale back a little on my original plan, but I am still pretty happy with the results I've gotten.  If nothing else, I learned what I would change for the next growing year!  I thought I would give an update on the good, the bad and the ugly...well, none of it's bad or ugly but some didn't turn out how I was hoping!


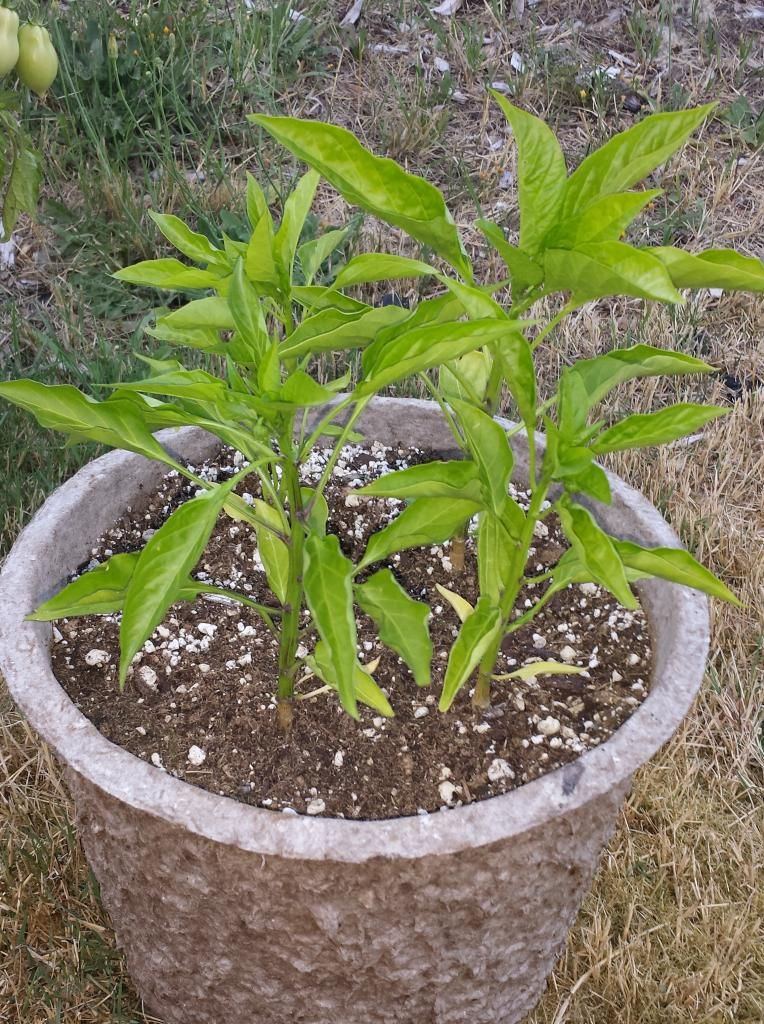
The bell peppers were REALLY slow growers - I planted them at the same time as everything else and they are only around 8-10" tall (and most of that was from the last few weeks).  They are supposed to be around 12-18" tall, so they are only half grown!!  However, they look great and they are starting to get the little balls that form the flowers/fruit - so hopefully I will get some great peppers soon!! 


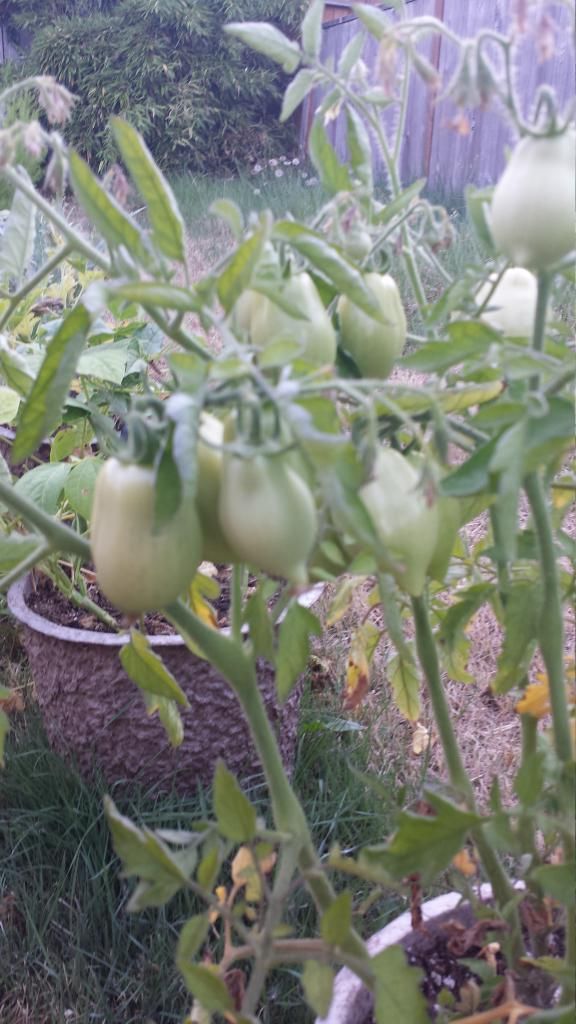
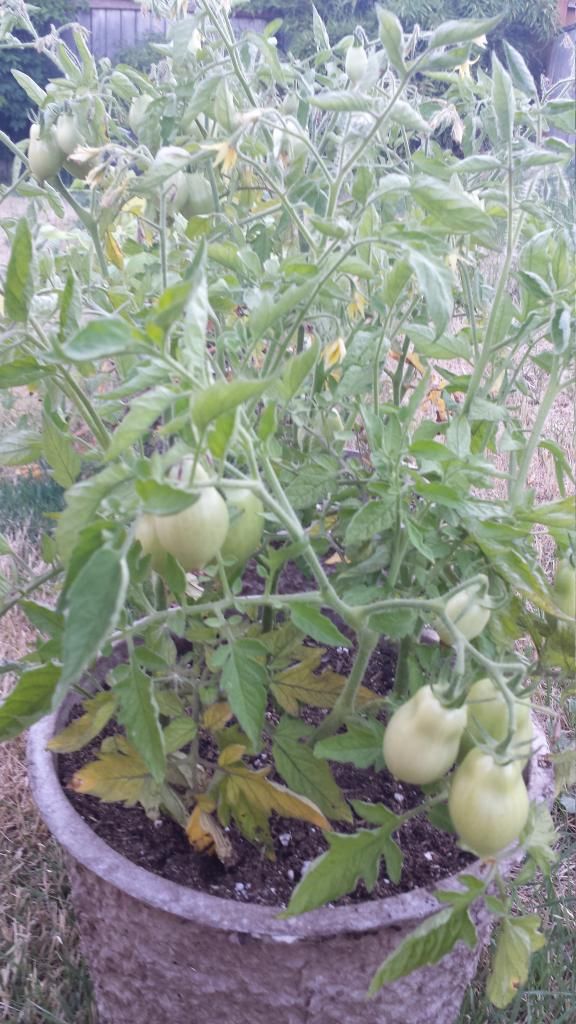
I thought my tomatoes had a similar height challenge - they are only around 20-24" - but it turns out that was the height they were supposed to be!  I forgot that I purposely got the ones that don't need to be staked, just to see how thye do - whew it wasn't me :)  I have had a bit of a challenge keeping them happy, I think I overwatered them at first, then it got hot and I missed watering them a few times.  They seem pretty happy now, there are tons of tomatoes growing!!  I forgot (okay, I might have felt too guilty) to thin them, so I have 4 plants per pot and there doesn't seem to be any issues.  I don't know, maybe they would have gotten fuller if there were less plants, but it doesn't seem to have slowed them down.  Luckily the heat had backed off a little when they started flowering!!


The green beans are really the only "ugly" bit - I bought bush beans, but they are more like vine beans.  To make matters worse, I completely dropped the ball and didn't put a pole up to support them until umm...last night...oops!  It doesn't seem to have affected the plants (except for the 'bad hairdo' look it's stuck with now).  I plan to go out and harvest those tasty green beans tonight for dinner!!


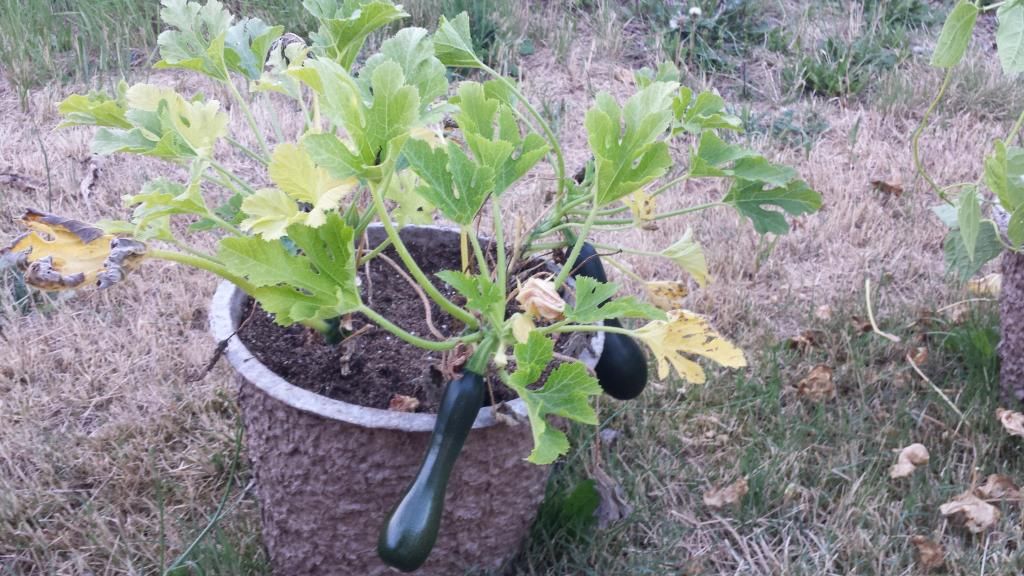
My zucchini plants are pretty sad too - I think it was too hot for the plants and the bees during their highest flowering season!  A few weeks ago I had tons of flowers - but ended up with very few edible results.  I laugh when I go out to see the zucchini hanging over the side of the pot, and the shapes they ended up being.  The shape doesn't matter - they are yummy!! 


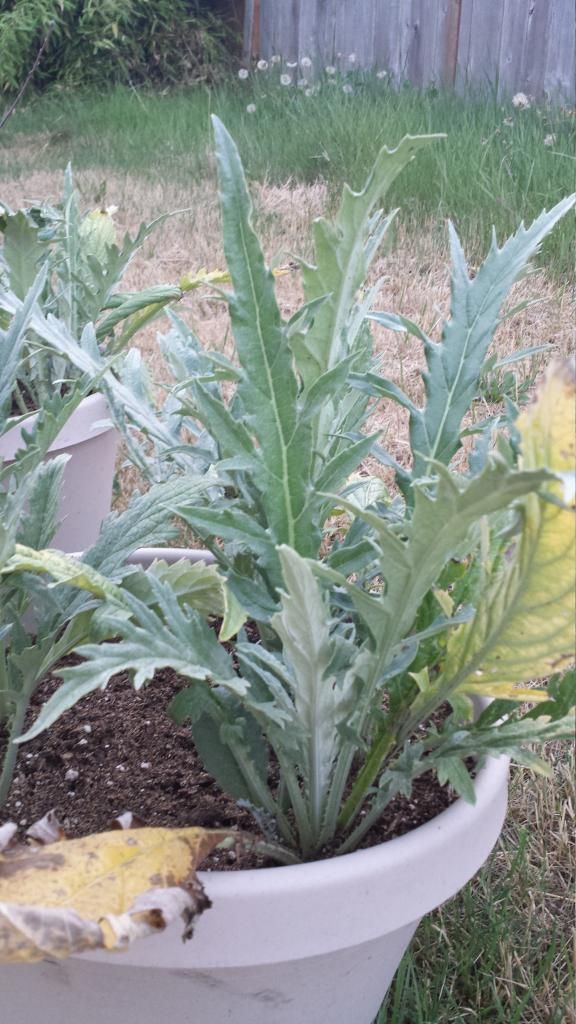
The artichokes are doing well, even if I have no idea when or if I will get to eat any this year or not!  They went through their second leaf shape change a few weeks ago, so maybe I will get late artichokes.  I actually did try thinning them - I cut a few of them off (not wanting to disturb the roots of the other plants), and they grew back!  Then I pulled them out and 2 grew back again lol - so I am just leaving them.  It doesn't seem to be hurting them and I can always trim the leaves on the inside if it gets too crowded.  About that second leaf change - seriously, I haven't found anyone who talks about it but the plants came up with the normal rounded 'starter' leaves, which changed to a still rounded but serrated edge (you can see them yellowing above) - and then they developed these very pointy dangerous looking leaves.  I'm assuming it's normal and I didn't end up with mutant artichokes lol!


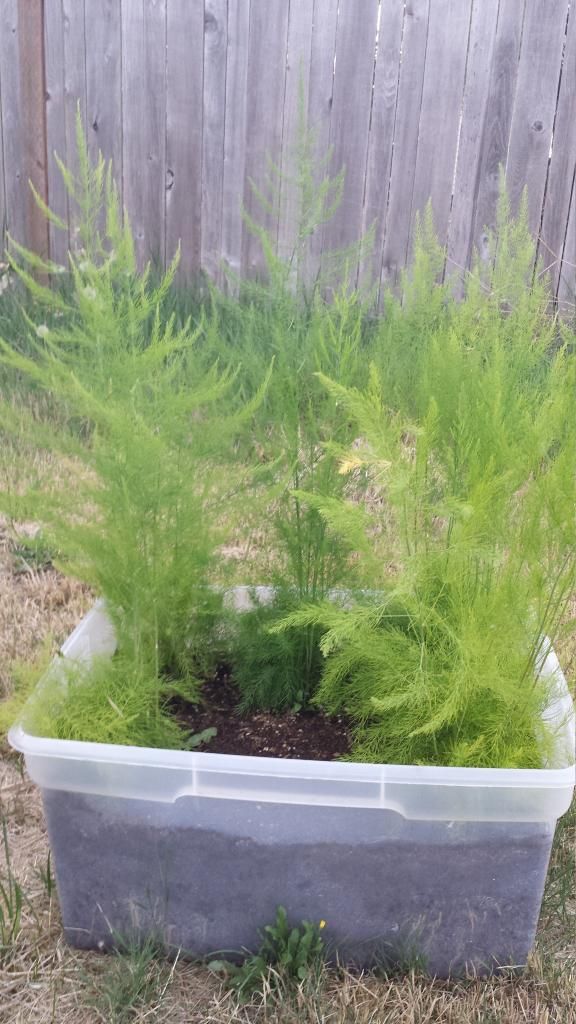
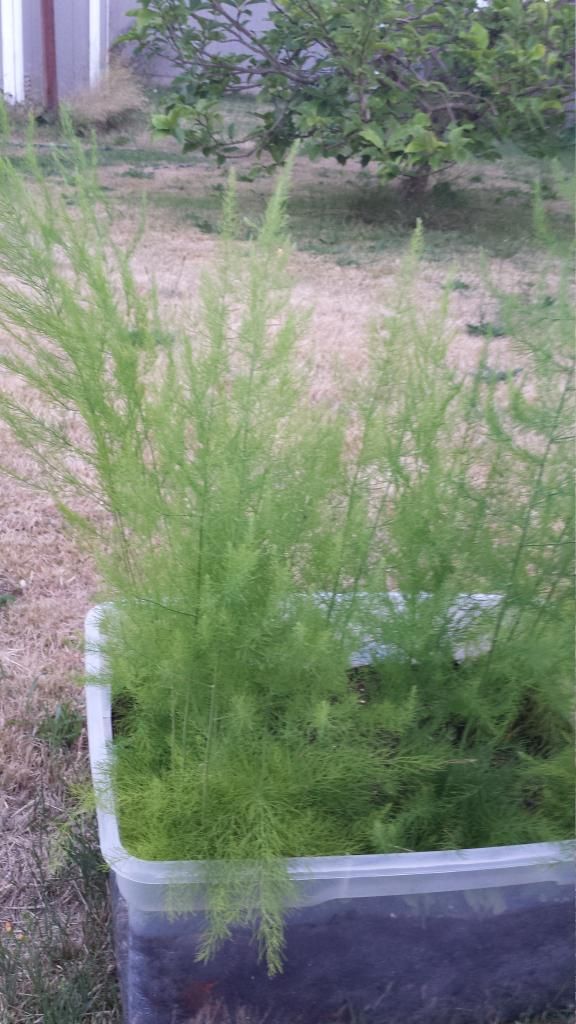
The asparagus is doing great as far as I know!  They grew these great looking stalks and that's about it for now.  I have two more years before I get to taste them, but I'm sure it will be worth it!


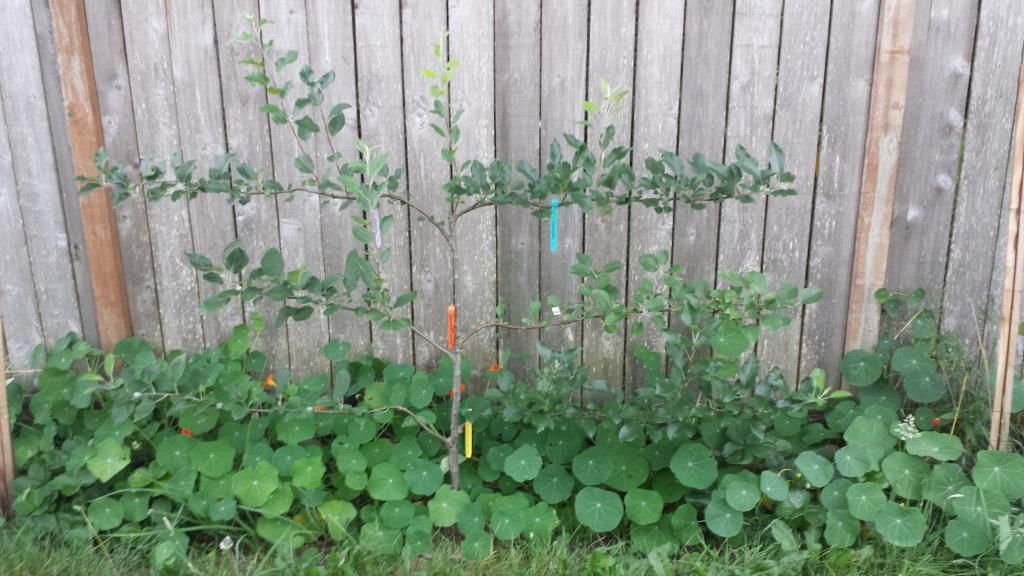
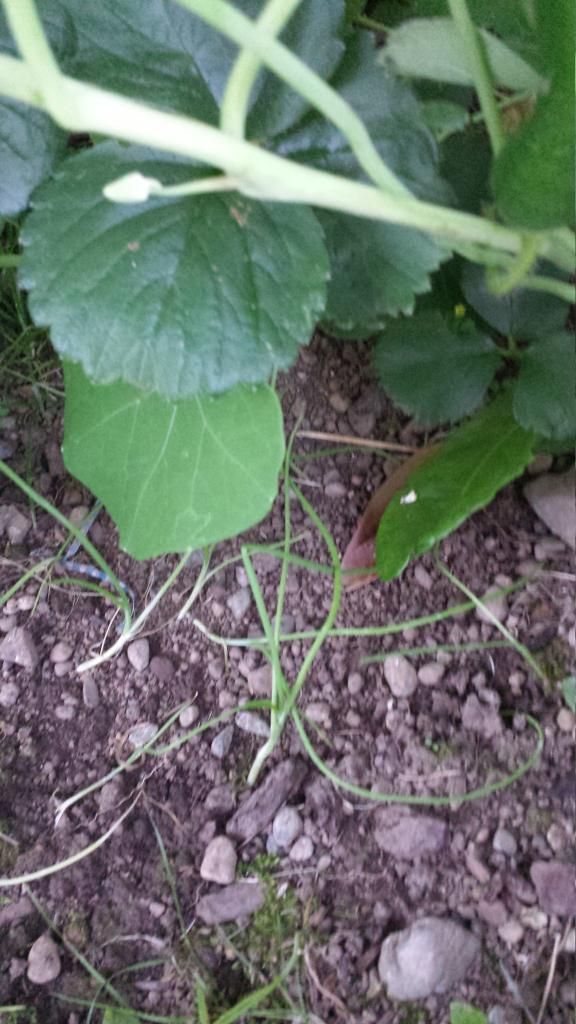
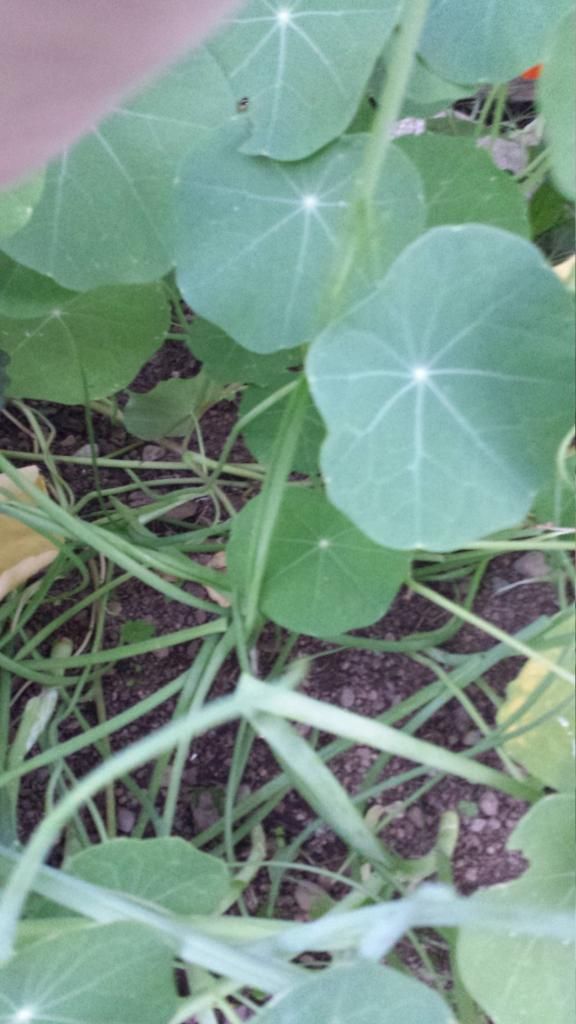
Finally, the apple tree!  It looks great, and it looks like I'm gonna have to put on my big girl panties and learn how to prune it soon!  Pruning is just as scary as thinning is!!  The plant growing below is the nasturtiums - it looks like I planted 20 of them - but there are only 6!!  I need to cut some of them back to give the scallions a little more light, but everything seems to be growing well with them.  You can't tell, but there are strawberries, onions, scallions and chives growing in there as well!"


So that's the latest!  I am hoping to get a winter plan in place soon so I can try growing things through the winter.  I'm sure I will be posting about that soon!

Have fun - grow something!
Beth

Wednesday, August 6, 2014

Yeah I meant to do that!


I made flourless peanut butter cookies last week. They were so delicious! A friend asked about them so I told her I would bake her some.

I made the mistake of making it from memory. It's too early for that. Even though it has a short ingredient list I still couldn't remember all of it. So I had a batch in the oven and it smelled amazing! I pulled them out and let them cool before transferring them to a cooling rack.

When they cooled I started to move them and they crumbled. Not to metntion they didn't flatten out like they did before. I baked another sheet, this time I rolled them by hand thinking that was the issue. Same thing they crumbled. I looked over the recipe and I couldn't believe I forgot the binding, an egg! Seriously! I was all impressed because it didn't have flour. I think I just overlooked another key ingredient in cookies.

I kept the crumbs, they tasted amazing. Luckily my husband and I have been sprinkling them on everything. It will be eaten I'm sure of that. Tonight we plan on blending them with a milk shake.

I had another idea, I make a peanut butter ice cream pie. If I make it into a cookie crust by adding butter, I think it would be Devine! I also think they could be used in trifles or individule parfait's. The ideas are pouring out now. You can dip fruit, marshmallows, or brownies in chocolate then into the crumbs. For a sweet treat for your kiddo (let's face it your self too) you can spread cream cheese on a whole wheat tortilla sprinkle with crumbs add sliced fruit then roll up cut them into rounds.

I will be trying out my ideas. It's nice to know that even though it didn't turn out I will be able to make into something just as good. Side note I made them last week and stored them in a sealed container and it's still soft today.

Tuesday, August 5, 2014

Cinnamon Raisin Bread


Last night on the way home, we had the same discussion we have every night - "What do we want for dinner?"  Somehow we decided on Homemade Pizza and Cinnamon Raisin Bread...After working all day and then running jogging elliptical-ing two miles, I wasn't super enthusiastic about spending all that time and effort!  Eric said he would help, so I agreed.  I'm not sure how helpful taking a nap was, but I was already craving the Cinnamon Raisin Bread, so I started looking up recipes and I found a Quick Bread recipe.  It's not the same, but it is yummy and was a lot easier than making the 'real' thing.  I managed to make both the pizza and the bread - but it made a bit of a mess I have to clean up tonight!!  I woke Eric up to tell him dinner was ready, and he asked if we were still making the bread - I laughed and told him it was already in the oven.  Now he owes me :)

Cinnamon Raisin Quick Bread
Ingredients:
4 cups all-purpose flour
2 cups sugar, divided
2 teaspoons baking soda
1 teaspoon salt
2 eggs
2 cups buttermilk
1/2 cup canola oil
1/2 cup raisins
3 teaspoons ground cinnamon

Preheat the oven to 350 degrees.

Combine the flour, 1 1/2 cups of sugar, baking soda and salt in a large bowl.  Beat together the eggs, buttermilk and oil.  Add the wet ingredients into the dry ingredients and mix.  Fold in the raisins (I actually added 1 cup of raisins and wished I had more - so add as much as you prefer!).  Stir the remaining sugar and cinnamon together in a seperate bowl/container.

Grease your pans.  Start with a layer of the batter, cover with a layer of cinnamon sugar and repeat.  Use a knife the swirls the mixture together.  Bake until a knife comes out clean, about 55 min.  I used two pans, but it took a long time for the center to bake - probably closer to 75 min.  I would actually make 3 smaller loaves next time.

As you can see, mine doesn't have a lot of 'swirls' in it - I always tend to over-swirl lol.  It is delicious so I don't think I would change that next time, but maybe :)

Enjoy!
Beth 

Friday, August 1, 2014

It's really potty time...

I have a wonderful little boy who is having trouble nailing potty training. Through this weekend I want to focus on potty training. I don't think it's a huge priority for him. So I have some good ideas on how to promote wanting to go on the potty!  Hot wheels is a big reward and luckily a cheap one too. One of the ABA people we work with suggested to really start from the beginning. To reward "I need to go potty" and "I'm dry" he would be full of sugar if I rewarded him with marshmallows. So I thought if I do a reward chart then when he fills up a certain amount then he can get a car.

I really want him potty trained by September when he goes back to preschool. Not to mention he's 4 and most children are trained by now. I know children take their own time. I want him to get this because I know he can, he's capable. He goes potty when I ask him. I know he's ready I just need to support him so he realizes it too.

Wish us luck!

Have a great weekend everyone!
Related Posts Plugin for WordPress, Blogger...