Wednesday, November 18, 2015

Thankful Cheese Ball


I made a Pin, Jamie sent this to me. I thought how perfect just in time for Thanksgiving! It's wonderful! Everything pairs well, the nuts add a little crunch, the cranberries add sweetness and the Worcestershire sauce adds a savory spice. I hope you try it out.

Ingredients:

1 8oz block softened cream cheese
8oz shredded white cheddar, I used cougar gold
1/4 teaspoon salt
1 teaspoon Worcestershire sauce
1/2 cup chopped pecans
1-1 1/2 cups dried cranberries (I used 1 cup)

Recipe

In a food process or bowl, pulse of mix cream cheese and shredded cheese mix until combined. Add salt and Worcestershire sauce pulse or mix well. Hand mix in the pecans and then cover with a big piece of plastic wrap, shape into bowl. Place in refrigerator for 30 min, press cranberries onto cheese ball you can serve or put back in to the refrigerator until ready to serve, up to 3 days.


Serve with butter crackers!

Tuesday, November 10, 2015

Big News!!


We're having a baby boy!!  His due date is April 8th (which is why I bought an Easter onesie lol).

Yay!!  I am so excited to share this with everyone!  We waited until we were past the first trimester before sharing the news with anyone, even our parents!!  It was hard, but it was the right thing to do for us.  After we told our family, we started sharing it with our friends and more family.  It hasn't been a secret, but I wasn't ready to share it with Facebook or on the blog.  I'm not sure if I can really explain why - I just wasn't ready.  So now I am 18 weeks and 4 days along, and man does it seem like time flies!  I am almost halfway there!!  It's scary and exciting and slightly surreal all at the same time!!  This is something we have been wanting, waiting for and planning for a long time...a really long time.  Everyone told me that waiting wasn't worth it because you can never be ready for a baby, and that is partly true - there will always be something else that needs to be done or paid for or earned.  However, the biggest benefit to waiting is being ready mentally and emotionally.  The second is that I get to stay home and that was a HUGE deal for both Eric and I, and probably the biggest reason we waited as long as we did.  We feel it was well worth the wait :) 

So, if you're curious about how the pregnancy is going here's the short answer...I nap/rest a lot and I hate food.  Lol!  The first 3 months I was extremely tired and needed a nap after doing anything, and I was nauseous (a word I never spell right and had to look up lol) 24 hours a day.  Then I started feeling better and got a sinus infection with headaches and a cold with a cough (at the same time!!) for the next 3ish weeks.  I finally feel more like myself, which is a relief.  I have so much to do and nothing was getting done!!  I finally got my house clean and started doing some projects for the nursery that I'll share in future posts.  The only thing I am still struggling with is food - I don't really like food, but hopefully that will change soon.  

You might be wondering why I haven't blogged for awhile.  Well, it's hard to write about anything when all you want to do is sleep, you can't share the few projects you do get done and food is a negative 20 on your 1-10 scale of fun stuff to do.  I don't think anyone wants to hear about my toast and cream cheese obsession...

I will try to get back on track for posting regularly, but I make no guarantees ;)

Have a great day!
Beth 
  
P.S. - I know everyone is going to want to know if we have picked out a name yet.  We are still looking and thinking about it, but we still have 150 days to go...deep breaths lol 

P.S. 2 - I am a little behind on pictures so I still don't have my 16 weeks picture done - when I finally get one taken I'll share it (Hopefully by then I'll actually look pregnant instead of just normal lol) :)

Friday, October 16, 2015

Twice Baked Potatoes


It's been awhile since I have blogged. I don't know what happened why I stopped or got overwhelmed. I'm coming back with my usual, I see something-I make it-then blog about it. I need to get back into my groove. 

What better recipe to come back with than a twice baked potato! These were a hit with my family. I actually just wanted a baked potato but my family isn't as thrilled as I am. I know right! I think I could eat one everyday! 

I haven't made them in awhile so I dug a little too deep on 1 potato so I had to toss the skins. That actually worked out just fine. These will still turn out really well if you don't destroy your skins like I did. The great thing about this recipe is that you can make it your own.

Ingredients

3 potatoes
2 Tablespoons Oil
1/2 teaspoon salt
5 slices of bacon
3 green onions, sliced
1 1/2 cups shredded cheese
1/2 cup sour cream
1/4 cup heavy cream
pepper to taste
4 Tablespoons butter cubed 

Preheat oven to 425 degrees Fahrenheit. Wash and dry potatoes, prick potatoes with fork to allow steam to escape. Rub with oil and sprinkle with salt. When oven is preheated place a piece of foil down on the oven place the potatoes on the rack and bake for 1 hour. Pull out and let cool on counter for 10 min or cool enough to hold

Meanwhile cook bacon, I cut mine before I cook it, crumble. Add bacon to a big bowl. Add 1 cup shredded cheese, green onions, butter. sour cream and pepper. When the potatoes are easy to hold. Cut in half and scoop out filling but leave a little bit of potato so that the filling can be held up. With a masher or hand mixer combine ingredients. Fill each potato half evenly and top with remaining 1/2 cup cheese. Bake for an additional 15 minutes. 

Potatoes are absorbent so if you need to add more of the liquids (heavy cream, butter or sour cream) do so. I think I will add a bit more liquid just to fluff it up more. I was looking at a bunch of different recipes and they had all call for a little bit of sour cream so I doubled it. 

This was a wonderful recipe the green onion with bacon is my all time favorite flavor for potatoes. Let us know if you make this and or what you added to yours!

Have a great weekend!

Tuesday, September 22, 2015

Dish Hoarder vs Realistic Minimalist - You Can't be Both!


Wow, September has been such a busy month!  I have been really distracted and unfortunately have been working on things that just aren't interesting enough to blog about!  I can only do so many posts about cleaning out our 'storage rooms' - we had 2 rooms that were full of things we haven't gone through since we moved into our house 4 years ago.  I was bored even thinking about it lol.  We also had a houseguest for a week, which is why we were doing so much cleaning!  It was a lot of fun having my dad here for a week, but we mostly played video games, watched movies and ate junk food!  My kind of vacation (and luckily his too).  And then I was feeling sick for awhile so I wasn't even making anything fun to eat - unless you want to hear about my bagel consumption??  Lol, but now I'm hopefully back on track!

Today, I wanted to talk about an idea I've been twirling around in my head - I saw this great video about someone who is trying to live a minimalistic lifestyle and as part of that has reduced their daily dishes to 1 per person.  At first I was ready to jump up and do it - that would reduce my dishes to almost nothing and I doubt it's a surprise to hear that I hate doing dishes.  Then I realized that having just 2 of everything would mean I would have to hand wash dishes between every meal...wait I would definitely hate that!  Lol

So I've been trying to figure out what would be more realistic for us.  I think I've decided that 6 of everything would be more realistic - then I could go an entire day without having to do dishes and could just run them each night.  Hopefully putting all of my extra dishes in the pantry will kind of be 'out of sight, out of mind' and I can keep from just getting more out.  As you can see from the picture above, I have plenty of 'more'...and I just can't seem to get rid of any!  I really need to figure out what I need to keep vs what's ok to give away!  All the dark blue dishes are from our wedding...I literally have enough serving dishes for a WEDDING!!

Besides dishes, I also need to work on figuring out what I actually need prep wise.   For example,  I've reduced my mixing bowls but I still have 4 glass bowls, 4 metal bowls, plus 2 large metal bowls - and this doesn't even include my tiny bowls (I have at least 30 different bowls that hold less than 1 cup) or my Tupperware bowls (I have 3 large drawers full of plastic containers)...this is AFTER I went through everything and got rid of what I didn't think I needed!!!  I think I have an addiction!   So yeah,  I'm going to have to go through it all again and really make some hard decisions - I don't even use the smaller metal bowls but I just can't convince myself to get rid of them!!

So my goal in the next few weeks is to take a hard look at my kitchen and work towards being a Realistic Minimalist.  We are only 2 people - I don't need enough dishes to feed an entire football team!!

I'll post about my progress when I've got my cabinets organized!  Wish me luck, there may be some crying involved. :)

Have a great day!
Beth

Friday, September 11, 2015

Blueberry Muffins


I'm back! Yay! I have been really absent! I just haven't had time to tend to the blog, that will all change now. I'm getting into a routine now that my big boy is in Kindergarten...yeah that happened! I was stressing out, mildly! I had no room in my head to post. He's all settled now. Love his school and his teacher, I'm so happy! On to the recipe!

This has some sour cream, it sure does help keep it moist and tart. I have blueberries in the freezer that need to be eaten.

I bought another cookbook, shocking I know! I like to keep tabs on my favorite chef/TV host cookbooks and I clicked (ebook) on one that had a similar name that I look for. Once I realized I kept browsing because it had brunch in the title. I love breakfast foods, I really like brunch too. I purchased it and started flipping through and bookmarking almost every recipe. It's so good!

In the front of this book was a blueberry muffin recipe, I had to try it. I'm so glad I did!

This makes 24 muffins. You will need 2 muffin tins, greased or with liners if you want. Preheat the oven to 350 degrees Fahrenheit. *Bring 4 large or 3 extra large eggs to room temperature.

Ingredients

2 cups all purpose flour
1/2 teaspoon baking soda
1/2 teaspoon coarse salt
12 Tablespoons unsalted softened butter
1 1/2 cups sugar
*4 large eggs at room temp
1/4 cup half and half
1 1/2 teaspoons vanilla
1 cup sour cream
2 ish cups frozen or fresh blueberries

In small bowl combine flour, baking soda and salt, set aside. In a large bowl combine butter and sugar beat for 3 minutes on high until fluffy. Add eggs one at a time, add half and half, vanilla and sour cream. Add flour mixture, mix until just as you see no more flour. Fold in blueberries and using a scoop fill your muffins wells. Bake for 20-25 minutes. Now mine took longer, I think my oven is breaking. Just bake until the edges turn golden brown.


I really hope you try these, they come together quickly and they are scrumptious!

Adapted from Bubby's Brunch Cookbook

Thursday, September 3, 2015

Slow Cooker Mac & Cheese...kind of


Wow!  I can't believe how quickly it feels like Fall around here!  For some reason,  Fall always makes me want to get out my slow cooker.  I know most people like to use them during Summer to keep the stove off,  but I don't have to worry about the heat so for me it's Fall!!  Luckily, Felicia agreed and our Cookbook of the Month is for Slow Cookers!  Unfortunately, I won't be using a recipe from there this week - I wanted to make mac & cheese, but their recipe called for condensed cheese soup.  I understand why - the cheese sauce tends to get grainy in slow cookers - but if I'm going to use something like that I might as well eat Kraft (which is my favorite even though I get told how awful it is everytime I tell someone I still eat it - it's my go to when I'm sick)...

Since I was thinking about making (and eating)  mac & cheese for hours, I really wanted it!  I decided to try making my own, since there are lots of people who think it turns out fine.  I tweaked the recipe enough that it's definitely my own, and I like it enough to use it again (but it's still not Kraft...)

3 cups milk
Sprinkle of garlic powder, paprika and pepper
4 cups of shredded cheese (I used the Mexican 4 Cheese kind)
3 cups pasta, your choice, uncooked

Butter your slow cooker.  Add all of the ingredients and stir together.  Set it for low heat, but it will only need to cook for about 2- 2 1/2 hours.  I stirred mine every 30 minutes until it was thick and creamyish, and the pasta was cooked.

So, yep tasty but grainy...hmm but I had an idea!  I put some of the mac on my panini press and grilled it (I usually like to fry it in a pan, but it was easy and I was hungry)  and I feel like it was totally worth making now.  So I'm going to put the rest in the fridge, and fry it up for lunch tomorrow (and maybe a few days after - there's a good amount).

Have a great day!
Beth

Friday, August 28, 2015

Caramel Cake


I'm not sure if this was really a fail. Or maybe I failed, the frosting wasn't really wasn't working. I re read the recipe and I was supposed to mix it (frosting) until creamy and have spreading constancy. I put it on the first layer and it seemed fine. It didn't spread well, so it looks horrible. I only took a picture of the cut cake and not the whole cake.

With that little tweak it would have been awesome. It taste great. One of my better cakes in fact.

You will need 2 - 9 inch cake pans greased. Preheat the oven to 350 degrees Fahrenheit.

Ingredients

1 8oz container sour cream.
1/4 cup milk
1 cup butter, softened
4 large eggs
2 3/4 cups all purpose flour
2 teaspoons baking powder
1/2 teaspoon salt
1 teaspoon vanilla
Whipped cream caramel frosting

Combine sour cream and milk in a small bowl. In a large bowl beat butter at medium speed until creamy gradually add sugar beating well. Add eggs 1 at a time beating well after each addition. In a medium bowl combine flour, baking powder, and salt. Alternating with flour mix and sour cream mixture, beginning and ending with flour. Beating well after each addition. Stir in the vanilla. Pour into prepared pans and bake for 30-35 minutes or until wooden pick comes out clean. Let cool in pans for 10 minutes, remove from pans onto cooling racks and let cool for 1 hour.

Whipped cream caramel frosting

Ingredients

1 cup butter
2 cups firmly packed brown sugar
1/4 cup plus 2 Tablespoons heavy whipping cream
2 teaspoons vanilla
3 1/4 cups powdered sugar.

Meanwhile make the caramel sauce. In a small pan melt butter over medium heat. Add brown sugar; bring to a boil stirring constantly. Stir in whipping cream and vanilla. Bring to a boil. Remove from heat and let cool for an hour. Transfer to a mixing bowl and gradually add powdered sugar beat on high until creamy and spreading constancy.

Spread frosting between layers, top and sides of cake.

Enjoy!


Leslie's Chicken and Wild Rice Casserole


I don't know who Leslie is but bless her. This is my favorite, family and friends too, casserole. It is my ultimate comfort food. This recipe is great for a pot luck or freezer meals. Depending on your size of family you can get 2-4 dishes out of this. We are a family of 3 so I could put this in 4 and have it be plenty. If we're really hungry then 3 is also great.

I just have to say real quick, I'm sorry I haven't been blogging. My mind has been racing, evidently for no reason. It's the first year of kindergarten for my kiddo this year. So I have been acting like a crazy women. Plus my husband has committed to a couple of huge events and we had a friend from CA stay with us. So it's been crazy all around.

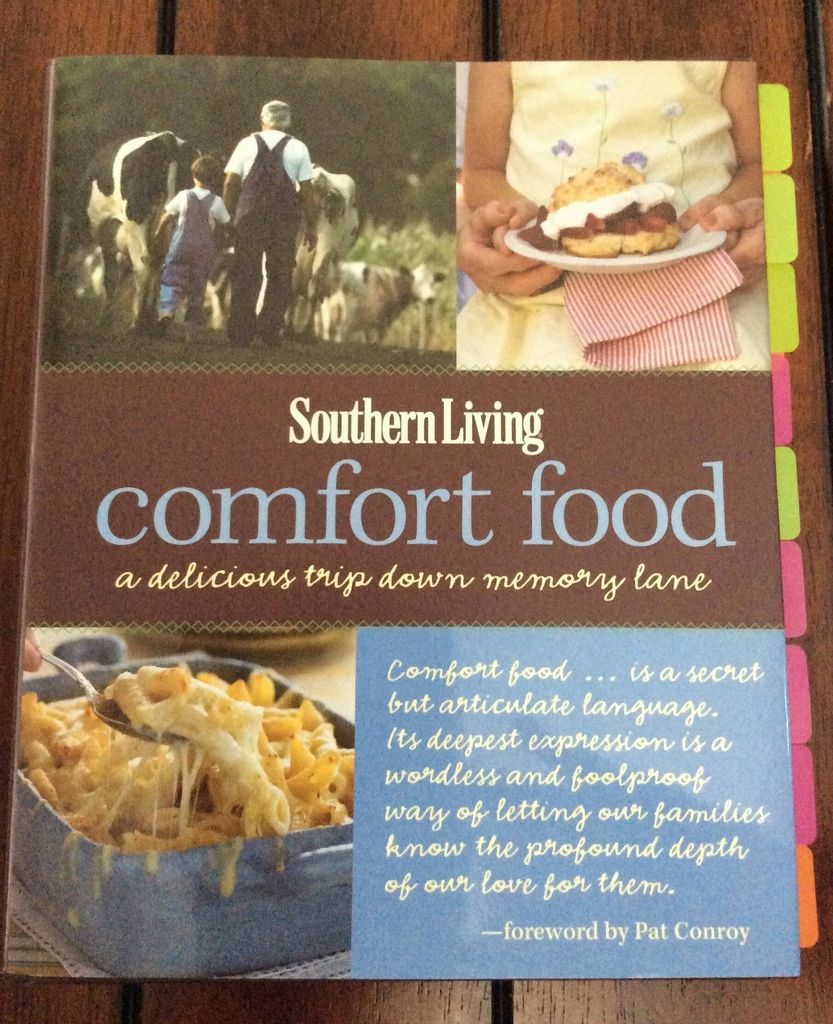
I really like that we have started our cooking from our cookbooks. Today's recipe is my most used recipe from Southern Living, Comfort Foods.

Like I said this makes quite a bit. You can scale it down if you need to. This really does freeze well. I prepped a little. This recipe is forgiving though. You can prep the beginning and then prep as you go.

You will need a big baking dish or 2 - 9 by 13's. I was also just thinking if you wanted, you can throw this in the slow cooker. The ingredients are all ready cooked it just needs to reheat. Preheat your oven, if cooking right away, 350 degrees Fahrenheit. A family size skillet or a smaller skillet and big bowl to mix the ingredients in. I forgot how much it makes so I needed a bowl to mix everything.

Ingredients
2 - 6.2oz fast cooking long grain and wild rice mix
1/4 cup butter
2 medium onions, diced
4 celery sticks, sliced
2 - 8 oz cans sliced water chestnuts, drained
5 cups chopped cooked chicken
4 cups shredded cheese, divided (16oz)
2 cans of cream of mushroom (if you have time make your own it's worth it)
1 cup milk
1 16oz sour cream
1/2 teaspoon Salt
1/2 teaspoon Pepper
2 cups bread crumbs
2.25 oz sliced almonds

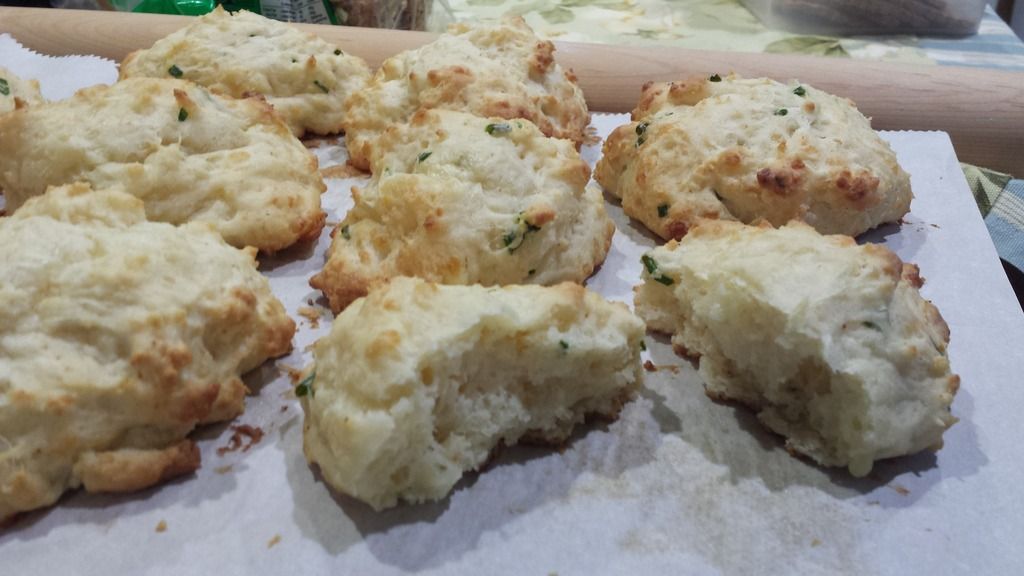
Prepare rice as instructed in a medium pan. Meanwhile in a large skilled melt butter, sauté onions and celery. Add water chestnuts, chicken, 3 cups cheese, cream of mushroom, milk, sour cream, salt and pepper. Stir and remove from heat. Pour into pan(s) when ready top with bread crumbs bake for 35 minutes or until bubbly. Top with almonds and the remainder of cheese and let bake for 5 minutes. To tell you the truth I have combined the crumbs, cheese and almonds altogether and baked the whole thing. I actually think it tast better this way. I have talked about my dislike of bread crumbs before so this mixture helps.


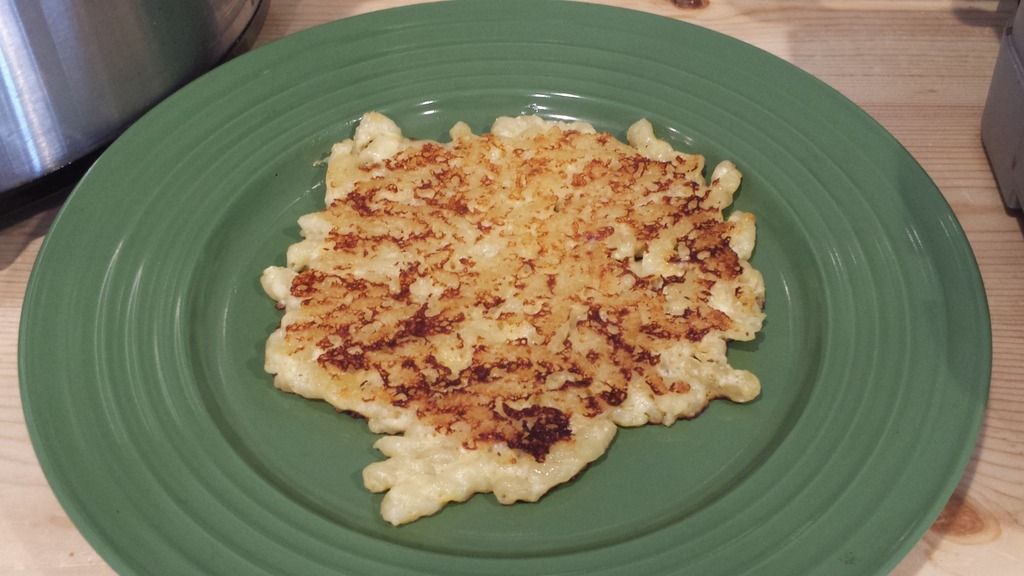
If your wondering why my dish looks so small I just baked off a little for Xander and me for lunch. The rest I'm keeping for a potluck this weekend. The more this dish sits the better.

Also like I said I've been slacking so there will be another post later today and 2 more on Monday.

I hope you like it as much as we did.


Thursday, August 27, 2015

Wacky Cake


One day I was browsing my Facebook and I ran across a picture of the yummiest looking chocolate cake!  I serious thought about that cake for 2 days before I finally got off my butt and made it (well, actually I did very little - I had a kitchen helper lol).  What made the cake more interesting was that it was called Wacky Cake, because it has no eggs, butter or milk in it - and yet it looked sooo good!  Well, I would definitely say it was well worth making!  The cake went together in 10 minutes and only used one pan and a fork (and the measuring stuff but those don't count ;) ) ...and it was moist and tasty!!  The frosting took more time and was good but very rich - unfortunately I didn't save the recipe so if I run across it I will definitely post about it.

1 1/2 cups flour
3 Tbsp cocoa (unsweetened)
1 cup sugar
1 tsp baking soda
1/2 tsp salt
1 tsp white vinegar
1 tsp pure vanilla extract
5 Tbsp vegetable oil
1 cup water

Preheat the oven to 350°.  Prepare an 8x8 pan by wiping with a small amount of oil.  Combine the dry ingredients in the same pan.  Make 3 holes and place the vinegar, vanilla and oil in seperate holes.  Cover the whole thing with the water and mix completely.  Bake until knife is clean when tested, about 25 minutes.

Easy, right?!  I will definitely be making this when I have a craving for a fast easy cake!  I got the recipe from here.

Have a great day!
Beth

Thursday, August 20, 2015

Blueberry Sweet Muffins


My kitchen is still filled with things from the pantry, but I decided I really wanted to make blueberry muffins anyway!  I used the recipe for our Cookbook of the Month: Southern Living Comfort Food.  I liked it, but I didn't love it.  It was really easy and I would totally make it again though.   I ended up not having blueberries (oops, they sat too long), so I stole the can of blueberries out of the boxed mix I had shooting around lol.  I definitely think the fresh ones would have made them better!  

1 1/2 cups flour
1/2 cup sugar
2 tsp baking powder
1/2 tsp salt
1/3 cup milk
1/4 cup oil
1 egg
1 cup fresh/frozen blueberries
Extra sugar

Preheat your oven to 400° and add muffin cups to your muffin tin (or grease it, but that's so much more work lol).  Combine the dry ingredients in a medium bowl.  Mix the milk, oil and egg together and add to the dry ingredients.  Fold in the blueberries.  Fill muffin tins up 2/3 and sprinkle the tops with sugar.   Bake for 20-25 min until golden brown.  Remove from pan to cool.

Enjoy!
Beth

Tuesday, August 18, 2015

The Pantry...Again?!


I was hoping to get some baking done over the weekend, so I would have something yummy to share (plus I feel like I'm letting our awesome Cookbook of the Month down lol).  Unfortunately for my stomach (but fortunately for my kitchen!), we worked on installing the pantry cabinets and started putting on the doors!!!  BTW, by we I mean Eric did all the work and I helped lift things and handed him stuff :)

Eric did such an amazing job getting all of this put together, and I am sooo happy with the results!  I was even able to start putting all of my china and knick knack's away up top.   As you may notice it is higher that I can reach, but I'm not to worried since it's all things I'll only need a few times a year when I want to change what's on display around the house.

What all this meant was there was no baking - I just got the mess cleaned up (shoved back on the shelves) last night, and even more will have to come back off once he's ready to replace the veneer on the lower cabinets.  So no recipes or fun stuf...just pictured of my pantry that I could stare at all day long!

Have a great day!
Beth

Wednesday, August 12, 2015

Banana Oatmeal Cookies


I was thinking of this idea and then I was talking to a friend about the flavor so I went out on a search. I found this recipe. I search for Banana Oat Cookies and they were all the 2-3 ingredient healthier recipes. I wanted a yummy cookie with lots of flavor. I change oat to oatmeal and I was successful!

They turned out soft and scrumptious! I had planned on throwing in nuts, it was smelling so good I decided not too. I didn't bake them all so I will add some tomorrow when I finish baking them!

Ingredients

3/4 cup softened butter
1 egg
1 teaspoon vanilla
3 bananas or 1 cup
1 cup brown sugar
1/2 cup granulated sugar
1 1/2 cup all purpose flour
1 1/2 teaspoon cinnamon
1 teaspoon baking soda
2 teaspoon cornstarch
3 cups old fashioned oats

Preheat oven to 350 degrees Fahrenheit. Line a baking sheet with parchment or foil or a silplat!

In a medium bowl with a hand mixer blend butter, egg, vanilla, banana and sugars. Add flour, baking soda, cinnamon, corn starch and baking powder blend until combined. Hand mix the oats in. Using a cookie scoop drop by rounded spoonfuls. They do spread out but not too much. Flatten the tops slightly with the back of a spoon. Bake for 10-12 minutes. Let rest a little before moving to a cooling rack to complete cooling.

I think you could enjoy these for breakfast, they are similar to oatmeal!

I adapted from this recipe.

Enjoy'

Tuesday, August 11, 2015

Progress Made on the Pantry!

I don't have a lot to talk about today because we've been working in the bookshelf boxes for the pantry all weekend (well, mostly)!! So, here is a picture of the boxes!! I'm so excited, but we still have a lot to do to install them and finish the trim edge...back to work!!


Have a great day!
Beth


Friday, August 7, 2015

Fresh White Bread


It rained a little this week. The Fall season crept into my mind for a little bit, I began pinning warm dips. I came back to reality when the heat came back and had an ice cream bar! I do love baking, luckily we have AC so that I can. One of the program's we are working on in Xander's therapy is independent activities. One of them is making a sandwich. Every time I buy bread it doesn't get eaten, so I figured I would make it instead. It always gets eaten!

I messed up a little, luckily it all worked out. I set out the butter but forgot to put it in towards the beginning. Then I didn't add the remainder flour, I should have realized it didn't look right. It's been awhile since I made bread from scratch.

This is my new favorite recipe and I will be making this again. This makes 2 big loaves.

You will need a big bowl, oil, 2 loaf pans, stand mixer with the dough hook, paddle attachment, foil and a clean towel.

Ingredients

4 1/2 teaspoons active dry yeast
3/4 cup warm water
1/4 cup sugar
1 Tablespoon salt
3 Tablespoons unsalted butter
2 2/3 additional warm water
9-10 cups all purpose flour
1/4 cup melted butter to brush on the tops

In the bowl of your stand mixer combine the yeast and 3/4 cup warm water with the paddle attachment. Let activate for 5 minutes. This is where I prep the other ingredients. Add sugar, salt, butter and additional water mix until combined on slow. Adding 1 cup at a time, add 5 cups of flour to the mixture until smooth. Still on slow add remaining flour. Remove paddle and attach dough hook, knead for 10 minutes. Lightly grease a large bowl. Put dough in the bowl and turn it once to cover the dough in oil. Cover with clean towel and let rise for 1 hour. Grease your loaf pans.

Punch down the dough. Divide by 2 and roll each out about 12 by 12 squares. Then start rolling one of the edges like a burrito. Tuck the ends and place in a loaf pan. When both are in their pans cover again with the towel and let rise agin for an hour.

Just before they are done rising, preheat your oven at 425 degrees Fahrenheit. Move your rack to the second from the bottom position.  Bake for 15 minutes and then cover with foil to prevent the tops from burning and bake for 15 more minutes. Brush the tops with 1/4 cup melted butter and let sit for a little bit before you slice. I usually can't wait, I like warm bread with butter!

I got this wonderful recipe here.

Enjoy!

Thursday, August 6, 2015

Yummy Peanut Butter Cookies


Felicia and I had so much fun doing recipes from our Cookbook of the Month last month!!  We hope that you were inspired to pick up a favorite cookbook and make a new recipe too!  This month we chose Southern Living Comfort Foods!!  My mouth starts watering just looking at the cover :)


For my first recipe I chose OldFashioned Peanut Butter Cookies!  I always forget how much I really love them, until I can't stop eating them!!  These are amazing and you get a lot of dough out of the recipe.  I ended up being too impatient and I made drop cookies before seperating and putting the rest in the fridge.   I plan to only make a few at a times so I don't eat to many at once!   I also want to try making Nutter Butters with them...mmm I can't wait to try those and I'll definitely share.

1 cup butter, softened
1 cup peanut butter
1 cup sugar
1 cup brown sugar, firmly packed
2 eggs
2 1/2 cups flour
2 tsp baking soda
1/4 tsp salt
1 tbsp vanilla

Cream the butter and peanut butter together then add both sugars and continue until combined.  Mix in the eggs.  In a small bowl combine the flour, baking soda and salt.  Add the dry ingredients to the butter mixture in small increments, mixing thoroughly between.  Add the vanilla and mix until everything is well mixed.

For immediate cookies, preheat the oven to 375° and drop scoop fulls onto parchment paper.  Roll the balls in sugar and use a fork to press the centers down - making the traditional criss cross pattern.  Bake for 7-9 minutes.  The cookies are done when the edges are just turning golden - this will give you crunchy outsides with soft insides!

For cookies later, refrigerate the dough by wrapping it in plastic.  When you're ready to make them, simply follow the steps above.  You will just need to roll the dough into balls instead of using a cookie scoop.

Ta-Da delicious peanut butter cookies in less than 20 minutes!

Have a great day!
Beth


Tuesday, August 4, 2015

A Personalized Scrapbook and Eiffel Towers

This was a really easy project and it was fun to make something that was personalized for Felicia for her birthday.  After looking for something ready made and finding nothing - I decided to do it myself!  I took a plain white scrapbook and used Mod Podge to adhere the scrapbook paper to the cover.  I laid it out first to decide how I wanted to look (don't just go slapping on whatever lol), then I spread a layer of the mod podge onto the bare cover and covered it with the base paper.  Then I painted on another layer over that and added the detail (the eiffel tower - which I cut out).  I then put 3 layers of Mod Podge on top of all of it, waiting 30 minutes between  each one.  Once it dried I was all done!! See didn't I say it was easy!!

I also used the same eiffel tower stencil (I drew it on plain drawing paper to use for a few things) to make silhouette 3D eiffel towers for table decorations.  I just cut out two of the same size outines, cut one in half and glued them to either side of the second one.  I used foam paper so they would be sturdier, but I think any heavy duty paper would work.  These were really easy too - but they were pretty time consuming.  I think it took about an hour and a half to make 5 I think.  (It was really, really hard to get a good picture of these - but there were pretty cool!)

Has anyone guessed the theme and color scheme used for Felicia's party yet?  I think we were too subtle! Lol

Have a great day!
Beth

Friday, July 31, 2015

Caramelized Onion Dip


I could eat this dip with a spoon! I have to admit, I licked the bowl. Very simple ingredients too. I will be making this again.

You will need a large skillet, a medium skillet and a bowl that holds about 4 cups.

Ingredients

3 lbs yellow onions about 3 large and 1 small, thinly sliced
1/4 cup oil
1/2 teaspoon salt
1/4 teaspoon pepper
2 Tablespoons white vinegar
1/3 lb bacon
1 1/2 cups mayonnaise
1 cup sour cream

In a large skillet heat oil at medium heat until it shimmers. Add onions and reduced heat to medium low to low depending on your stove, stir occasionally. The onions will get deep in color, it takes about 45 minutes. Take off heat, add vinegar, stir and let cool.

In a medium skillet cook bacon on medium heat. I sliced my bacon before hand so that I didn't have to crumble them. Either way works just fine. Drain the bacon on paper towels.

In a bowl mix sour cream, mayonnaise, bacon and onions. Serve with a spoon, just kidding! Crackers, flat bread, pita or the classic potato chip would be great. So would vegetables!

I have to tell ya, I won't find that packaged onion dip edible anymore. Luckily this is pretty quick to put together.

This concludes our cookbook segment. We are so glad we choose Lucinda Scala Quinn Mad Hungry Cravings.


We look forward to sharing our other cookbooks with you!


Have a wonderful weekend!

Tuesday, July 28, 2015

Heart Pie Pops


I just have to say that these are AMAZING!!  They are really easy to make and are completely worth the extra time.  Everyone will be impressed with them!  You can use any preserves or jam that you like - or make your own!  I cheated and bought store made pie crusts, but since I had a ton of other things to make I didn't have a lot of time.

Heart Pie Pops

Pie crust
Filling
Sugar
Butter
Sticks

Preheat oven to the temperature suggested by your pie crust directions.  Roll the pie dough into 1/8" thick and use a cookie cutter to make the hearts.  Place a dab of filling into the center of half of the hearts and spread it to 1/4" from the edge.  Press a stick onto the length of the center - just to the edge of the filling.  Cover with a second pie crust and firmly press the edges.  Use a fork and indent the edges for a decorative edge.  Brush on melted butter and sprinkle with sugar, then poke with a fork on either side of the stick.  Bake for 10-15 minutes until golden brown.


See it's easy - it just takes a little time!  I made them with cherry preserves and no one could stop eating them - they were just so yummy!!

Have a great day

Thursday, July 23, 2015

Strawberry Rhubarb Crisp


Late night dessert. I picked up strawberries, I already had rhubarb so of course I had to make something. I really wanted to make a pie. I'm to the point in my baking where I'm comfortable with pie crust, biscuits, and scones. You really do need to know what you're feeling and how the dough is acting. It just takes time and confidence and in my case a lot of reading and watching how it's done. I'm a visual and written person, I need to both to understand.

On to the recipe!

Adapted from here.

You will need a 9 by 11 baking dish or 2 qt or bigger, greased. Preheat your oven to 350 degrees Fahrenheit. Big bowl, medium bowl and a little bowl and 2 spoons.

Ingredients

6 stalks rhubarb chopped
2 cups hulled and sliced strawberries
1/2 cup sugar

Crumb topping :
1/2 cup butter melted, 1 stick
1 cup flour
1/2 cup quick cook oats
1/3 cup sugar
1/4 cup dark brown sugar, packed
1/2 teaspoon cinnamon
1/4 teaspoon salt

In a large bowl combine Rhubarb, Strawberries and sugar combine well. Pour into prepared pan. In a medium bowl combine flour, sugars, cinnamon, and salt, add butter until well combined. Sprinkle the crumb mixture on top. Bake for 30-40 minutes. Let cool to set and serve, if you want, with whip cream or ice cream!

Enjoy!

Wednesday, July 22, 2015

Macaroni and Cheese


I too had a recipe that I didn't like. I made the macaroni and cheese recipe from Mad Hungry Cravings. I think mine was chef error! It tasted wonderful before I put it into the oven. I didn't have panko, I ran out, so per her notes I could swap out bread crumbs. As I'm sitting here realizing that they are not swappable. Panko had bigger flakes and is lighter, bread crumbs are fine and heavy. My problem was it was like putting a layer of dry sponge on top. It soaked up the favors and dried out the dish. I was going to make notes here to say use less crumbs or more butter. I personally would not even bake it. Or if I was making it for company I would cover with foil with extra shredded cheese on top to help it not dry out.

Let's get started

Preheat oven 375 degrees Fahrenheit. Set out a 9 by 13 pan.

Ingredients

1 lbs macaroni or any small shape pasta
7 Tablespoons butter, divided
1/4 cup flour
1 quart whole milk
12 oz shredded cheese, any combo you like, this time I used Gruyere and sharp cheddar.
Pinch of cayenne
1/4 teaspoon black pepper
1 1/2 cup of panko or 3/4-1 cup bread crumbs

In a large pot boil pasta as instructed on packaging. Meanwhile in a large skillet melt 4 Tablespoons butter at medium high heat, add flour and cook for 2 minutes until brown and fragrant. Slowly add milk and bring to a boil and thickened. Remove from heat and slowly add shredded chews stirring after each addition. Add cooked pasta and stir until combined. Put in baking pan. Mix crumbs and remaining 3 Tablespoons butter, sprinkle over the top and bake for 20-30 minutes.

When it was ready to eat, I took a scoop, the bread crumbs were still dry and pouring off like sand. It was like eating sandy glue. I was focusing on the bread crumbs, I couldn't taste the wonderful cheese sauce like before. It was sad, my favorite thing to eat is macaroni and cheese. I'm going to try this again and see if my thoughts will make it better. Trust your instincts, I was thinking I should have added more butter. I also have made the cheese on top and put foil on and it turns out wonderful.


Let us know if you make it and how it turns out or your suggestions!


Tuesday, July 21, 2015

Baked Potato Poppers


I wasn't sure if I should share this recipe or not at first - usually I like to say how much I like a recipe and that's why I share it.  This time I thought I would go ahead and share it since I was the only one who didn't like it!  I shared some with friends and even Eric -and they all loved them!  So maybe it's just me ;)

This is another recipe from our Cookbook of the Month: Mad Hungry Cravings by Lucinda Scala Quinn.  Try it out for yourself and tell us what you think!!

Baked Potato Poppers

2 large potatoes (about 1 pound)
1/2 cup flour
1 tbsp cornstarch
1/2 tsp coarse salt
1/4 teaspoon white pepper
1 large egg yolk
1 1/2 cups panko bread crumbs
1/4 cup oil

Preheat the oven to 425° and place a rimmed baking sheet inside.  Shred the potatoes and cover with boiling water for 10 minutes.  Drain and press to remove as much water as possible.  Mix in all of the ingredients except the panko crumbs and oil.  Scoop and roll the potato mixture into balls and coat with the panko crumbs.  Remove the pan from the oven and coat it with half of the oil, place the balls onto the pan and drizzle with the remaining oil.  Cook for about 30 minutes until crispy and browned - turning once.

For the ones for Eric, I just put the balls onto an ungreased pan and baked them - they did not brown, but they still got crunchy.  He really liked them and has asked me to make more!  He says they are like a potato dumpling more than a tater tot...maybe that's my problem - I really wanted tater tots!! Lol :)

Here are the links to the other recipes from this cookbook:

Honey Mustard Wings
Cheddar Drop Biscuits
Creamed Spinach

Have a great day!
Beth


Tuesday, July 14, 2015

A New Pot Rack...and the Start of Something More


I'm sure that it will come as no surprise that one of my biggest goals is to have an organized kitchen!  I have maybe mentioned it a time or thirty...
Eric and I have been doing lots of boring behind-the-scenes things that I don't mention, but we've finally gotten to the interesting stuff!!  Last weekend we started working on our cabinets and I am so excited by how they are turning out :)  We made the pot rack and then attached two lid holders to the inside of the cabinet - so now I have an easy way to get to a pan without having it all stacked (one of my biggest complaints lol).  I haven't put anything away yet because we painted the front edge of the cabinets and knowing me I will drop something and ruin it :/  When I first started looking for ideas for pot and pan organizing I saw a pot rack that slid out of the cabinet, but because of the fake drawer panel on the cabinet it wasn't really possible for my kitchen.  Instead I came up with this idea for a pot rack inside the cabinet and Eric really did a great job!  I'll definitely share a picture when I get it all loaded up!

As I said before, we also got the front edge of this set of cabinets done.  It doesn't look like much but I'm very happy with the color and I can't wait to get the rest of the cabinets done and the doors painted!!


Here's a reminder of my kitchen inspiration:

Find it here on Houzz

Have a great day!
Beth

Friday, July 10, 2015

Honey Mustard Wings


This was a simple recipe and you know how I love those! I choose chicken wings from Mad Hungry the cookbook we are cooking from this month.

Her original recipe is teriyaki glazed wings. At the end of the recipe she has notes about different types of wings, one of them is this recipe so I decided to make this version instead. With our new eating habits we are doing less sweet food so I wanted to stay away from those delicious sauces like teriyaki. Of course I know honey is sweet, it is more nutritious than granulated sugar.

This recipe can serve 4 people easily. She said or two hungry college students, hehehe.

I will be exploring new ways to make a glaze for these wings. I love how she understands how to make them perfect. Cook them then begin to glaze.

You will need a sheet pan and bowl with a spoon or spatula.

Ingredients

2 lbs chicken wings
2 tablespoons oil
Salt
1/8 cup honey
1/8 cup mustard (we used yellow and it's good)

Preheat oven to 375 degrees Fahrenheit. In a bowl toss wings with oil and salt, I would toss and then sprinkle some salt on until it all had some on it. Place on baking sheet and bake for 30 minutes. Meanwhile make glaze, combine honey and mustard. Brush glaze on and return to oven for 5 minutes, flip over wings and glaze again. Flip one more time and glaze. I then turned on the broiler for a couple of minutes and let them get crispy.

Enjoy!

Thursday, July 9, 2015

Organizing My Decorative Stuff

I recently changed out the items on my dining room hutch, so I wanted to find a way to organize and store the items that I removed.  We are still working on finishing the upper cabinets for my pantry, and this is where all of my seasonal decorative things will be stored in the future, so it will be great to have everything ready to put away when they are done.  I decided to use plastic storage boxes because they will stack and keep everything safe.  I found these boxes at IKEA for $3 each, which makes them very affordable!  Nine boxes will fit into each of the cabinets, so that will be a lot more storage than just using the single shelf in each cabinet.  I started with the three in the picture, but now I need to go back and get more boxes!!

I'm excited every time I figure out how to organize something new - it's silly but fun!!

Have a great day!
Beth

Wednesday, July 8, 2015

4th of July Mini Pies


I made these little cuties for the 4th. I love this basic tart dough recipe from Pampered Chef. You can bake these and fill with what ever you want from sweet to savory. I found out you roll and cut the dough as well.

You will need a mini muffin tin, tart shaper or some thing rounded and small that will fit into the wells. Small biscuit cutter or small star shaped cutter. Medium size bowl and small scoop.

Ingredients *

1/2 cup of softened butter
3 oz cream cheese softened
1 cup flour

Pie filling

Combine butter, cream cheese, and flour well. With the small scoop fill the wells, shape the dough by pushing in the center with the shaper to make space for the filling. Fill with your choice of pie filling.  *I just realized I tripled the ingredients because I threw in the whole block of cream cheese (I often do this) so I just made more. Which means I had left overs for the cut outs on top. So you can double or quarter the recipe so that you can have a little extra for the top. Bake for 10-12 minutes or until browned around the edges.

Enjoy!

Tuesday, July 7, 2015

Cheddar Drop Biscuits


I'm so excited that Felicia and I decided to start using our cookbooks on a regular basis!!  We have a lot of really great cookbooks that we never use, because Pinterest or internet searches are just so convenient!  I love  Pinterest, but I either need to stop buying cookbooks or use them...so, we have a great way to search our cookbooks for recipes (I wrote about it last year, you can find the post here) and now we have a fun way to explore different cookbooks each month.  We decided that we would pick a cookbook each month, and we would each pick four recipes to make and share (one each week).  I have to say that I am already glad we did this - my very first recipe is amazing!  

Felicia already shared that this month our recipes are from Mad Hungry Cravings by Lucinda Scala Quinn.  I chose the Cheddar Drop Biscuits...they were so good I couldn't stop eating them!  They were even better the next day as a breakfast sandwich with egg and bacon.  I was very sad that I only had 1 left to have for breakfast!!  I think I might try making frozen breakfast sandwiches with these in the future...

2 cups flour
2 tsp baking powder
1/2 tsp baking soda
1 tbsp sugar
1/2 tsp salt
Pinch cayenne pepper (I actually used paprika instead)
6 tbsp cold butter, cubed
8 ounces sharp white cheddar, shredded (I think any kind of cheese would work)
1 1/3 cups buttermilk
3 tbsp chopped chives

Preheat the oven to 425 degrees.  Combine the dry ingredients in the bowl of a mixer.  Add the butter and mix on low until small pea sized lumps are formed.  Using a spatula, stir in the shredded cheese.  Using a low speed, add the buttermilk and chives and mix until the dough comes together.  Drop the dough into baking sheets with parchment paper, leaving 2" spaces between.  Using 1/4 cup measurements you should have 16 biscuits.  Bake for 12-15 min until golden brown.  

Amazing...can I say that enough to get you to try making these yourself??  These are so good I have made them twice in a week - and eaten way more than I should (stupid scale)!!!

Here are the rest of the recipes we've made from this cookbook:

We would love to here about your favorite recipes from cookbooks!  Comment and share!!

Have a great day!
Beth


Friday, July 3, 2015

Creamed Spinach


Beth and I decided to cook from our cook books! We love Pinterest but we have all these books and it is time to start using them.

Beth bought a wonderful subscription online to catalog our books and have the ability to search for recipes and ingredients minus the instructions.

We chose a favorite, well they are all my favorite, Mad Hungry Cravings by Lucinda Scala Quinn. We are going to do a recipe a week from her book for 1 month.


Then the next moon will be a new book!

Today I made creamed spinach!

I didn't realize how much spinach is 2 1/2 pounds. So I cut the amount in my recipe by quite a bit. I need to keep enough for our drinks in the mornings. The recipe turned out super cream and it is so tasty! Even the kiddo went back for more, that's saying something!

You will need a big pot, a colandar and a large skillet.

Ingredients

8 oz spinach (if you have more by all means do more)
3 Tablespoons butter
1/4 cup flour
1 cup milk
Salt and pepper
A pinch of nutmeg (I didn't use this)

First rinse the spinach, don't dry, the water on the leaves is enough water for the spinach to steam with. Place spinach in a pot and cook over medium heat with the lid on. When the leaves have cooked down, drain and squeeze out the liquid.

In the large skillet melt butter over medium heat, add flour and whisk for 1 minute. Add milk and continue to whisk. Turn off heat add salt, pepper and nutmeg if using. Add spinach and enjoy!

This isn't her exact recipe, we'll say this highly inspired and slightly adapted.

Wednesday, July 1, 2015

Refrigerator Bran muffins


I was excited about this recipe...still am! Although I would make some slight changes just so that I am super happy. Change #1 would be that I would crush the flakes a bit. The kind I get are huge. So there's giant pieces when you take a bite. Awesome flavor though, just for picky texture people it doesn't work! Change #2 is I would cut this recipe in half for my small family of 3. We just couldn't eat that many. If you want a great size recipe for a bake sell this would be perfect.

I got the recipe here. She says she puts the batter in her 8 cup bowl and keeps it in the refrigerator, the liquid alone almost filled an 8 cup cup bowl. So I think that was a typo! This makes a lot! It should keep in the refrigerator for 2 weeks. I figured I can make them on Mondays, when I'm all out I will make the batter the Sunday before.

My son loves these even with out the blueberries. I have to tell you though He went nuts for them even more.

Ok for real now, let's get to the recipe!

You will need a big bowl and a lined or greased muffin tin if you plan on baking some now. Preheat the oven at 400 degrees Fahrenheit.

Ingredients

15 oz bran flake cereal
5 cups all purpose flour
2 1/2 cups sugar
5 teaspoon baking soda
1 1/2 teaspoon salt
4 cups buttermilk
1 cup vegetable oil
4 eggs
1 1/2 cups raisins or craisins optional
Fresh or frozen blueberries optional
Chopped pecans options

This is where I would put the bran flakes in a gallon size bag and take a rolling to it! It shouldn't be dust but definetly broken. In a large bowl sift flour, baking soda and salt. Add cereal and stir. Combine buttermilk, eggs, and oil pour over cereal mixture. Stir until combine. You scoop into prepared muffin time top with raisin, craisins, blueberries or nuts if desired. Bake for 20 minutes and cool for 10 minutes.

Place batter in refrigerator. Use within 2 weeks. No need to stir, just scoop out what you need and put the batter back into your refrigerator.

I can't help it, I have all muffins with butter, try it! So amazing!

I hope you enjoy this recipe as we did!

Monday, June 29, 2015

Apple Update!

The last few weeks has been hard on my plants - I've lost most of the plants on my front porch and all of my veggies :/  I know it's mostly my fault,  I didn't water as often as I should have (or at all in some cases).  I will say I was pretty disappointed that I forgot the plants on my front porch - I guess that's what happens when you only use the front door once a week lol.  However, I am very happy with my apple tree!  I have 10 apples growing - 4 Fuji and 6 Yellow Transparent (the ones in the picture).  I will definitely need to step up my watering game for the rest of my plants to stay alive, but at least something is going my way lol!

Have a great day!
Beth

Wednesday, June 24, 2015

Chocolate Sauce 2


I made a new chocolate sauce recipe. This is better suited for an everyday sauce. In my earlier post I talked about how that recipe was amazing. It was better suited for special occasions. This recipe uses water instead of heavy cream. It pours better so I am able to put it in a squeeze bottle which was my goal. I really like this recipe and so does my son which is great. It's really easy to make and I have the ingredients in my pantry to make it at all times.

Recipe source

Ingredients:

1 1/2 cups sugar
1 cup unsweetened cocoa powder
dash of salt
1 1/2 cups water
1 1/2 teaspoons Vanilla

Combine all in medium pan and place over medium heat. While constantly stirring bring to a boil for 2-5 minutes when sauce has thickened. Let cool and store in refrigerator.

Enjoy!
Related Posts Plugin for WordPress, Blogger...