Friday, February 13, 2015

Love pies


I wanted to find something to make for my son's therapist for Valentine's Day. I love chocolate that's my go to but there's something about pies that says love in my opinion. I saw this recipe on Pinterest, the link is gone so I'm making up my own. You can put in any fruit you want I happen to have beautiful blueberries that I froze from last season.

What's great about this recipe is you can quickly make these. I happen to have ready made pie crust. There's also cream cheese in these so they become blueberries and cream hand pies. I can't wait to try them.

Recipe, makes six pies

1 box of ready made pie crust or 2 crust pie recipe
1 4 oz cream cheese room temperture
1/4 cup of powdered sugar
1/4 teaspoon vanilla
1 cups of frozen blueberries not thawed or fresh
1 egg beaten

Pre heat the oven to 400 degrees Fahrenheit. Prepare a baking sheet with foil and spray with oil or rub with butter.

In a small bowl mix cream cheese, powdered sugar and vanilla, set aside. Roll out 1 pie crust.

I have a heart hand pie shaper. So I first cut out my hearts, you can do this also with a cookie cutter, biscuit cutter or even a cup to make shapes. Brush the edge of one cut out shape with the beaten egg. Add a spoonful of cream cheese mixture, sprinkle blueberries on top. Make sure the filling is in the middle and not on the edge. Brush the edge of another cut out shape and place egg side down on top of the other. Seal with your fingers or a fork, I pressed my lid down and it marked it just like a fork. Place on baking sheet. With a knife make an X or what ever you feel like, this lets the steam out. Finish the rest by first rolling out the other crust and then brush the tops with the egg wash. Bake for 30-35 minutes.

Let cool for about 15 minutes before eating. I have learned the longer you let them rest the better they taste.

I hope you enjoy this as we did. Happy Valentine's Day from The Three Peas!

Thursday, February 12, 2015

Granola...3 Ways


Breakfast is served!!  I really like the versatility of this recipe.  I can make granola bars, granola for cereal and even just granola to have as a snack - all at the same time!  It takes about 10 min of actual work, and can be changed every time you make it.  So go crazy - I'm sure it will taste good :)

The original recipe is here.  Her's look better than mine, but I think mine are still tasty!  To help cut down on the amount of fat in my bars I added a small amount and mixed it in, this causes the chocolate to melt but helps the oats stick together.  I also eliminated the oil.

3 cups old fashioned oat
2 Tbsps water
1 Tbsp brown sugar
1 Tbsp maple syrup
1/4 cup honey
1 tsp vanilla extract
1 tsp cinnamon
1/4 tsp nutmeg
1/2 cup dried blueberries
1/3-1/2 cup mini chocolate chips

Preheat oven to 350 degrees F.  Spread the oats on a cookie sheet and roast for 15 min - they should be slightly brown and smell mmm good.  Once they are done, combine all of the ingredients except the chocolate and blueberries (or any other add-ins you would like).  Bring the syrup to a slight boil (it will almost foam as it comes to a boil) - make sure that all of the brown sugar is dissolved.  Remove from heat and pour over the oats in a bowl.  mix to coat all of the oats, then add any add-ins and mix again.  Place parchment paper in a casserole dish and press the granola mixture firmly with a second piece.  You want to try to get it as even as possible so your bars are uniform(ish).  Let the granola bars sit for at least an hour.  I use the parchment paper to remove them from the pan and then use a knife to cit them to size.  At this point some will crumble - now you have granola cereal :)  If you want you can crumble more or all of it.  It just depends on what you want!

These are just that easy!  You can make any combo, but this seems to be our favorite.  You can also make larger batches very easily.  I make the bars for Eric to take for a mid-morning snack.  I wrap them in parchment paper and put them in a sealed container in the fridge.  They stay fresh until they are gone, usually a week and a half or so. 

I am slowly starting to make all of our food from scratch, but I don't think everything will be replaced (How do you make Funyuns?!).  This is a great recipe to add to any collection.

Have a great day!
Beth    

Wednesday, February 11, 2015

Heart Crafts Penguins and Cats


When I was on the farm with my family, my nieces, nephew and I made these fun crafts. I thought with Valentine's Day right around the corner these would be good to share.


You will need:
Construction paper, in colors of your choice
Scissors
A glue stick
Googley eyes
Crayons 


The kids and I had a great time making them together and they are so easy my (almost) 3 year old nephew could do them by himself.


As you can see they are mostly just cutting out hearts and putting them together.


Enjoy and Happy
Valentine's Day!

J


Tuesday, February 10, 2015

Breaded Turkey Cutlets with Honey


This was so delicious. I'm so happy when I try something new and the family likes it. The flavors are savory then you get this caramelized finish and it's fantastic. I paired it with some veggies and garlic mashed potatoes. This will probably be at least a monthly recipe. I'm so happy to have them eat turkey too. We are a beef loving family so I get tired of having red meat all the time. Not to mention it's not good to eat all the time. So slowly I have been trying to find things we all like that is healthier for us that I can mix in.

Recipe

4 Turkey cutlets
1/2 cup of flour
1/2 teaspoon salt
1/2 teaspoon pepper
2 eggs
2 cups of Panko bread crumbs ( I think you can use less, I ended up throwing out about 3/4 cup)
1 teaspoon garlic
1 teaspoon dried parsley
1/2 teaspoon crushed chili flakes or to your liking
Raw honey
oil for cooking


Preheat oven to 350 degrees Fahrenheit, You will need 3 shallow bowls, you will be dredging your cutlets in them. Line a baking sheet with foil.

First bowl mix flour, salt and pepper. Second bowl crack and whisk eggs. Third bowl mix panko, garlic, parsley and chili flakes. First dip one cutlet in flour, then egg and last panko mix place on plate and finish the remainder cutlets.

In a large pan heat oil, about 2-3 Tablespoons on medium high heat. Cook each side for 3 minutes. Place on baking sheet, drizzle with honey and bake for 15 minutes.

My husband went back for seconds. I was planning on taking pictures after we ate. So I had to borrow his veggies for the picture.

I hope you enjoy this recipe as we did.

My Seeds Are Started...


I have finally gotten my act together enough to get my seeds started and now I just have to wait...well for 2 weeks and then I have to do it again :)  I decided that since this is the first year I am doing starts, I wanted to try out a few different ways of doing it for comparison. 

The first way was how I would do it 'traditionally' - I used the small plastic containers my dog food comes in (I have about 100 of them since this was the way I originally planned for and I have been saving them for the last year).  We drilled four holes in each container (Another win for the Drill Press - we were able to do them six at a time in under a minute), and then I planted two seeds in two spots in each container.  This way I can thin them for the healthiest ones and each container will only have two plants.

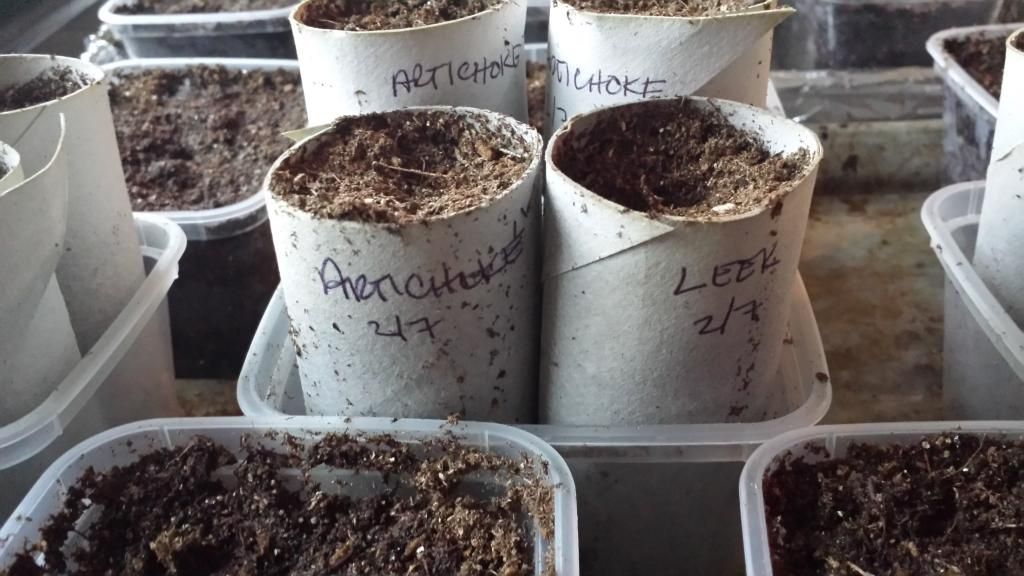
The second way I tried is with toilet paper rolls.  I read about this in one of my gardening books and it sounds like a great idea - but I'm still not sure about the outcome.  The idea behind it is that instead of removing them from the containers, you can plant the rolls directly in the ground and they will disintegrate.  This will hopefully be a smoother transition for the plants (I always lose about have of my transplants from shock) and the starters will be able to grow longer roots.  Fingers-crossed that it will work!!  I also put two seeds in each of the rolls, for thining later - you never have a guarentee that every seed will sprout so I always plant at least two.  I was a little nervous that the rolls would just flop over after the first watering, but the next day they were dried and only a little deteriorated.  I'm also hoping I'll still be able to read the type of plant once I'm ready to put them in the ground lol... 

Yes, they're dirty and messy but let's be real - so is gardening!!
I also plan to try something called Winter Sowing.  My weekend got a little busy so I wasn't able to do it at the same time (Plus, I ran out of seed starting soil and wasn't able to get more until yesterday).  Basically, winter sowing is growing your starters outside.  Most people will use milk jugs to create mini greenhouses.  Since I don't have them to show today, I will do a follow up post about them later this week. 

By now, I would be wondering what was planted so here you go...


Imperial Star Artichokes
Sweetie Tomatoes (Cherry Tomato Type)
Stupice IPB Type Tomatoes (Early 2-3" Type)
Early Roma Tomatoes
Red Scallions
White Scallions
Early Jalapeno Peppers
Cal Wonder Red Pepper
King Richard Leeks
Nautic F-1 Brussel Sprouts
Early Snowball Cauliflower
Broccoli

I currently have at least 4 starters for each type of veggie above...plus two more once I do the winter sowing...which is way too many for this year.  I just find it impossible to only plant one or two of anything - what if it doesn't grow?!  I wont have enough room for all of them (if they all survive), but that's what friends are for right? :)  I will share them among a few friends, so they wont go to waste.

I should also mention those two larger containers - I planted lettuce in one and carrots in the other.  I wont be transplanting the carrots (they for sure would not survive), but I wanted to see how they would do grown in a smallish container.  The lettuce can be transplanted and it will give me a little jumpstart this year since I don't have the beds ready yet.

Anyone else get their starters done it time?  I barely made it at 7 weeks before the last frost date - yikes!  I was a little late on a few of the plants, but I'm hoping it wont make a huge difference...only time will tell :)

Happy Planting!
Beth


Related Posts Plugin for WordPress, Blogger...