Wednesday, December 31, 2014

End of the Year - How did I do?

Winda says: Bye 2014 - Can we go play now?
Wow - I can't believe it's the last day of 2014!!  Of course this means I have to decide how successful I was at my 2014 New Year's Resolutions...yikes! 

Here is a recap of what they were:
My 2014 Resolutions:

1. Start Blogging! - It's been far too long that we have been talking about doing this blog - we are doing it!

2. Get in Shape! - This is the year. I have to start working out and eating better. I am not expecting miracles, I would just really like to lose some weight and create a better eating habit.

3. Finish Projects! - We have so many things going on all the time, but this year we agreed we would finish all of our outstanding projects before starting any new ones.

I think I can say we were pretty successful with the first resolution - we have 243 posts published (well, 245 after tomorrows post lol) and over 8,500 pageviews in 2014!!  That seems pretty amazing to me - who knew we could follow through so well!  We are looking forward to adding new resolutions to this beginning, but we will cover those tomorrow.

The second resolution is a little harder for me to decide if I was successful or not.  I did (finally) find a workout that works for me (after trying a few different types/combos) and while I have managed to workout more often than not this year (I managed to workout unless I was sick, hurting too much or on vacation) - I still feel let down.  I have not lost a single pound - at all!  I did lose some inches, and the fatty areas seem to be moving around and thinning, but still - that stupid scale is my enemy!!  I get the whole fat to muscles, muscles weigh more blah blah blah...but I want the scale to say I weigh less!!  (Yes - I am pretty much a toddler throwing a fit about it.)  Lots of people have told me I am looking slimmer so at least that is a plus :)  I have been a little less successful finding a better eating habit - that's something I am working on for next year.

The final resolution is mostly a success.  We haven't started any more large projects this year - but we also didn't finish as much as I was hoping to.  We did have one project that we had to do - replacing our hot water heater - but it was finished in one weekend.  We have finished Eric's office and are continuing to work on the kitchen.  The kitchen is such a large project, but I am hopeful we are making good progress on it.  I just recently realised I never did an actual post on the finished office so I will see what I can do about getting some pictures together for that.  I thought the hot water would be neat too - but Eric says he can't see why it would interest anyone else.  We did some kind of cool upgrades so I may still convince him to share :)

So there you go, I feel like I did a pretty good job with my resolutions this year.  I definitely did better than I ever have before!  Comment and share your success or failure with your resolutions - we would love to hear them!

Have a great day!
Beth

Tuesday, December 30, 2014

Cheesecake for Christmas


I really enjoyed making this cheesecake. Not because of the recipe but because my husband helped me. He is a great a sous-chef. In fact he was too good, I'm going to need to step up my game. He meticulously made the crust. My cheesecake came out perfect because of it.

Cheesecake, in my opinion, is so easy to make. It's usually really hard to remember to take the ingredients out to come to room temperature.

Recipe

32 chocolate wafer cookies about 1 1/2 cup crumbs
1/4 cup melted butter
2 Tablespoon sugar

4-8oz block of cream cheese at room temperature
1/4 cup sugar
1 can 14 oz sweetened condensed milk
1/3 cup heavy cream
2 Tablespoons flour
2 teaspoon vanilla
3 eggs at room temperature

3/4 cup heavy whipping cream
1 1/2 cup semi-sweet chocolate chips

Crushed peppermint candies

Preheat oven to 350 degrees Fahrenheit. Set aside a springform pan. Heat around 4 cups of water to boiling. Set aside a big baking pan like a roasting pan.

Let's first make the crust. Crush cookies in a large plastic zip bag. You can use something heavy like a rolling pin or a can of food. When the crumbs are all crushed fine mix with sugar and butter. Press mixture into the pan and up the sides a little. Bake for 10 minutes then reduce oven to 300 degrees Fahrenheit. Let the crust cool for 10 minutes. Wrap pan with foil make sure it is pressed in real well so that water doesn't get inside from the water bath

In a large bowl beat cream cheese and sugar until fluffy. Slowly add sweetened condensed milk until just combined then add the heavy whipping cream, flour and vanilla. Add eggs one at a time beating after each addition. Pour cream cheese mixture over cooked crust.

Place pan in the roasting pan and carefully pour boiling water into the pan, not getting any on the cheesecake. Place roasting pan into the oven and bake for 1 hour and 15 minutes. Turn oven off and open the door at least 4 inches and let sit in there for 30 minutes. Pull out and let rest for 30 minutes on counter. Remove foil and wrap the top with plastic wrap. Now it's ready to go into the refrigerator for 6 hours.

When you're ready to serve make the ganache. Heat heavy whipping cream in a microwave safe bowl for 1 minute add chocolate chips mix until smooth about a minute.

Release collar of pan and pour ganache over the top smooth with an offset spatula or butter knife. Last sprinkle with crushed peppermint candies.

Finally it's ready to eat. This is a great base recipe you can easily adapt from here. For instance you can top with fresh raspberries and also heat up some raspberry jam and then pour on the cheesecake before the ganache.

Have fun and I hope you enjoy this as my family did!

Monday, December 29, 2014

Sourdough Rolls

 
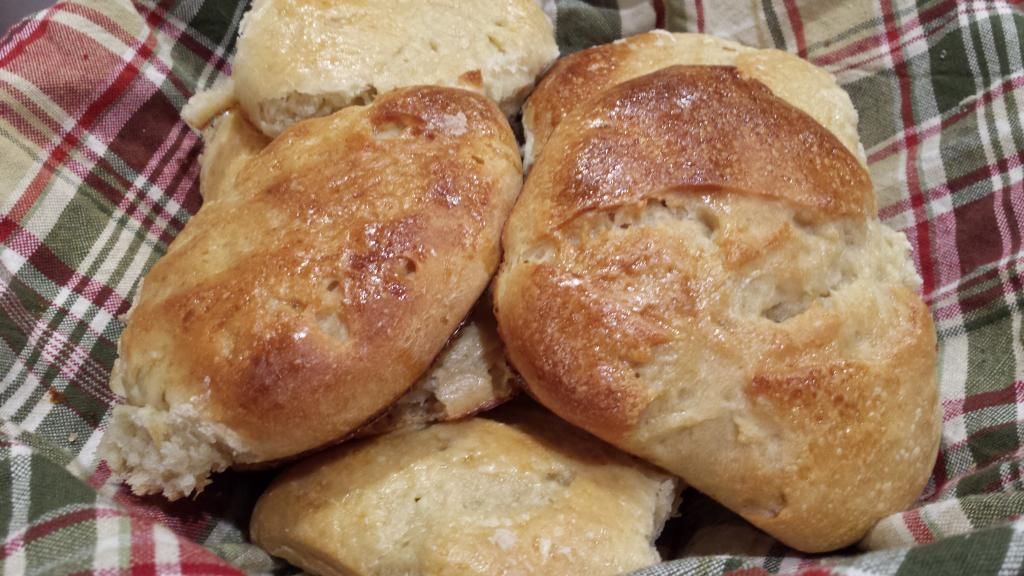
I was pretty excited to make these rolls - I even called my mom at midnight to tell her I was making them and how much I liked how the dough felt (if you make bread from scratch you know what I mean lol) and to thank her for giving me the sourdough starter.  I'm not sure where it all went wrong, or if it even did.  I made them for Christmas dinner and every one loved them - except me...What?!  I am hoping my tastebuds were just out of whack because they tasted like dirty socks to me, but everyone kept telling me they really liked them!!  Besides the taste - I was pretty disappointed with the texture - they were more like a dense bread instead of a fluffy inside with a crunchy shell.  This was mostly my fault - I knew they weren't going to turn out the way I wanted about halfway through the recipe but I didn't have time to find a new recipe and start over and I was fine with a more dense roll - but then I over-proofed them!  ( I thought I would use my bread proofing function on my oven, which made them rise a lot faster than I expected)  Erg...Well, I decided to share them anyways - maybe someone else will have better luck than me :)
 
Since I was home and I knew I wanted to make sourdough rolls, I pulled my starter out of the fridge 4 days beforehand.  I fed it around 1/2 cup each of flour and warm water every other day, and added just the 1/2 cup of flour the other days.  It seems like a lot, but I needed to double the recipe and needed to use 2 cups of starter.
 
Ingredients:
1 cup fresh sourdough starter
¼ cup brown sugar (I used white sugar)
¼ cup warm water
¼ cup melted butter
1¼ teaspoons sea salt
2-2½ cups all-purpose flour
1 egg
1-2 tablespoons water

In a mixing bowl combine starter, sugar, warm water, melted butter, and sea salt. Add flour slowly, mixed with a fork or spoon until it is thick and then switching to using your hand.  Knead the dough for around 10 min - until it is smooth and elastic.  (Every recipe will tell you to knead the dough on a floured surface - I actually use an extra large bowl to mix the dough and knead it right in the bowl - it seems to cut down on the amount of extra flour that is needed and it is not as messy).  Oil a bowl and place the kneaded dough into it, turning it to cover the dough.  Cover the bowl and place in a warm space to rise until doubled in size, 4-8 hours, or overnight.  
Divide the dough and roll into small balls.  Place into a buttered dish.  Cover and let rise until double, 4-8 hours (unless you use the bread proof function - then it's less than 2).  Preheat oven to 375ºF.  Make an egg wash by beating egg with water and brush the mixture evenly over the rolls.  Bake 20-25 minutes, or until golden brown.

Here is the link for the original recipe.
 
I hope you have better luck than I did - I will definitely be trying more sourdough recipes! :)
Beth

Wednesday, December 24, 2014

Christmas No-Bake Cookies


We were having a hard time deciding on what type of cookies we wanted to have for our cookie exchange this year - both of our favorite cookies have already been talked about!!  Then we came up with the idea to do No-Bake Cookies.  We have both been so busy, much like most people this time of year, and these are a great option if you are short on time!!  (You know - like if it's Christmas Eve and you have to make cookies for tomorrow and you just don't have the time ;)!!)


Felicia's No-Bake Chocolate Peppermint Cookies : 

1 stick (1/2 cup) butter
2 cups sugar
1/4 cup cocoa
1/2 cup milk
3 cups quick cook oats
1/2 - 3/4 cup crushed peppermint candies
1 teaspoon vanilla

In a large pan melt the butter, sugar, cocoa and milk over medium heat until it boils. Add oats, peppermint candies and vanilla - mix thoroughly.
It will look soupy but it will set after 20 minutes. Drop rounded spoonfuls on to a baking sheet lined with parchment or wax paper, I have non stick liners for my pans and that worked perfectly. 
I put in 3/4 cup of crushed peppermints, but I now think a 1/2 cup will work better - and I might put in a smidgen peppermint extract next time.

Beth's No-Bake Butterscotch Peanut Butter Cookies:

1/2 - 1 bag of butterscotch chips
1 cup peanut butter
6-7 cups corn flakes

Measure the corn flakes into a large bowl before starting.  In a double boiler (or in a bowl over a boiling pot of water), melt the butterscotch chips completely, stirring until it is smooth.  Add the peanut butter and continue to stir until the mixture is melted enough the pour off the spoon.  Carefully pour the hot mixture over the cornflakes and mix until they are evenly coated (I used 2 spatulas to toss the corn flakes).  Spoon the coated flakes onto parchment paper into cookie mounds - or spread it out and break it up after it has cooled.

We hope you enjoy these as much as we did!

Merry Christmas and Happy Holidays!!
Three Peas Create

Tuesday, December 23, 2014

Our Christmas Trees

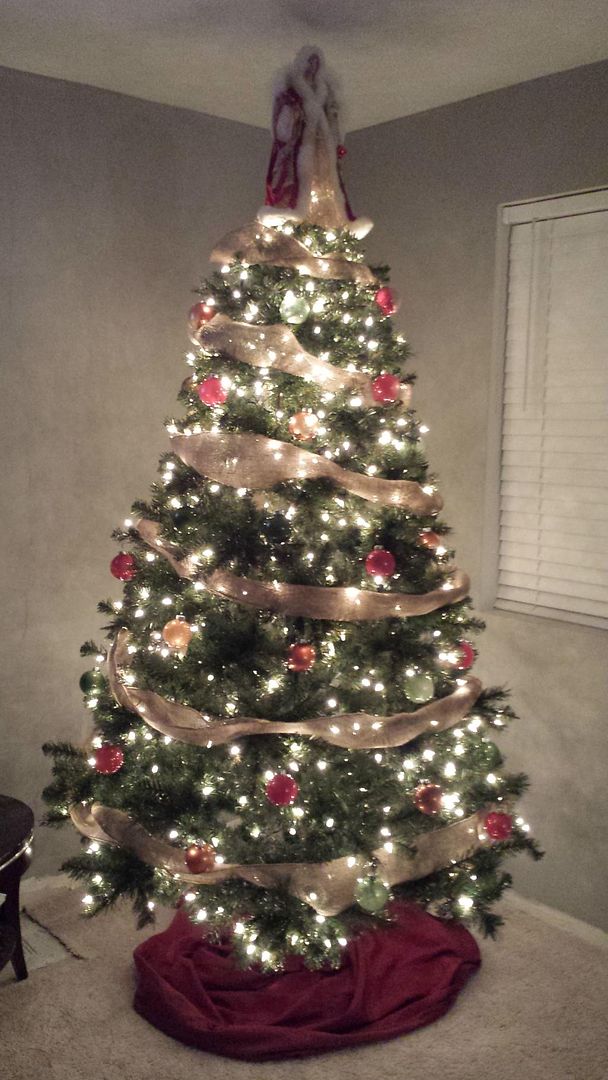
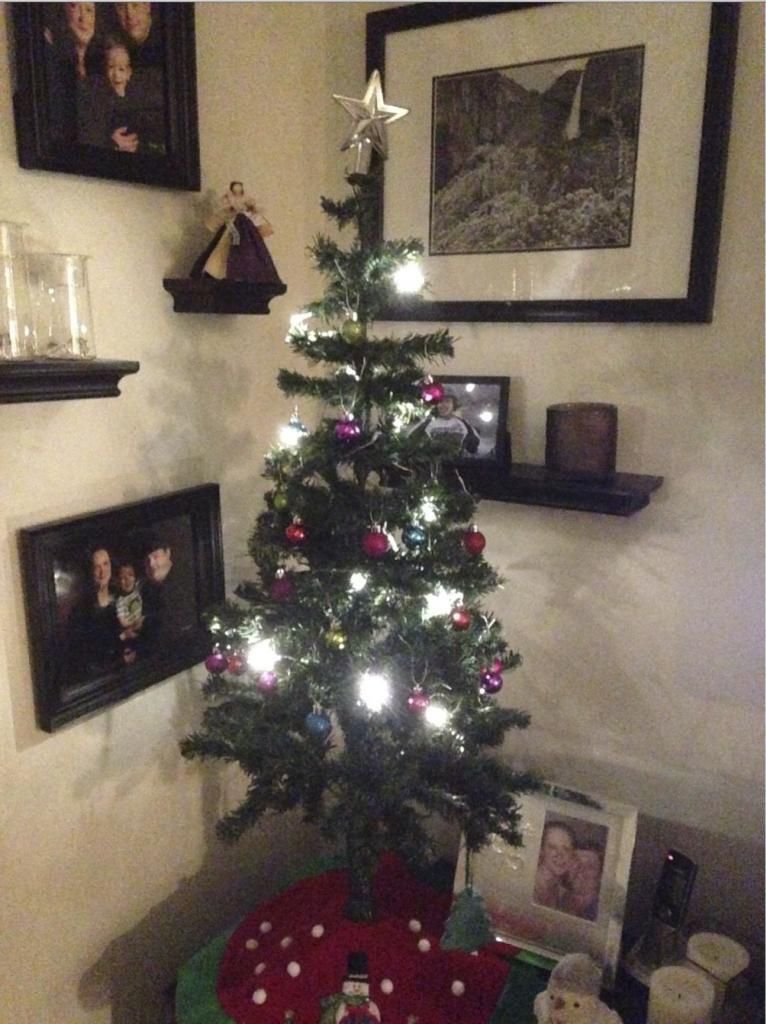
Here is a look at our Christmas Trees this year.  We had a lot of fun using new decorations!!

Beth's Tree:


I am so excited that I actually got to put my tree up this year!!  I wasn't able to get all of our ornaments out, but I did have fun making ornaments (even if they didn't turn out).  I wanted to keep it simple - and I think I did a pretty good job!  The angel doesn't really go with the rest of the tree, but I didn't want to buy a new one - I may own a few (like 3 or 4) and this was the best match.  I hope everyone had as much fun as I did getting their trees ready this year!

Felicia's Tree:


 This year we put up our little tree. Other than the skirt I had nothing to decorate it with. So I went to the store and found these cute battery operated low heat lights. I found a box of small ornaments in several colors and the other red and green. I let Xander pick which one. I let him decorate it too. Then I had to rearrange them, the cat has been playing with them and biting the strings until they break. Luckily they came with one whole extra string. So Hopefully I have them high enough or I will have to break out the twine if she gets them again. I have always like this little area, but now the tree has really made it my favorite spot!

Merry Christmas and Happy Holidays!
Three Peas Create


Related Posts Plugin for WordPress, Blogger...