Monday, March 31, 2014

I got an Apple Tree!

I have been trying to convince Eric to plant an apple tree since we bought our house.  I wanted to have fresh apples, but he wasn't sure about the upkeep and all the apples falling on the ground.  Well, a few weeks ago I finally found a solution to our dilemma - Espalier Apple Trees!  I had no idea that this was even an option -I randomly ran across the idea one day when I was wandering my local hardware store's nursery.  So after about one day of thinking about it and researching it - I talked to Eric and convinced him to give it a try.  I ran right out and bought one - I was too excited to wait!


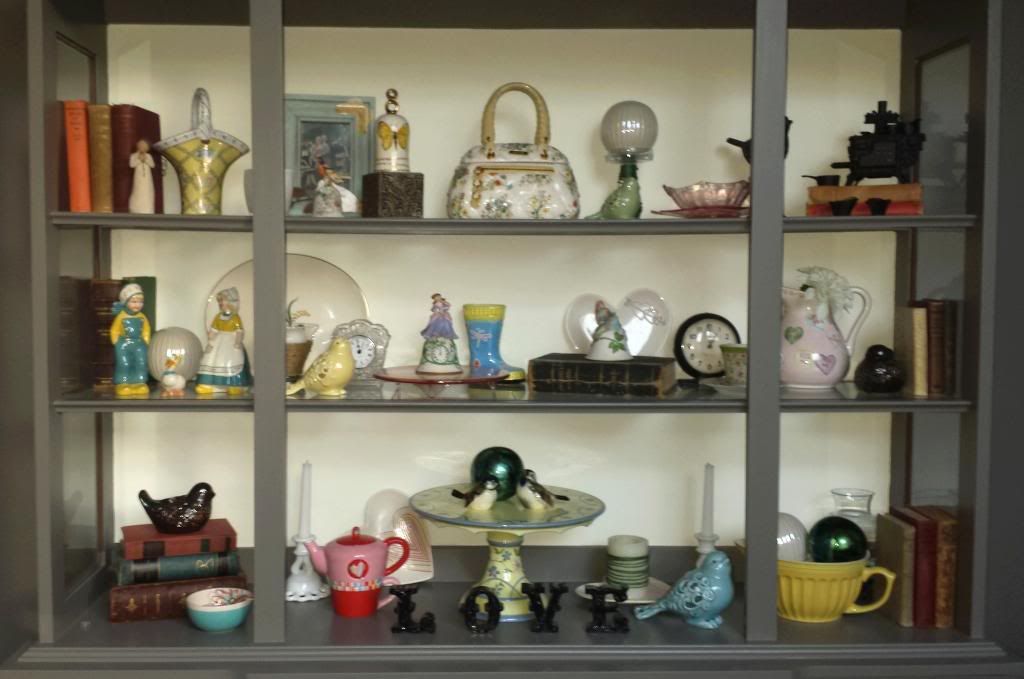
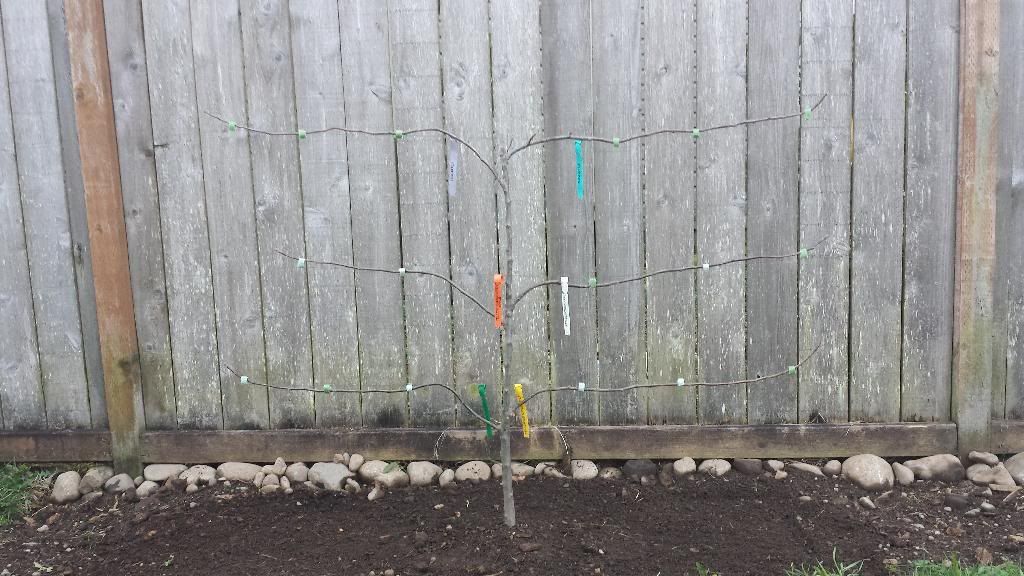
You can't see the wires but there are 3 wires running along the branches.  I attached the branches using velcro tape - that way I can change the loop size without a lot of fuss.  Also, I plan to beef up the wires and posts as the tree grows.  I don't know if it will get taller or not, so we thought it would be better to start out smaller. 

The other exciting thing about this tree (other than I got to buy an apple tree), is that it is 6 different types of apples: Fuji, Gala, Red McIntosh, Yellow Transparent, Gravenstein and Yellow Delicious.  I put the tags on the wire so they wouldn't hinder the tree growth, but I wanted to remember which types I was growing!


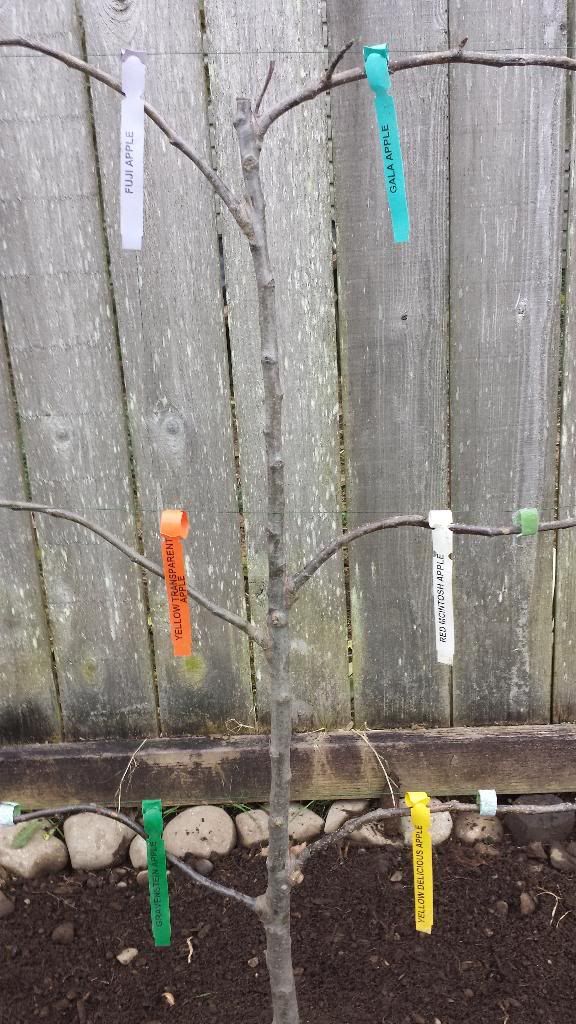
I am super excited about this tree (can you tell?).  It will only get about 4 feet tall, but will grow out to be around 10 feet wide.  This means I will be able to reach any apples that grow, without needing a ladder.  I plan to plant an additional apple tree and a pear tree next year.  I wanted to give this location a try before buying everything - I may end up having to move it next year if it doesn't do well.  The hardest part will be waiting - for the first 2 years I am supposed to pick any fruit that grows when it reaches about the size of a cherry!  So no apples for almost 3 years!!  In the long run it will be better because it forces the tree to concentrate on growing instead of producing.

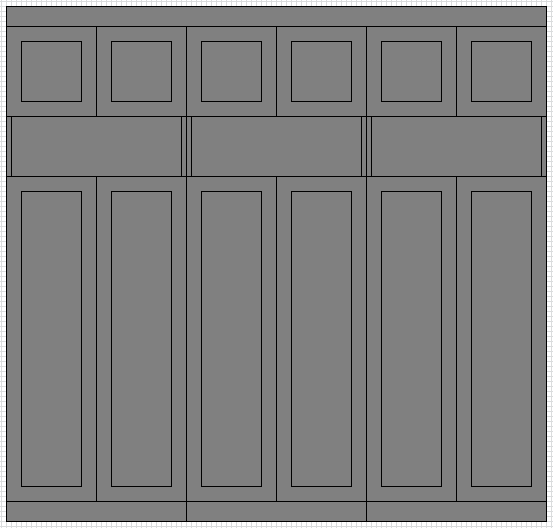
Since I am trying to grow an organic garden, I also planted onions and garlic in the bed directly below.  here is an idea of how I want to place things:


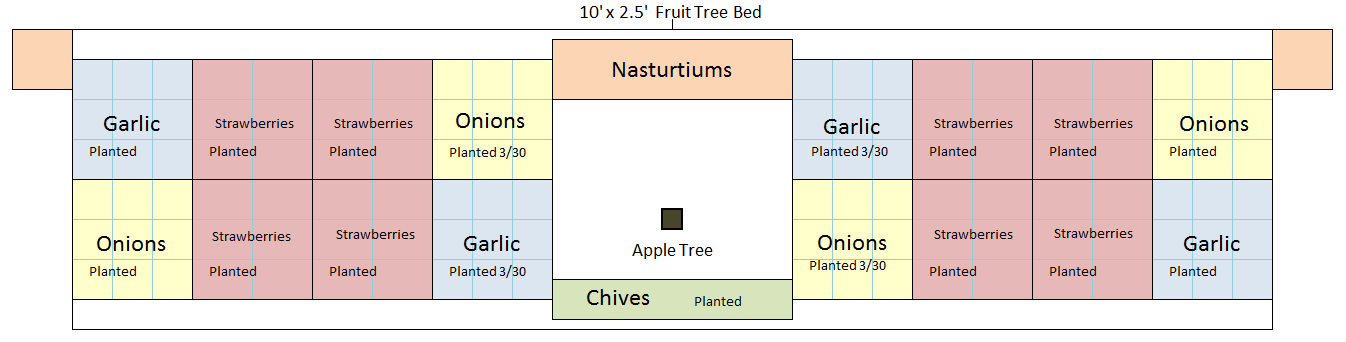
The items that don't have a date below have not been planted yet.  I am going to spread out the garlic and onions so I can harvest them at seperate times.  The strawberries are kind of a pipe dream at this moment.  I am working hard to convince Eric that we can grow them there without having the critters get into them.  I am thinking I can create some kind of dome cover out of chicken wire that will help keep the critters out.  I may only grow a few plants this year - just to see how they do.   

If everything goes they way I want it to (haha), then I will have 3 beds similar to what is above.  This will work out to be 108 Onions, 108 Garlic bulbs, 144 Strawberry plants and a lot of chives. :)

Just in case anyone is wondering what a mature espalier apple tree can look like - check here, here or search for it online.

Friday, March 28, 2014

I start gardening when?!


It seems like I have been doing a lot of book recommendations lately, but I just keep getting these really cool books and I love to share them!  This one is not just a great resource book - it is also a workbook!  I love when I can write notes in books and not feel guilty about it. 

This workbook is really cool.  Instead of only working for a specific zone or area, they have all of the weeks broken down by how far before/after the last frost date.  So you can use it no matter where you live!  All you need is the average frost date for your area.  I found mine here:


I didn't want to plan for an early date of March 10th, but I thought April 4th was a little too late.  So I chose to use the March 10th and April 4th dates and estimated that my Average Last Frost Date is March 24th.

Since I am not doing a full garden this year, I am not completing the workbook.  Instead I am using it to give me tips for this year and to help with setting up and getting ready for next year.  The first week it has is 20 weeks before the last frost date...which puts it around November 4th!  I don't think I would have ever started that early on my own :)

Here is a view of the start of the planning section:


It starts by summarizing what you will be doing 20-15 weeks before the average date of last frost.  It also gives you an area on the right side to write down any information you want to remember for the next year.  I want to use it to catalog where I buy my seeds and what did/did not store well at that point.  There are summary pages like this for every 5 weeks until 29 weeks after the last frost (which is around October 9th for me) - so it pretty much covers an entire year - I get 3 weeks off! lol    

Then the next several pages break down each week: 


Obviously, the first week is not very exciting - but it does break everything down to simple steps.  I have already found it to be useful - getting this post ready reminded me to order the seeds for what I plan to plant this year!  So now I have organic seeds for artichokes, bell peppers, tomatoes amd zucchini, as well as crowns for organic asparagus coming next week!! 

Here's why I chose to go with these:
     Asparagus takes 3 years to produce an edible crop - so I wanted to get a headstart.
     Artichokes are sooo expensive and I love them - they can also take 2 years to produce.
     Bell Peppers are really expensive as well (especially yellow and red ones) and I use them a lot.
     Tomatoes are supposed to be pretty easy to grow and I really want to start making and
                           storing homemade sauce..
     Zucchini are just for fun - Eric loves them so I use them a lot.

So if you are looking for something to help you get your garden started, or to help you keep track of what you are currently doing - I definitely recommend this book.


Thursday, March 27, 2014

Nutella N' Me!

It smells amazing in my house. I love baking brownies!

I'm making Nutella brownies for a friend. She loves Nutella!

I made this entire recipe in 1 pot.

Let's get started.

Pre-heat the oven to 350 degrees Fahrenheit. Grease a 9 by 13 baking pan with baking spray.


Melt 1 cup of butter, or 2 sticks, 


until completely melted.


Add 2 1/4 cup of Sugar and mix constantly for about 2 minutes.


Then add 13 oz of Nutella, that's a whole regular size jar.


I had to change to a spatula, it was thick!


Add 1 1/4 cup of cocoa powder, a teaspoon each of salt and baking powder,


add 4 eggs 


Mix until shiny!


Add 1 tablespoon of Vanilla and 1 teaspoon of espresso powder (if you don't like coffee, you can leave this out.)


Mix in 1 cup of flour until just combined.


Mix the last 1/2 cup of flour with the 10 oz of Chocolate chips (this helps the chocolate chips from falling to the bottom of the pan.)


 Add to the batter and mix until just combined.


Pour into your prepared pan and bake for 30-35 min.


Yummy! So Pretty!


I cut them too soon, it's best to let this recipe rest, it's pretty gooey. It was tasty though, which means it will be really tasty after it cools.


Here's the recipe that I adapted:

1 cup (2 sticks) butter
2 1/4 cups sugar
1 jar of Nutella 13 oz
4 large eggs
1 1/4 cup of Cocoa powder
1 teaspoons of salt
1 teaspoon of Baking Powder
1 teaspoon espresso powder
1 tablespoon vanilla extract
1 1/2 cups of all purpose flour
10 oz chocolate chips

Pre-heat the oven to 350 degrees. 

Coat a 9 by 13 baking pan with nonstick spray. 

In a small saucepan over low heat, melt butter completely. Stir in sugar and continue cooking for 1-2 minutes, stirring constantly.  Do not allow to boil. 

Remove from the heat and stir in the Nutella until smooth. Stir in cocoa powders, eggs, salt, baking powder, espresso powder and vanilla extract. Mix until well combined. Stir in 1 cup of the flour and combine the chocolate chips and 1/2 cup of flour and add to the batter. Pour into the prepared baking pan. Bake for 30-35 minutes. The edges should be set and the center should look slightly moist. 

Enjoy!


Wednesday, March 26, 2014

A no cooking baby shower...yes!


This last Saturday I hosted a baby shower for my friend. We discussed a while back about where to have it. She has a little one at home and didn't want to have to clean and pick up for the party and my house is too small. So we decided on a restaurant. I started looking online and called around for somewhere to host it. Some places were out of my price range, but I finally found the perfect place. It was on the water and we would be tucked away and still be around other diners.

There's usually something I forget to bring, but this time I didn't forget anything! I did however go to the wrong restaurant - I thought I knew where I was going! I picked up Jamie and she too thought we were going to a different place, bad intel! It was me! The Peas took me out to lunch to a similar place for my birthday. To be fair, one place was called The Beach House the other Beach Cafe and they are less than a mile apart from each other. Because we were late most of the ladies were already there, so Jamie and I set up the shower with them sitting there. I had everything planned out and I didn't want it to go waste!


I had arranged the flowers myself with orange and yellow roses, yellow tulips and willow curly branches. My theme for the shower was a woodsy yet elegant setting. I found a lot of things at Pier 1. They have these great moss covered rock decorations that I picked up. They also had wicker balls that I added to my idea, and one of my favorite new items, votive lanterns.

I also found these round log plates online, they look like someone took a piece right from the center of a tree and called it a plate. I picked up a few to use as risers, but since I got there late I just used the one I had the cake on. It looked amazing! I made these really cute party favors of a canning drinking glass with paper grass. Nail polish and a nail file. I wrapped a printed hair tie around the rim.


The restaurant had a little table for presents. I was originally planning on having that beautiful platter on the table for cards. It has silver handles, which ties in with the vases.

We were able to play a few games before the presents and cake. Just as we were leaving the sun started to set. Everyone had a great time. No one needed to clean up, except for the stuff I brought with me - but that was easy. All in all it was a fun shower. I always tell people when they ask me to host that I need help because I don't do decorations well. Now I can no longer say that - I'm proud of what I accomplished. This couldn't have been done with out my husband watching our son who just had surgery a couple of days prior, and Jamie - I love her support!

A Horrible Disaster and Some Hope


On Saturday, March 22nd 2014 - Darrington/Oso, Washington had a deadly mudslide. In this incredibly sad event people have lost homes, and even worse - some have lost loved ones. As of today the death toll is 24, with around 100 people still missing.     
http://www.mygvtc.com/news/read/category/Top%20News/article/the_associated_press-woman_mudslide_likely_killed_4_family_members-ap

I have some very close family friends who live outside of Darringtion, and was very relieved to find out they are both ok. I cannot even imagine what this town is going though, or how the ones who lost people they love are feeling.

 http://www.nydailynews.com/news/national/108-people-unaccounted-deadly-washington-mud-slide-article-1.1732042

I am a co-admin for a Facebook group for the town I live in. There are many of these groups called Buy Nothing and then a towns name, they come from The Buy Nothing Project. These groups are all about community, helping each other out and steering away from an economy driven world. I will write more about this wonderful movement on another post.

I really wanted to help these towns in anyway I could, so I asked my group to help. We have been doing a food and personal items drive. My house turned into a drop off spot for so many people who wanted to help. I have been in contact with other admins from other groups to get updates and wish lists from the people in shelters. We have collected food, toiletries, baby items, toys, games, books, blankets and towels. I know it's not much when people have died, but it was something I could do and I needed to help in some way.
This is our 9 month old puppy, Dexter. He is watching over some of the donations.

He fell asleep on the job - but only for a minute.
We still have hope that more people will be rescued. We are all sending hope, love, well wishes, prayers and good thoughts for the victims and their family's.


Tuesday, March 25, 2014

Pantry Dilemma Solved

For the last few weeks I have been trying to finalize how I wanted my finished kitchen to look (you know - after the 3 years I have been designing it in my head).  It isn't easy - I have to not only decide what I want now but what I may need in the future, and what will work for a long time to come.  I have almost everything figured out - but the area I am most excited about is my Pantry.  Instead of the tiny walk-in pantry the kitchen originally had (it was 6 shelves that were 24" Wide x 18" Deep), I am putting in an entire wall of pantry cabinets.  The wall is approx. 103" Tall x 113" Wide x 18" Deep.  This seems huge - and it is - but it will have to hold all of our pantry food, seasonal dishes/small decorations, candles and vases, serving dishes, ect...I am sure there is more that I haven't listed.  I have made a commitment to not keep things I don't have a place for - so the pantry is kind of the catch-all for the entire 'living space' of our house.  The other side of making sure it is organized and functional for the space, is to make sure it is nice to look at - it is an entire wall and can be seen from several different places in the house.  So first on my list was function then form, but I also have to worry about price.  (Can you see why it wasn't easy yet?)  I need a lot of cabinets, and because of the size of the pantry area - these cabinets in particular are not cheap.  I obsessively searched for ideas on my favorite sites: Pinterest and Houzz.  (If you have never been to Houzz - I recommend it for anyone who likes pretty house pictures.)

I have probably spent close to 100 hours over the last 3 years looking for, designing, looking again, re-designing, and throwing out options for my pantry cabinets.  Some were just boring, some were really expensive, some didn't fit the space (wrong design style).  Once I had a few I liked, I then spent about a week comparing the functionality and price of each of my options.

I finally decided on this:


I'm sure that looks super impressive!  I do not have the ability to make it in 3D - I just make everything in Excel lol.  Here is a better picture of what I want, which I found on Houzz:
 
Pantry Idea
Pantry Idea

 I love that there is a visual break in the cabinet doors.  I also love the idea of putting cookbooks and pretty dishes in there (this is my knickknack space for the kitchen).  This not only solved my boring wall of cabinets issue, but it gave me an additional cabinet to use in my island since I would no longer need to put the cookbooks there.  As an added bonus - eliminating the need for 3 cabinets (12"x36" each) saves me a suprising amount of money.  Originally, I wanted drawers on the bottom and several different cabinets stacked on top for visual interest but all the diferent cabinets were really pricey so I was hesitant about that - and I actually really like the clean look of this and I plan to put pullout drawers on the inside of some of the cabinets.   

Hopefully, I will be ordering all of our cabinets next weekend...If I can decide on everything before then.  Wish me luck - I am equally excited and terrified! :)


Monday, March 24, 2014

Pee Pee Covers


So many people I know are pregnant with boys right now, so I have been making these pee pee covers like crazy. I know everyone calls them different names, my husband really wanted me to go with smurf hats, but I thought I would keep it simple. They are just what they sound like - a little cover to cover a baby boy and stop the pee from hitting you and making a big mess. Pee pee covers are just as easy to make as they are to use.

What you will need:
For the stencil:
Pencil or pen
A bowl
A piece of paper

For the pee pee cover:
2 pieces of fabric. One for the outside (I use a cute flannel or cotton) and one piece of soft fabric for the inside (I use fleece or minky). Scraps work well for this project.
Thread


Put the bowl upside down on the paper and trace around it.


Cut out the circle. Mine looks out of shape because I use the same one every time and it's not use to being open.


Fold the circle in half.
  

Trace the half circle on both fabrics and out them out.


Put the two pieces together with the outside in and pin together. Sew around the half circle only and then flip it right side out. This photo shows one inside out and right side out.
  

Then you will want to fold your half circle in half lining up the ends and making sure the inside of your pee pee cover is facing outside. Next you will sew along the strait line. I like to trim the line with scissors after I sew the line, it just makes the seem look neat.


Last step is to pop it right side out.


These will make new mothers happy and be a fun conversation piece at the shower. I hope you have fun making these!

J

Friday, March 21, 2014

Planning for the Harvest...2 years from now


How I wish I had a root cellar, or even a basement to convert, but that wasn't even on our list when we started house shopping.  Three years later and it would be in the top 5 if I was to make a list now.  Well there isn't much I can do about the lack of a root celler, except learn how to preserve my future harvests other ways.  There are lots of ways to prolong the life of the fruit and vegetables you can grow: canning, freezing, drying, smoking - just to name the most obvious.  I will still need to figure out where I am going to store all of these items, but I do have a little time.  First I need to learn the best ways to preserve the items I want to grow, so I can figure out how much space I will need! 

To get me started, I found this great book.  I wasn't looking for it specifically, but once I started flipping the pages there was no way I was leaving the store without it.  I am really looking forward to trying out some of the options this year.  I plan to shop our local farmers market this year and use the items I buy there to test out what works for me.  It is every Saturday and is located 5 minutes from my house - how have I lived here for 3 years and still never made it!  (Well it is probably because I worked every other Saturday until recently - but still).  I am looking forward to sharing my success (or not) with preserving different foods this year! 

Happy Friday, Everyone!

Thursday, March 20, 2014

Beef and Broccoli


One of the ongoing struggles I have with dinner is finding recipes for beef.  I love beef, and will eat it pretty much anyway I can get it - Eric, not so much.  We have worked out a pretty good system - I make beef once a week and he can choose if he wants to eat it.  Obviously I want him to eat what I make, so I rarely make things I know he wont enjoy without making other options for him.  There are exceptions of course - sometimes I really just want a hamburger! 

One of the recipes he will eat is Beef and Broccoli.  It's one of my favorites for two reasons: 1) It's tasty and better for you than other beef options and 2) It's really fast to throw together.  It takes around 15 minutes if you are really well organized, so it's great to have on a weeknight when you get home late from work.

Beef and Broccoli

3 Tbsp Low Sodium Soy Sauce
2 Tbsp Mirin
1 Tbsp Brown Sugar
1/2 tsp Cornstarch
2 Tbsp Peanut Oil
1 Tbsp minced Garlic
1 lb Beef Sirloin, cut into thin strips
3 cups chopped Broccoli
2 Tbsp chopped Green Onions

Mix together the soy sauce, mirin (or any white wine), brown sugar and cornstarch and set it aside.  Heat oil in large pan or wok, add the garlic and saute for 15-30 seconds until it starts to brown, then add the steak.  Stir-fry until beef is browned, then add the broccoli and green onions.  Continue stir-frying for around 3 minutes, add the sauce mixture and simmer until it thickens.  Serve hot over anything you want.

Printable Recipe
Some tips:
1)  If you want the broccoli to be softer, put a lid on it after adding the sauce mixture.
2)  I like to have this over rice, but noodles are yummy too.  Just remember to start them before you start the recipe - it really sucks to get this finished and realise you forgot to start the rice or it isn't ready yet so you have to wait.
3)  If you forget to add the cornstarch (like I did in the picture above, darn it) - no worries!  It still tastes great, the sauce just isn't as thick.  I actually like it better this way, but Eric prefers the thicker sauce.

I hope you enjoy it!
      

Wednesday, March 19, 2014

Crockpot Lazy Cabbage Rolls


My husband loves cabbage rolls and last time I made them in the crockpot the flavor was good, but the cabbage was way over-cooked. This time (after looking at some recipes) I decided to just throw it all in the crockpot and make something like a cabbage roll casserole. My husband loved it. This would make an easy (it will cook while your out for the day) and tasty weeknight dinner- perfect for a cold day.

Ingredients: 
1 can Tomato Sauce, 15oz
2 cans Stewed Tomatoes with juice, 14.5oz each chopped up (I just pour both cans in a bowl and cut            them up with a fork).
1 small can Tomato Paste, 6oz
1 cup Rice
1 1/2 lb Hamburger 
1 Onion, chopped 
1 medium Cabbage, chopped
3 to 4 tablespoons Butter
2 1/2 tablespoons Worcestershire Sauce
1/2 tablespoon Garlic Powder 
1/2 tablespoon Onion Powder
1/2 tablespoon Dry Mustered
3 tablespoons Sugar
2 cups Water

Directions:

Start by browning the hamburger in a pan. While your meat is cooking throw everything except the rice, cabbage and butter in a large bowl and mix together.  Put half the cabbage in the bottom of the crock pot then layer the browned hamburger on top. Next pour the rice over the meat and the sauce on top of that. The last step is to top it off with the last half of the cabbage. Cook on low for 7 to 8 hours.

Enjoy
J

A Break in Time...


Over the weekend, while preparing for a party my son got hurt!
He was playing outside and I kept looking outside and I saw him having a great time with his friends. Time went on and my friends husband came in to tell us he thought he was hurt. We got outside to see him holding his arm and crying. I hugged him until he calmed down a bit. His arm was red, I didn't see anything other than it being red so I was hoping he sprained or dislocated his arm. I asked him to stretch his arm out and he couldn't and that's when I saw the swelling. I was out of town so I went to the nearest ER that I knew of St. Pete's - I just have to say real quick they are great!

My son wasn't calming down in the car in fact he was really uncomfortable. It didn't take me long and we were waiting in the waiting area. They gave us a pager like you get at a restaurant, that was the only thing that was funny since my son got hurt and for the rest of the day. We talked with a Nurse Practitioner and they requested x-rays so we went back out to the waiting room. They were very quick, we gave them our insurance info and they were ready for us. The technicians were patient and talked calmly which really helped. My son had a hard time with it but he was very brave. We went back to the room they assigned us and shortly after they told me it was broken, I must have been in my head with worry because I heard 2 breaks. They told me they were paging the Orthopedic Surgeon. I told them I need to let my husband know since I couldn't get cell reception. They were able to patch my long distance call through the room. Once I told my husband, he was on his way. 

They wanted more X-rays, because of the type of break he has sometimes there can be more than one break. I was super worried by then. They wanted to give him some pain reliever before the next set of X-rays. They have liquid Vicodin for children, I was happy to hear that they would be able to make him feel better. Once that set in we went back to Imaging. The technician's were great again. It did take another set of hands to help and luckily one of them was able to help out. My son did better the second time, and they positioned the machine to him instead of the other way around. He got a cute stuffed animal for doing so well. When we got back to the room a nurse came in to put a splint on. He did really well with that too. He's pretty brave and I think the medicine helped. There was a shift changed and we got a new Nurse Practitioner - he didn't like the way the splint looked so he got one of the best to redo it again. I'm so happy they were willing to go with their instincts. 

My son's attitude was great, he knows when he doesn't feel well he can pretty much ask for whatever and we will say yes. He wanted ice cream, then marshmallows and a lollipop. I couldn't deny him, and as the night went on we had a few treats.  We didn't get to every treat, plus we hadn't eaten since lunch and a snack around 12-2.

We were finally getting out of there. Since we were not from around there and the drive back and forth would not be good for him, they had called our pediatrician office to handle the follow up with the surgeon. I stopped at fast food place to get some food in his belly, I was too sick from worry to eat. He fell asleep on the ride home. His medicine had warn off by then, so got him more and some ice cream and then he went back to sleep with us. Until he gets his cast on he will sleep with us.

We couldn't get an appointment until Tuesday morning with Orthopedic Surgeon. Sunday and Monday went pretty well - he had some energy to play a little. I even caught him jumping on the couch. I believe he was trying to make me have a heartattack!

The appointment was nerve-wraking. We're expecting to hear he needed surgery but I was hoping he didn't! Turns out he does. He will need 2 pins put into his elbow. They will leave the pins outside of his skin so they can easily pull them out after 3 weeks. Scary part is the chance of infection. My husband and I are beyond worried, not only for the surgery but keeping his arm dry.

On Thursday, please wish us good luck, pray if you pray and we thank you!


Tuesday, March 18, 2014

Spring Update

One of my favorite things to do is change out the items displayed in my dining room hutch.  I have so many knicknacks and things I have been given that I love, but I don't want everything out all the time.  Our goal is to have an uncluttered life - including our house and how we decorate.  This means we don't have a lot of areas that are open for clutter - plus less knicknacks means less dusting!  We do have at least one area (bookcase, shelf, hutch, ect) planned for each room, but the dining room is the only one that is completed.  I try to rotate the items that match the season and holidays, but there are also some things I always leave in.     
Here is a close up of how it looks now.  Do I get extra points for getting it done in time for Spring?


I still plan on putting some spring flowers in the vases, and I always find items that I have to buy a little later in the season (umm...75% off? Count me in!).  So it is always a work in progress, but most of these items I pulled out of boxes.  I always think of Spring colors as lighter greens, blues, yellows and pinks - can you tell?  I also apparently have an obsession with birds, and I wish I could say they were all on here but I would be lying.  

Here is a wider view.  Don't mind the pile of stuff in the background - I said our goal is to be uncluttered, not that we were there yet :)  I left it in because this gives you a good picture of how the hutch is situated, and what it looks like being the same color as the wall. I really like how it shows off all the colorful items.     


Has anyone else done any decorating for Spring?  I still need to add some Easter things in there, maybe I'll go shopping tonight!

Update:  Here is the hutch after I add a few things:

Related Posts Plugin for WordPress, Blogger...